Content Targeting
Targeting is a CrafterCMS feature that allows delivering the right experience, with the right content, to the right people at the right time. CrafterCMS provides the ability to render content adapted to specific users, depending on different aspects like geographical location, language, preferences, etc. The following sections describe how you can use this feature to organize content.
Targeting Using Taxonomies
Taxonomies allow you to organize your content to make it easy for your project users to browse what they want and deliver content appropriate for them. It also allows you to search for content faster.
The Content Authors - Audience Targeting section of the documentation, describes how Content Authors can target content with taxonomies based on segments and how to view the project depending on who is browsing. This section describes how to add the segments and segment targeting on pages as seen in the Website Editorial blueprint, so that content authors can target their content.
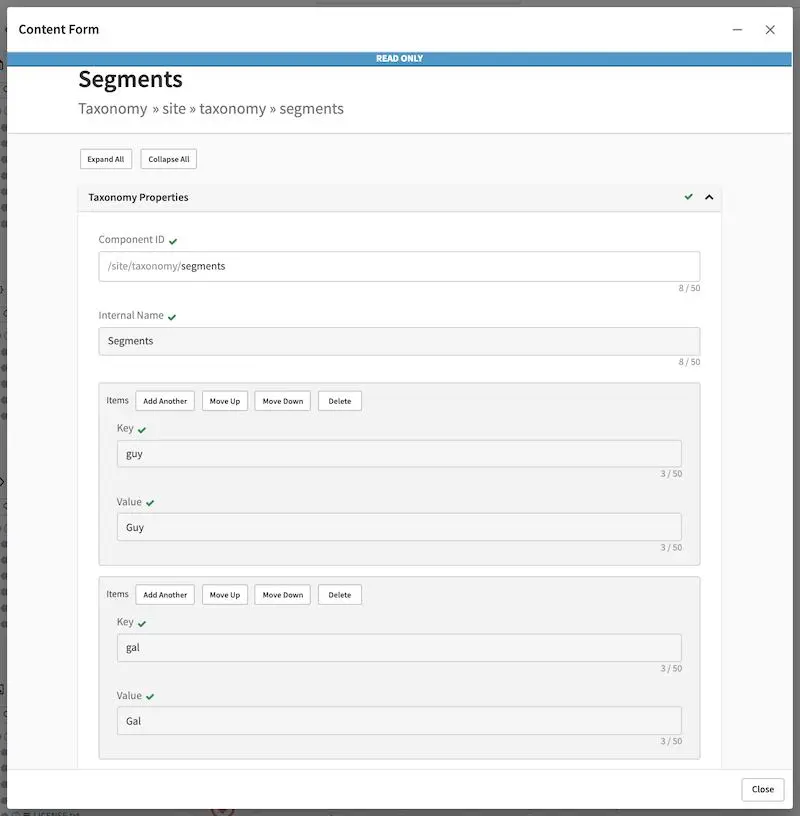
For the segments, we will have the values Guy and Gal.
Configuring
Targeting Configuration
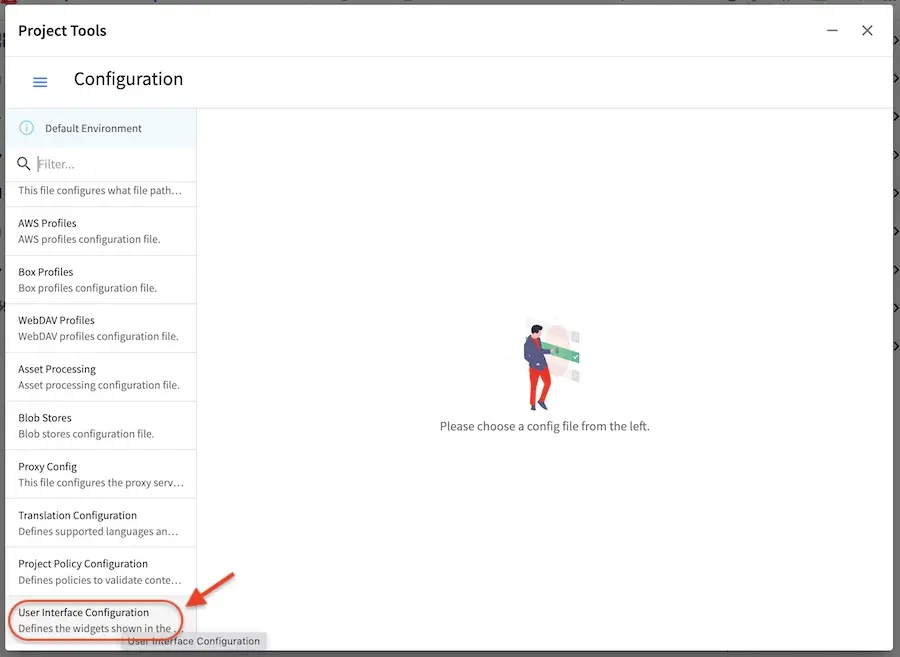
Targeting can be configured by clicking on ![]() in the Sidebar, then clicking on
Configuration and finally selecting User Interface Configuration from the dropdown box.
Below is the sample configuration for Guy and Gal, that is used in the Website Editorial
blueprint.
in the Sidebar, then clicking on
Configuration and finally selecting User Interface Configuration from the dropdown box.
Below is the sample configuration for Guy and Gal, that is used in the Website Editorial
blueprint.
The file can also be found in the path /config/studio/targeting/targeting-config.xml
 1<widget id="craftercms.components.ToolsPanelPageButton">
 2  <configuration>
 3    <target id="icePanel"/>
 4    <title id="previewAudiencesPanel.title" defaultMessage="Audience Targeting"/>
 5    <icon id="@mui/icons-material/EmojiPeopleRounded"/>
 6    <widgets>
 7      <widget id="craftercms.components.PreviewAudiencesPanel">
 8        <configuration>
 9          <fields>
10            <segment>
11              <id>segment</id>
12              <name>Segment</name>
13              <description>User segment.</description>
14              <type>dropdown</type>
15              <defaultValue>anonymous</defaultValue>
16              <values>
17                <value>
18                  <label>Guy</label>
19                  <value>guy</value>
20                </value>
21                <value>
22                  <label>Gal</label>
23                  <value>gal</value>
24                </value>
25                <value>
26                  <label>Anonymous</label>
27                  <value>anonymous</value>
28                </value>
29              </values>
30              <helpText>Setting the segment will change content targeting to the audience selected.</helpText>
31            </segment>
32            <name>
33              <id>name</id>
34              <name>Name</name>
35              <description>User's first and last name.</description>
36              <type>input</type>
37              <helpText>Enter user's first and last name.</helpText>
38            </name>
39          </fields>
40        </configuration>
41      </widget>
42    </widgets>
43  </configuration>
44</widget>
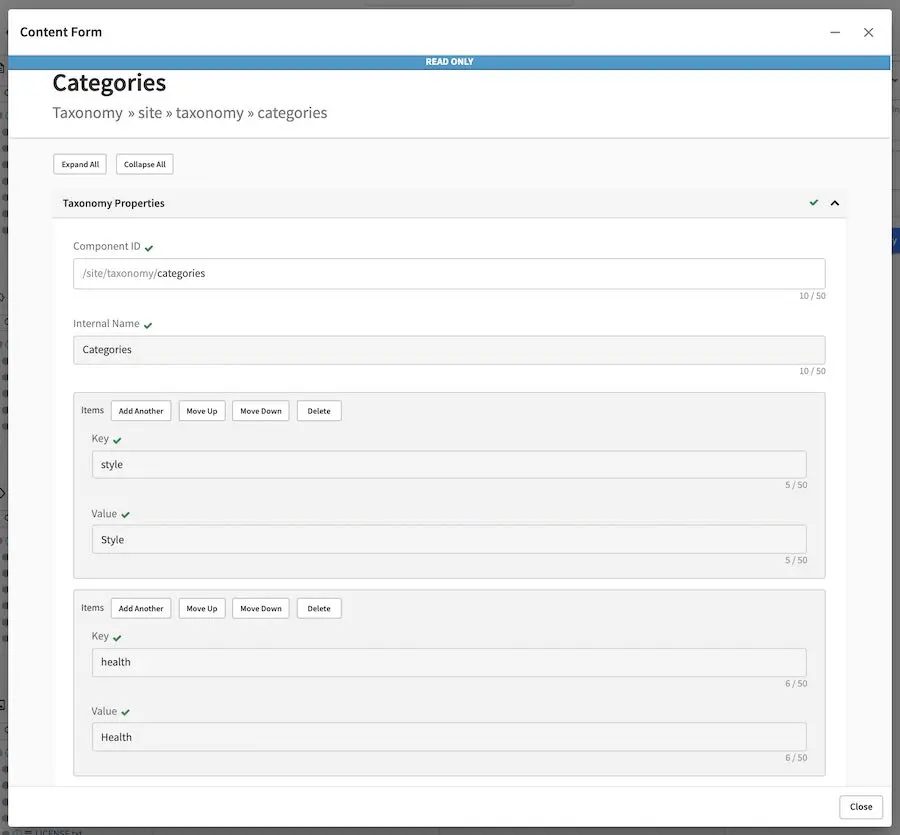
Segments List
Here’s the list that will be used by the Website Editorial blueprint when modeling the segments into the content. The list was created by right clicking on Taxonomy in the Sidebar, then clicking on New Content.
Here’s the list after entering the desired segments:
Here’s the resulting xml file:
 1<component>
 2
 3  ...
 4
 5  <items>
 6    <item>
 7      <key>guy</key>
 8      <value>Guy</value>
 9    </item>
10    <item>
11      <key>gal</key>
12      <value>Gal</value>
13    </item>
14  </items>
15
16  ...
17
18</component>
Model Criteria in Content
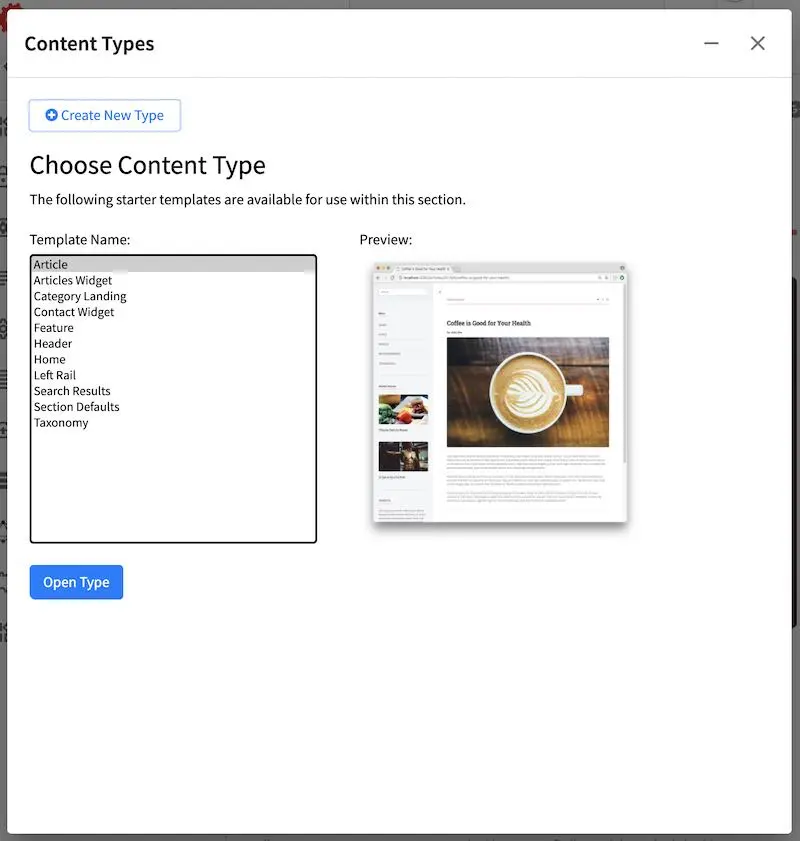
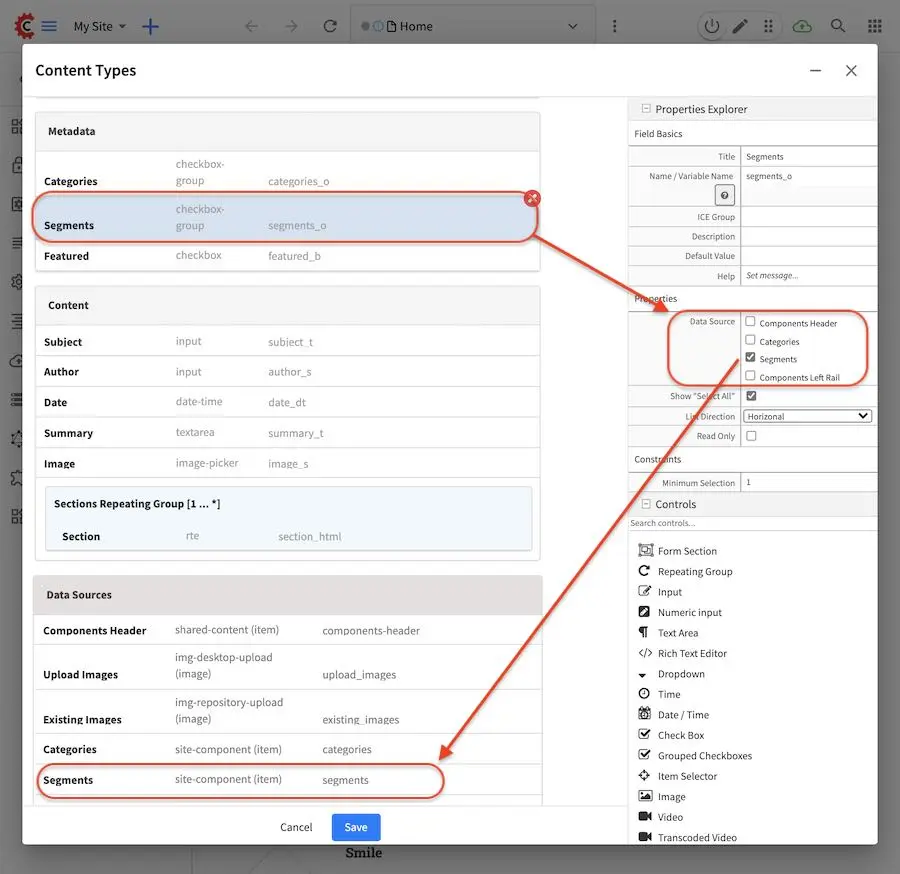
We will now see how to add the segments you just configured into a page. From the Sidebar, click
on ![]() , next click on Content Types. Select Article, then click on
Open Type
, next click on Content Types. Select Article, then click on
Open Type
In the Metadata section of the form, a Grouped Checkboxes control is used to model our segments. The control is then named Segments, with the Data Source property in the Properties Explorer Section set to Segments.
Update the Content
Now that we have modeled the criteria, we can now update the content. When you create a new article
page, you will see the grouped check boxes that we added in the previous section, in the Metadata
section, ready for the content author to select which segment the page is targeted for. We will
look at one of the articles in the blueprint, “Coffee is good for your health” as an example of
content for targeting. Click on the article from the Sidebar, then click on Edit in the
toolbar Options. Notice that the article is targeted for both Guy and Gal (Guy and Gal checkbox
checked).

Build Dynamic Components
After targeting the content, we will now see how we can display pages depending on which user is logged in. Let’s take a look at the home page of the Website Editorial blueprint. We are browsing as an user with the segment Gal, and we’re looking at the featured articles:

In order to display only articles targeted for gal, a groovy script is used that is run before the page renders so it knows which articles are supposed to be displayed for the current user. Here is the groovy script used to get the articles according to the right segment:
1import org.craftercms.sites.editorial.SearchHelper
2import org.craftercms.sites.editorial.ProfileUtils
3
4def segment = ProfileUtils.getSegment(profile, siteItemService)
5def searchHelper = new SearchHelper(searchService, urlTransformationService)
6def articles = searchHelper.searchArticles(true, null, segment)
7
8templateModel.articles = articles
From the script, you can see that it gets the segment currently active, then it searches for articles targeted for the right value, which it then returns to the template, ready to be displayed when the page renders. To see how the articles displayed differ depending on who the current active user is, please see the section: Viewing the project with different segments
Targeting Using Categories
Another way of using taxonomies for organizing content is by targeting pages based on categories. First, decide on the categories that you’d like to use. After deciding on the categories, we will now work on adding in metadata to our project that content authors can use. In the Website Editorial blueprint, the following categories are used:
Health
Style
Entertainment
Technology
Configuring
Here’s the list that will be used by the Website Editorial blueprint when modeling the categories into the content. The list was created by right clicking on Taxonomy in the Sidebar, then clicking on New Content.
Here’s the list after entering the desired categories:
Here’s the resulting xml file:
<items>
  <item>
    <key>style</key>
    <value>Style</value>
  </item>
  <item>
    <key>health</key>
    <value>Health</value>
  </item>
  <item>
    <key>entertainment</key>
    <value>Entertainment</value>
  </item>
  <item>
    <key>technology</key>
    <value>Technology</value>
  </item>
</items>
Model Criteria in Content
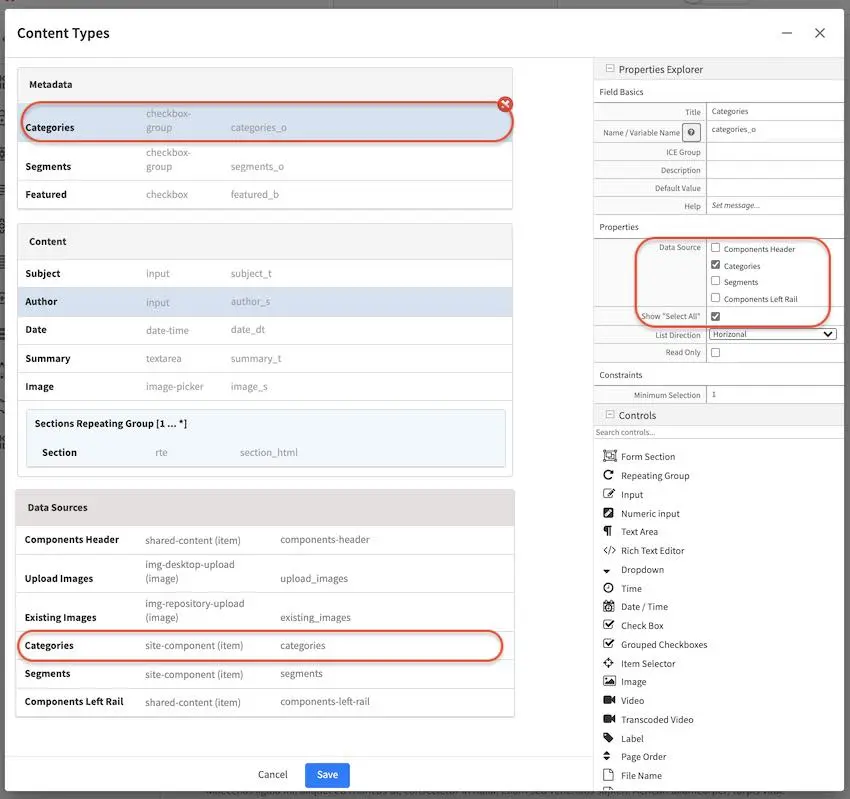
We will now see how to add the categories you just configured into a page. From the Sidebar, click
on ![]() , next click on Content Types. Select Article, then click on Open Type
, next click on Content Types. Select Article, then click on Open Type
In the Metadata section of the form, a Grouped Checkboxes control is used to model our categories. The control is then named Categories, with the Data Source property in the Properties Explorer Section set to categories.
Update the Content
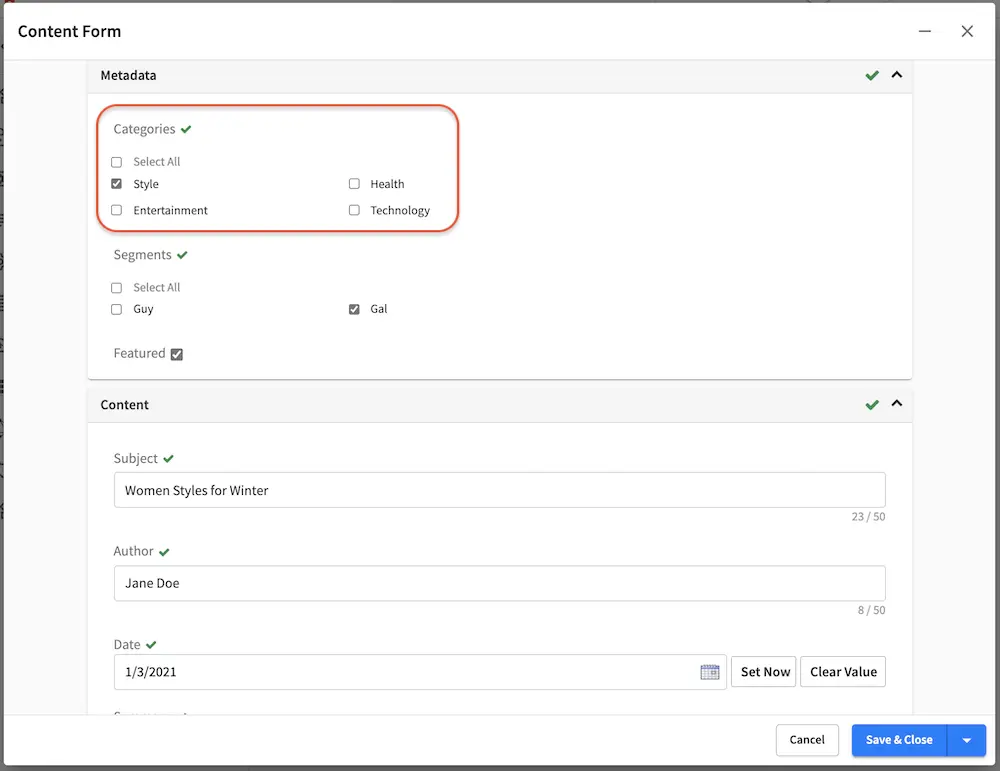
Now that we have modeled the criteria, we can now target content. When you create a new article page,
you will see the grouped check boxes that we added in the previous section, in the Metadata section,
ready for the content author to select which category the page falls into. We will look at one of the
articles in the blueprint, “Women Styles for Winter” as an example of targeting content based on
category. Click on the article from the Sidebar, then click on Edit from the toolbar Options.
Notice that the article is targeted for the Style category.
Build Dynamic Components
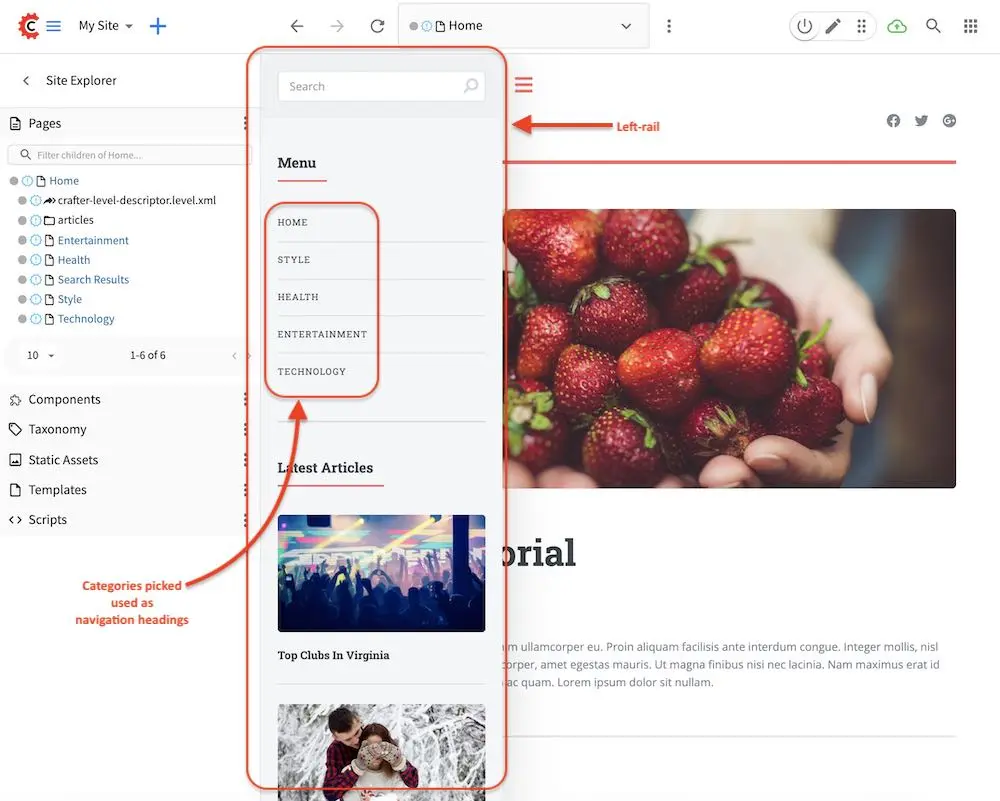
After updating the content, we can now see how we can use the categories we just setup on displaying content. Let’s take a look at the homepage of our project. On the left side of the page, you can see the left rail of our project. If your screen is not wide enough, look at the top left corner of the page, there is a hamburger icon/button (multiple lines in red that sort of looks like a hamburger), click on that icon to display the left rail.
Let us look at the navigation menu on the left rail. As you can see, the categories we used to target our pages can be used as navigation headings for the project.
We’ll now take a closer look on how our taxonomy for categories is used for displaying articles in
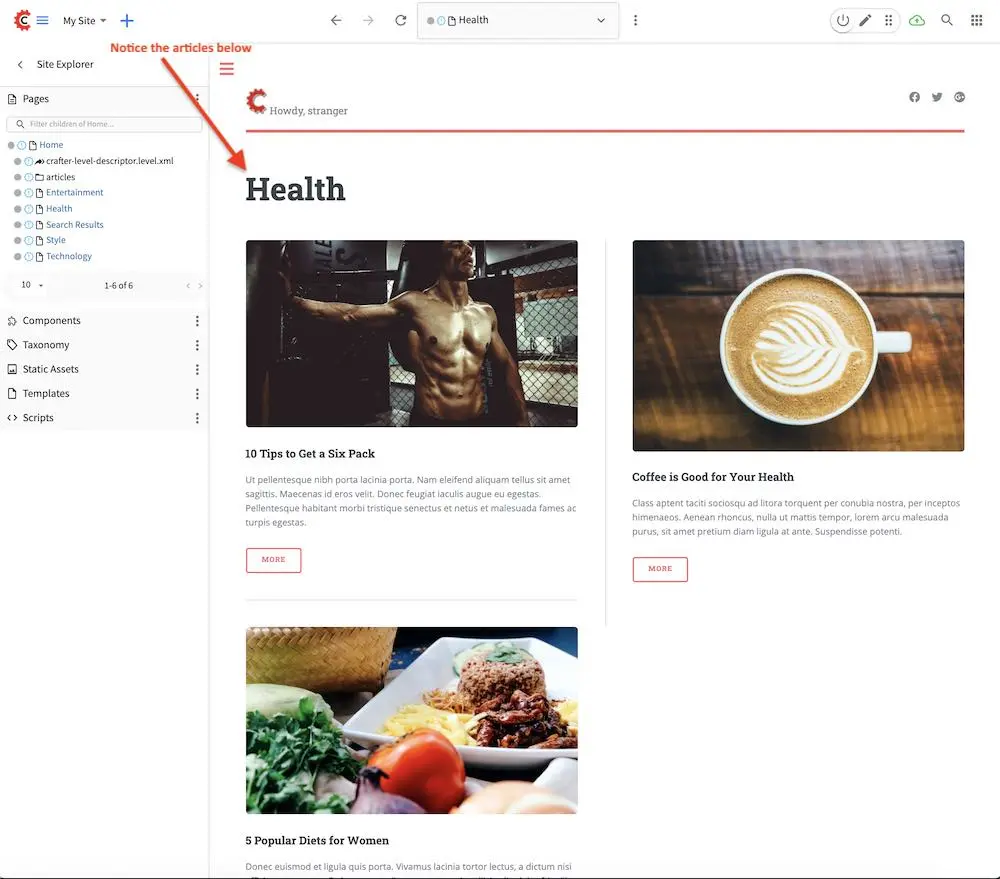
the landing pages of our project. On the left rail of our project, click on Health, notice how all
the articles listed on the page are targeted for category Health. (To check the category for
an article, just click on the article then click on Edit on the toolbar Options (stacked three dots)
at the top of the page. Go down to the Metadata section to see which category is selected.)
In order to display just the articles targeted for a certain category, a groovy script is run before the page renders. To do this, we need to create a script named after the page we want the script to run before rendering, under scripts -> pages In the groovy script below, a query is sent to ask for all articles targeted for the requested category. (To see the script in Studio, from the Sidebar. navigate to scripts -> pages -> category-landing.groovy) Please see Content Type Controller Definition for more details on binding a script to a page or component.
 1import org.craftercms.sites.editorial.SearchHelper
 2import org.craftercms.sites.editorial.ProfileUtils
 3
 4def segment = ProfileUtils.getSegment(profile, siteItemService)
 5def category = contentModel.category.text
 6def maxArticles = contentModel.max_articles.text as Integer
 7def searchHelper = new SearchHelper(searchService, urlTransformationService)
 8def articles = searchHelper.searchArticles(false, category, segment, 0, maxArticles)
 9
10templateModel.articles = articles
Another way of using the categories tag is for displaying a list of related articles based on the
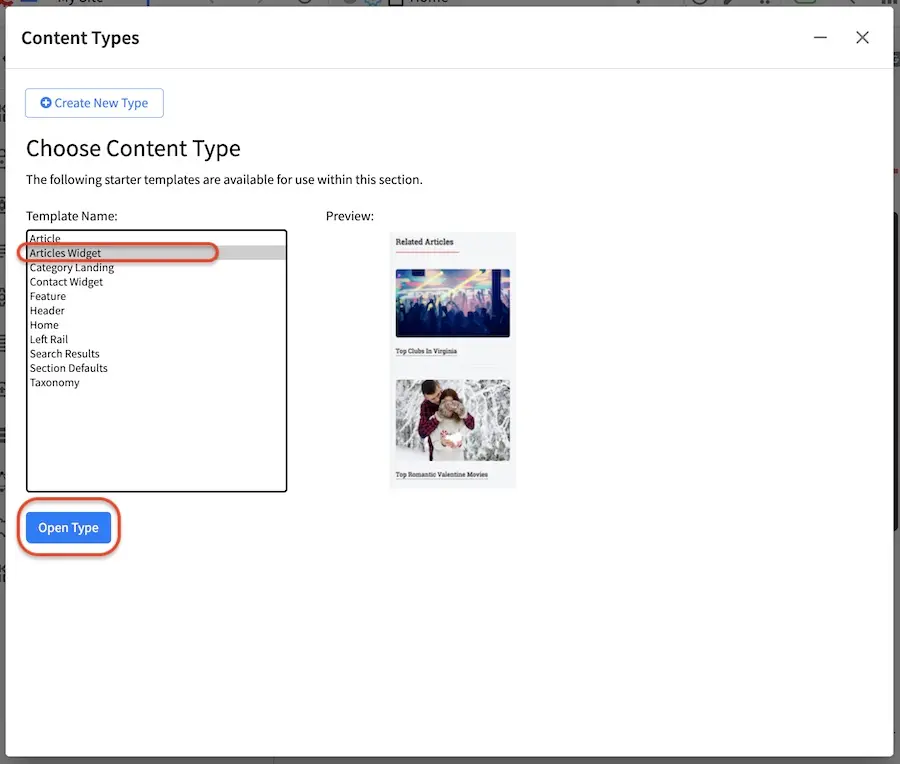
article being browsed. We will look at the content type component Articles Widget
to see how this is done in our Website Editorial blueprint. We will open the model for the
component article widget by going to the Sidebar Project Tools, then clicking on Content Types -> Articles Widget -> Open Type
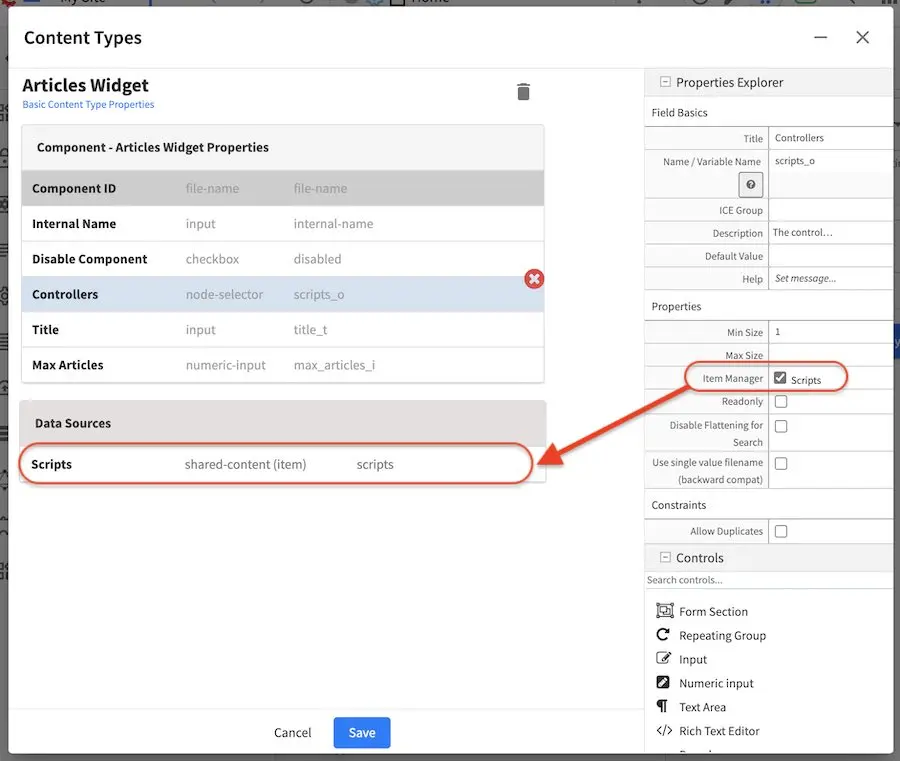
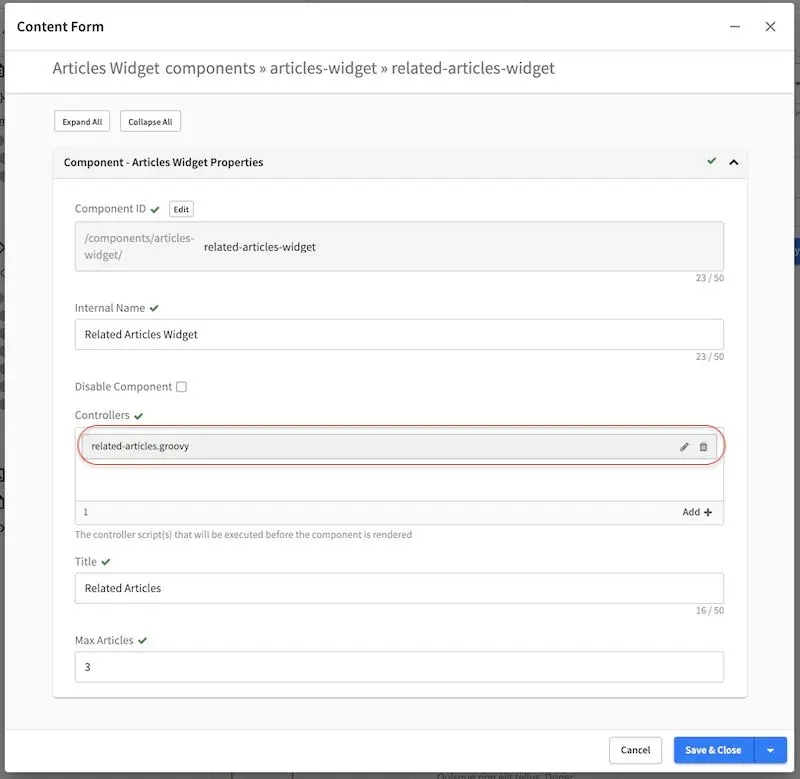
In the dialog, notice the item selector control labeled Controllers with data source Scripts. This picker will be used to select which script we want to run before the component renders in its container.
We’ll now take a look at the component created to display related articles. In the Sidebar, navigate to the components -> articles-widget folder, then right click on Related Articles Widget and click on Edit
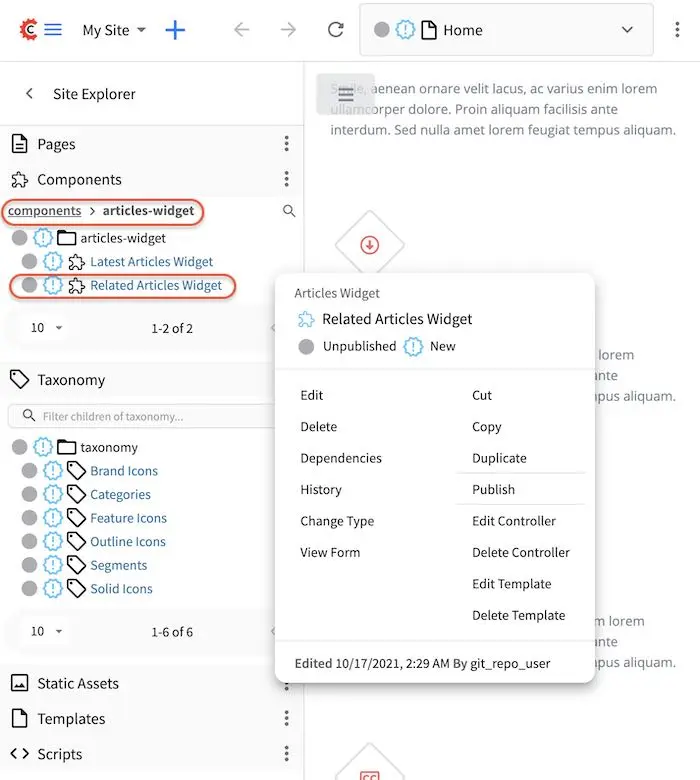
In the Controllers section, you’ll see the groovy script that will be run before rendering the component.
To open the groovy script, click on the Sidebar and navigate the path navigator tree to scripts -> components then right click on related-articles.groovy and select Edit. In the groovy script, it sends a query for articles in the same category as the article being viewed, then passes on the articles to the template model of the component ready for rendering.
 1import org.craftercms.sites.editorial.SearchHelper
 2import org.craftercms.sites.editorial.ProfileUtils
 3
 4def segment = null
 5
 6if (authToken) {
 7  segment = ProfileUtils.getSegment(authToken.principal, siteItemService)
 8}
 9
10def searchHelper = new SearchHelper(elasticsearch, urlTransformationService)
11// articleCategories and articlePath should be provided as additionalModel of the component and
12// should be the categories of the current article
13def articles = searchHelper.searchArticles(false, articleCategories, segment, 0, 3, "-localId:\"${articlePath}\"")
14
15templateModel.articles = articles
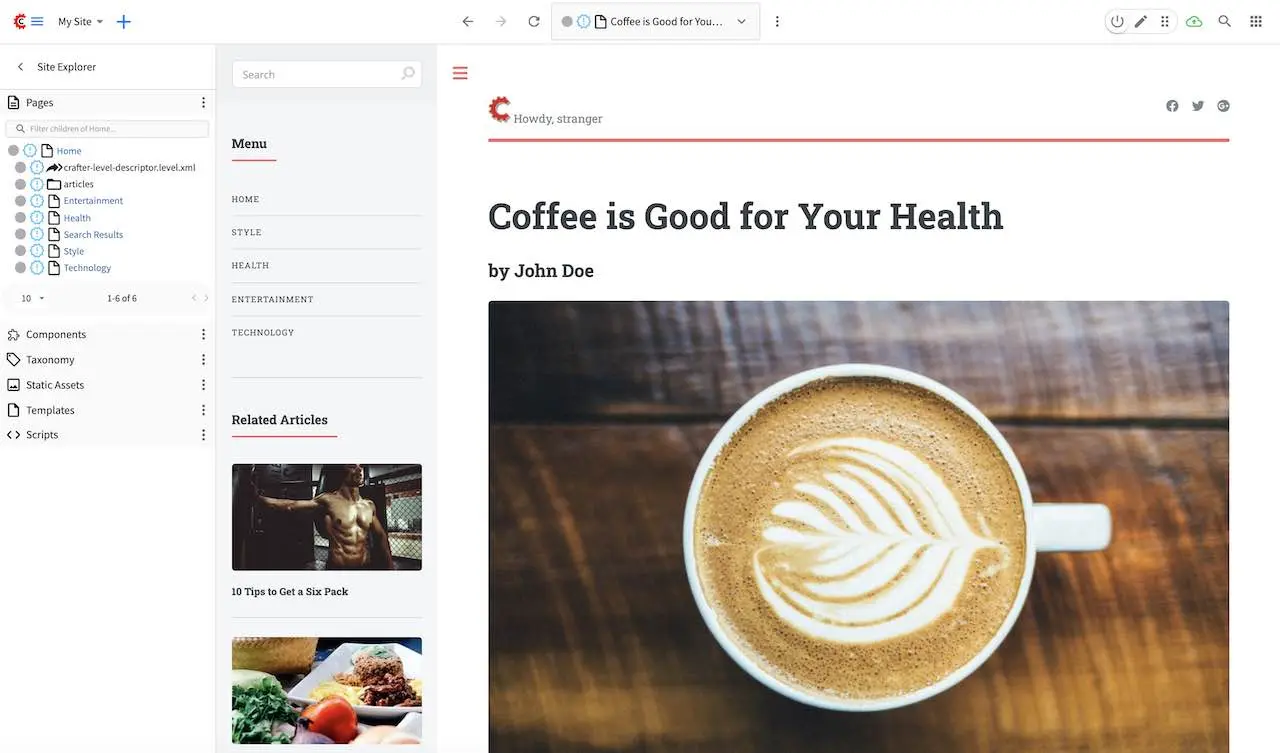
To see the component in action, click on one of the articles to view. In the image below, the article Coffee is Good for Your Health is being viewed, which is tagged for the Health category, then the left rail is expanded by clicking on the hamburger icon at the top left of the page. In the left rail, we can see the related articles to the one currently being viewed in the page (articles tagged for category Health).
Targeting Using Roles
Another way of organizing content is by targeting pages based on role(s). First, decide on the roles you’d like to use. After deciding on the roles, we will now work on adding in metadata to our project that content authors can use. Using the Website Editorial blueprint, for example, we can have the following roles for targeting purposes:
ROLE_user
ROLE_admin
ROLE_editor
Configuring
Let’s configure targeting based on roles by clicking on ![]() in the Sidebar, then clicking on
Configuration and finally selecting User Interface Configuration from the dropdown box.
in the Sidebar, then clicking on
Configuration and finally selecting User Interface Configuration from the dropdown box.
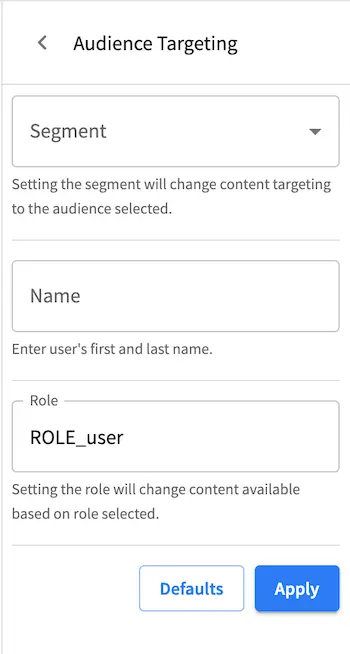
Add the following to the Audience Targeting widget:
<roles>
  <id>roles</id>
  <name>Role</name>
  <description>User role, e.g. ROLE_admin</description>
  <type>input</type> <!-- valid types: dropdown, checkboxes, input -->
  <helpText>Setting the role will change content available based on role selected.</helpText>
</roles>
Below is how the configuration for roles using the Website Editorial blueprint will look like:
 1<widget id="craftercms.components.ICEToolsPanel">
 2  <configuration>
 3    <widgets>
 4      <widget id="craftercms.components.ToolsPanelPageButton">
 5      ...
 6      <widget id="craftercms.components.ToolsPanelPageButton">
 7        <configuration>
 8          <target id="icePanel"/>
 9          <title id="previewAudiencesPanel.title" defaultMessage="Audience Targeting"/>
10          <icon id="@mui/icons-material/EmojiPeopleRounded"/>
11          <widgets>
12            <widget id="craftercms.components.PreviewAudiencesPanel">
13              <configuration>
14                <fields>
15                  <segment>
16                    <id>segment</id>
17                    ...
18                  </segment>
19                  <name>
20                    <id>name</id>
21                    <name>Name</name>
22                    <description>User's first and last name.</description>
23                    <type>input</type>
24                    <helpText>Enter user's first and last name.</helpText>
25                  </name>
26                  <roles>
27                    <id>roles</id>
28                    <name>Role</name>
29                    <description>User role, e.g. ROLE_admin</description>
30                    <type>input</type> <!-- valid types: dropdown, checkboxes, input -->
31                    <helpText>Setting the role will change content available based on role selected.</helpText>
32                  </roles>
33                </fields>
34              </configuration>
35            </widget>
36            ...
Model Criteria in Content
We will now see how to add the role(s) into a page. From the Sidebar, click
on ![]() , next click on Content Types. Select Article, then select
Open Type
, next click on Content Types. Select Article, then select
Open Type
From the Controls list on the right, select Repeating Group and add it to the Metadata Form Section.
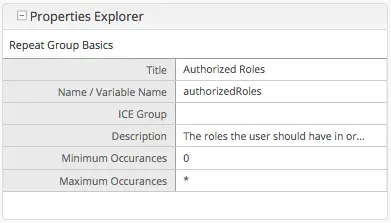
In the Repeating Group properties, set the Title field to “Authorized Roles” and the Name / Variable Name field to “authorizedRoles.”
Warning
The UI autofills the Name/ Variable Name field and adds postfixes as you’re typing in the Title field. Remember to remove the postfix
_o, asauthorizedRolesis a reserved variable name used by CrafterCMS. For a list of variable names used by CrafterCMS, see Form Control Variable Names for more informationThe
ROLE_prefix is optional for values inauthorizedRoles
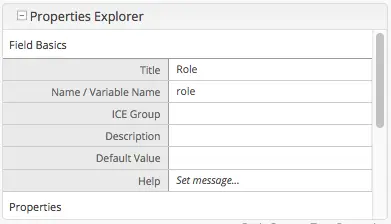
Add an Input control inside the Repeating Group, with the Title field set to “Role” and the Name / Variable Name field set to “role”. Make this Input required by checking the checkbox under Constraints in the Required field in the Properties Explorer.
Warning
The UI autofills the Name/ Variable Name field and adds postfixes as you’re typing in the Title field. Remember to remove the postfix
_s, as therolevariable name is used by CrafterCMS for enforcing access to a page. For a list of variable names used by CrafterCMS, see Form Control Variable Names for more information
Update the Content
Now that we have modeled the criteria, we can now target content. When you create a new article page,
you will see the repeating group control that we added in the previous section, in the Metadata section,
ready for the content author to input which role is authorized to preview the page. We will look at one of the
articles in the blueprint, “Top Books For Young Women” as an example of targeting content based on a
role. Click on the article from the Sidebar, then click on Edit in the toolbar Options.
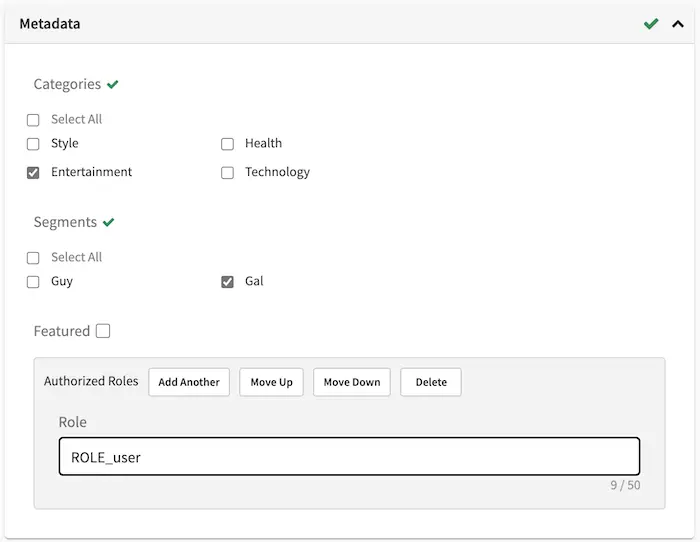
Scroll down to the Metadata section in the form to the Authorized Roles field. Click on Add First Item
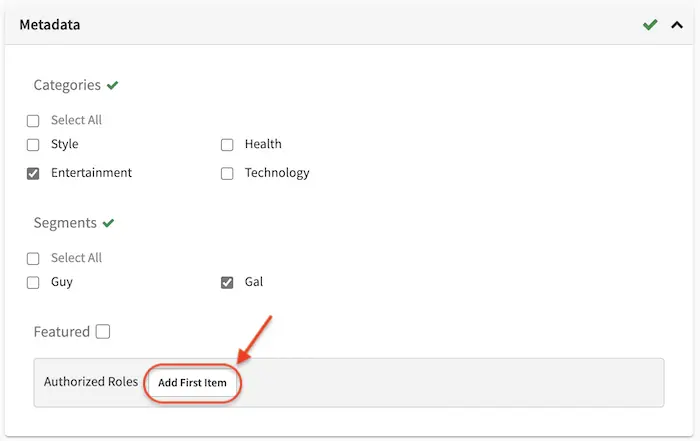
Let’s setup the page to be available to users with the role user. The prefix ROLE_ for the values in authorizedRoles is optional.
Build Dynamic Components
After targeting the content, we will now see how we can display pages depending on which role a
user has. Let’s take a look at the home page of the Website Editorial blueprint. We are browsing
as a user with the role ROLE_user,
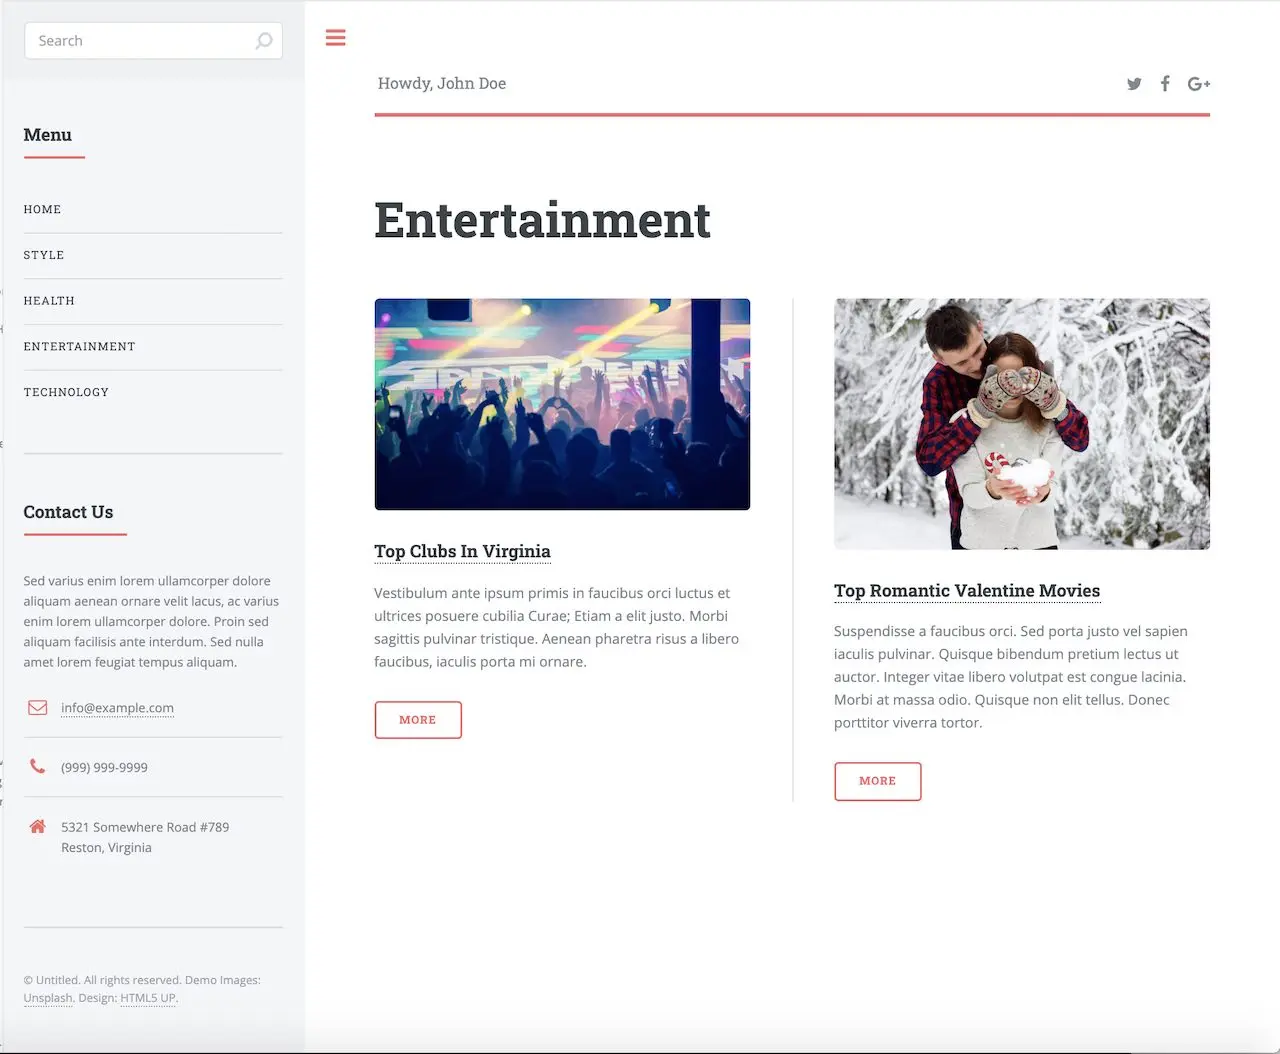
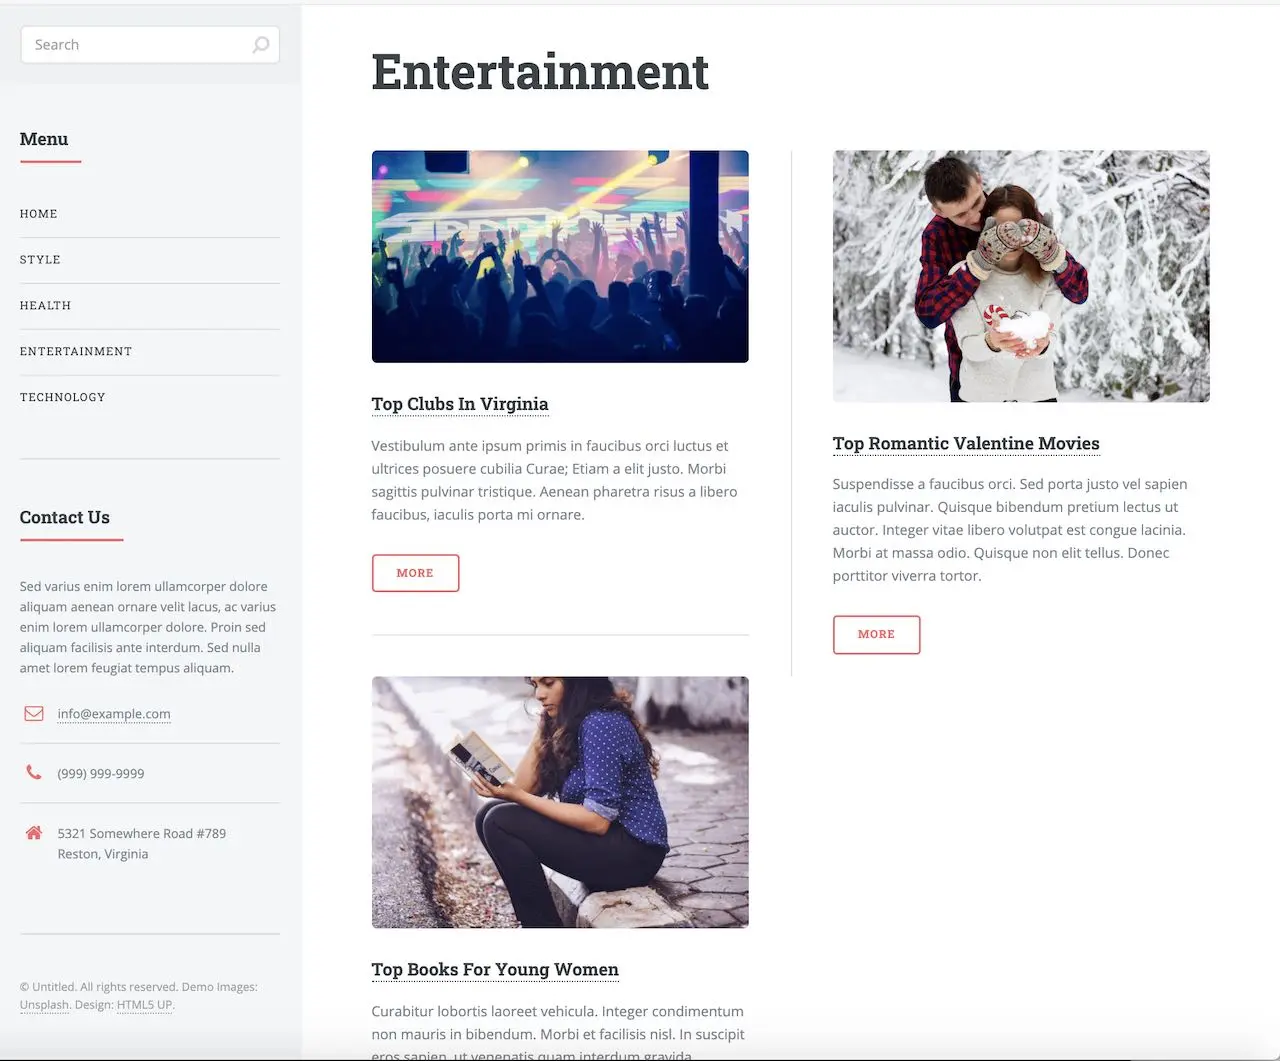
and we’re looking at the Entertainment category page. Notice that the article we setup with role ROLE_user is listed:
By using authorizedRoles (Used to restrict pages based on roles) and
role (Contains the role required to access a page) reserved variables, access to pages can be restricted based on whether a user has a certain role.
Now, let’s change the role to ROLE_admin and notice that the article Top Books For Young Women is not listed
in the Entertainment category page.