Rich Text Editor (RTE TinyMCE 2) Setup
CrafterCMS provides support for TinyMCE 2. This section details how to setup RTE (TinyMCE 2).
What Out-of-the-Box Functionality Does Crafter Studio’s RTE (TinyMCE 2) Support?
Our RTE is based on TinyMCE (https://www.tinymce.com/) and can leverage all configurations and plugins designed for the TinyMCE editor. You can find the documentation for these TinyMCE configurations and settings here: https://www.tinymce.com/docs/configure
TinyMCE plugins
Crafter Studio uses standard TinyMCE plugins. Here’s a list of available TinyMCE plugins in Crafter Studio:
Plugin Name
|
Button Name(s)
(where applicable)
|
Description
|
|---|---|---|
advhr
|
advhr
|
Advanced hr dialog that supports noshade, width
and size
|
directionality
|
ltr,
rtl
|
Adds directionality icons to TinyMCE that enables
TinyMCE to better handle languages that is
written from right to left.
|
emotions
|
emotions
|
Insert smiley images in the editable area
|
fullscreen
|
fullscreen
|
Adds fullscreen editing mode
|
iespell
|
iespell
|
Provides spell check for IE browsers
|
inlinepopups
|
Make all dialogs to open as floating DIV layers
instead of popup windows.
|
|
insertdatetime
|
insertdate,
inserttime
|
Insert customized date and time strings
|
layer
|
insertlayer,
moveforward,
movebackward,
absolute
|
Adds support to create/remove and z-index block
elements
|
media
|
media
|
Handles embedded media such as QuickTime, Flash,
ShockWave, RealPlayer and Windows Media Player
|
nonbreaking
|
nonbreaking
|
Adds a button for inserting nonbreaking space
entities at the current caret location
|
paste
|
pastetext,
pasteword,
selectall
|
“Cleans” content pasted from clipboard; useful
when pasting from MS Office
|
preview
|
preview
|
Opens a popup showing the current content
|
searchreplace
|
search,
replace
|
Adds search/replace dialogs
|
style
|
styleprops
|
Adds CSS style editing support
|
table
|
tablecontrols,
table,
row_props,
cell_props,
delete_col,
delete_row,
delete_table,
col_after,
col_before,
row_after,
row_before,
split_cells,
merge_cells
|
Adds table management functionality
|
template
|
Adds support for custom templates
|
|
visualblocks
|
visualblocks
|
Adds support for show/hide block elements
(to see block elements)
|
visualchars
|
visualchars
|
Adds the possibility to see invisible characters
|
wordcount
|
Adds word count functionality placing a counter
on the right edge of the status bar.
|
|
xhtmlxtras
|
cite, ins, del,
abbr, acronym,
attribs
|
Adds support for some XHTML elements these
include cite, ins, del, abbr, and acronym
|
To use the TinyMCE plugins, add the Button Name(s) to one of the toolbarItem tags: <toolbarItems1>, <toolbarItems2>, <toolbarItems3> or <toolbarItems4>.
TinyMCE Plugin Example
Let’s take a look at an example of using one of the TinyMCE plugins.
To be able to embed a YouTube video in the RTE, do the following:
Add the button name media to one of the toolbarItem tags:
<toolbarItems1>. An Insert/Edit Embedded Media button will now be available for users of the RTE.
Click on the
button to add the link to the YouTube video you’d like to embed in the RTE and to setup other parameters. In the General tab, select iframein the Type field, then fill in the File/URL field with the URL of the YouTube video you’d like to embed and finally, fill in the Dimensions field to the size desired. Click on the Insert button.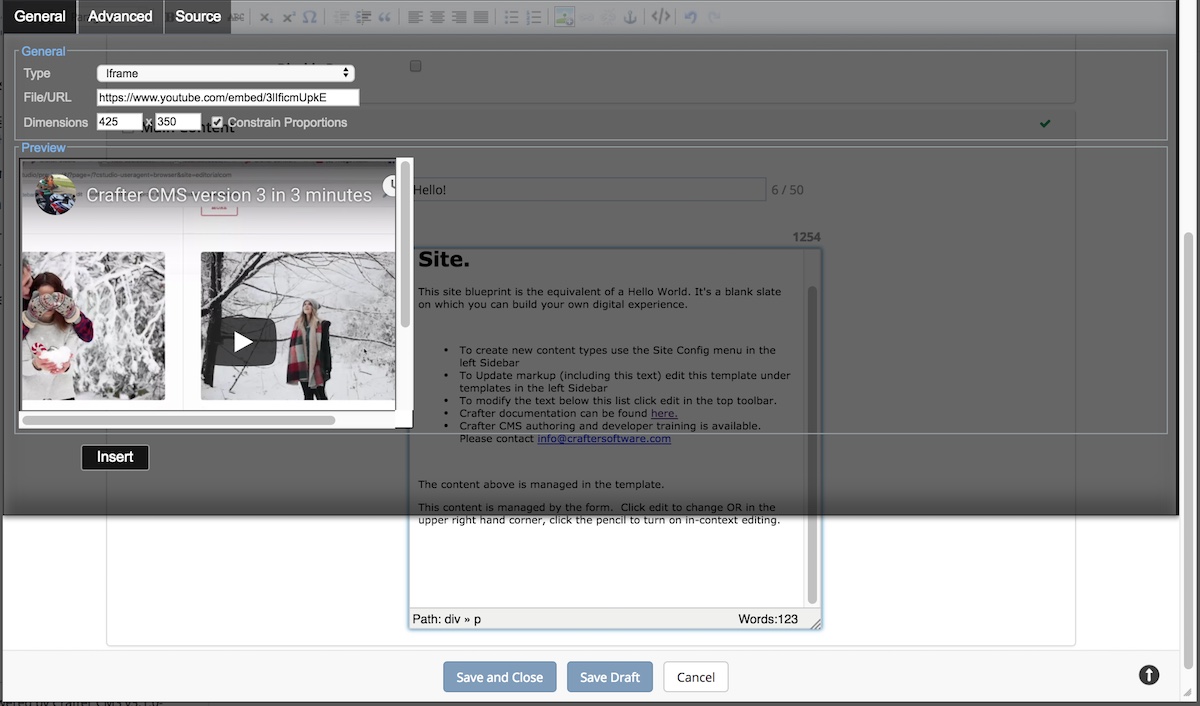
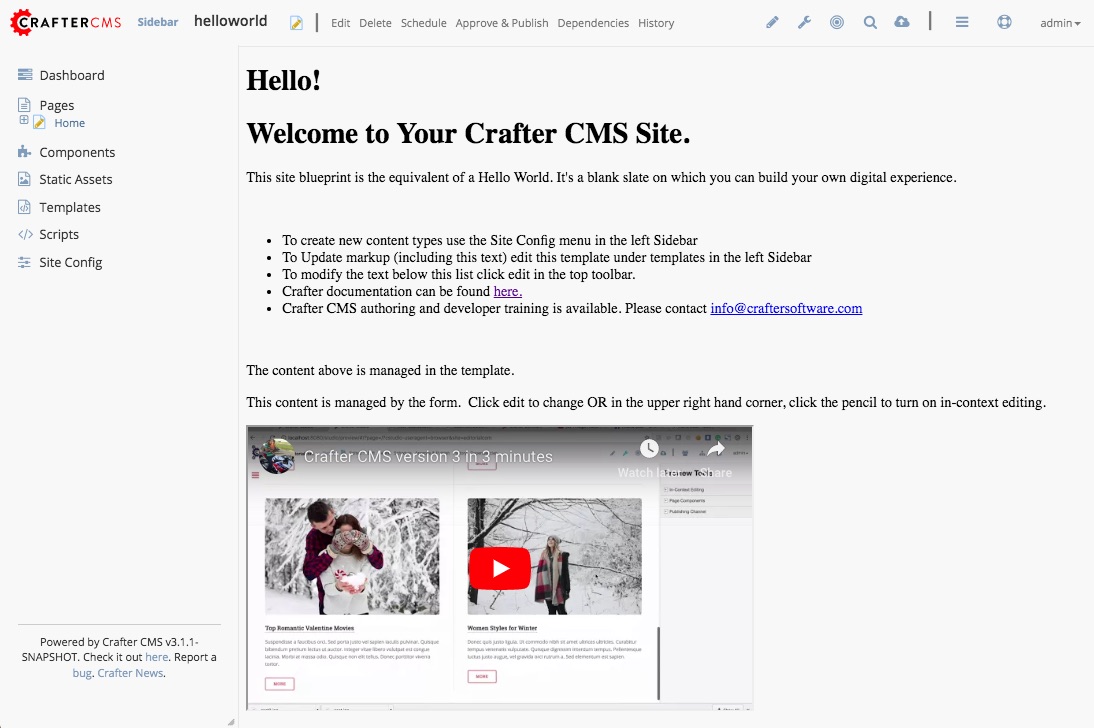
Save your changes, and your video should now be embedded in your page
Crafter Studio Specific Extensions
Here’s a list of Crafter Studio Specific Extensions:
RTE Module Name
|
Button Name
(where applicable)
|
Description
|
|---|---|---|
channel
|
channels
|
Gives the user a dropdown of channels.
Changes the RTE size and Style Sheets to
match the given channel.
|
edit-html
|
edithtml
|
Adds syntax highligted HTML code editing
to Crafter Studio.
(Replaces out of the box code plugin)
|
edit-image
|
Allows the user to edit an image in the RTE
|
|
insert-component
|
insertComponent
|
Enable user to insert full fledged
Crafter component in to RTE.
|
insert-image
|
managedImage
|
Enable the user to insert an image from
1 or more datasources.
(Replaces out of the box image plugin)
|
insert-layout
|
insertLayout
|
Allows user to insert markup designed to
act as a layout in to the RTE.
|
insert-predefined-table
|
predefinedTable
|
Allows the user to insert a predefined table
|
insert-stub
|
insertStub
|
Enable the user to insert canned markup
in to the RTE. This is useful when a
component is too heavy weight.
|
To use the extensions, add the RTE Module Name inside the tags <rteModules> like this:
<rteModules>
    <module>RTE Module Name<module>
    <module>RTE Module Name<module>
</rteModules>
If a button for the toolbar is applicable for the extension you are using, add the Button Name inside one of the toolbarItem tag: <toolbarItems1>
Some extensions also require some more items to be setup. Crafter Studio specific extensions are available in Crafter Studio-ui’s Git repo.
Let’s take a look at some examples on how to use some of the Crafter Studio specific extensions.
Inserting an Image
The out of the box blueprints Empty and Website_Editorial uses the Insert Image specific extensions which enables the user to insert an image from 1 or more data sources, which replaces the TinyMCE out of the box image plugin.
In the blueprints, in order to use the Insert Image extension, add managedImage inside the tag <toolbarItems1>. Inside the tags <rteModules>, insert <module>insert-image</module>. (See the sample RTE Setup configuration file below.)
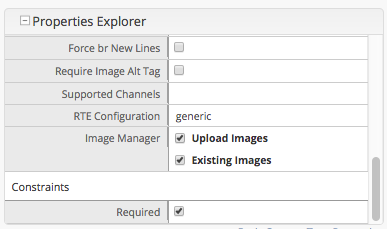
Once the RTE Setup is attached to an RTE in a form, you can now specify multiple data sources for the image. To specify data sources for the image, open the Content Type containing the RTE you would like to be able to insert an image, from ![]() . Add a data source for images, then select the RTE. In the Properties-Explorer, go to the Image Manager field, where you should be able to see the data sources for image you setup earlier. Put a checkmark on the image sources you want available for your RTE.
. Add a data source for images, then select the RTE. In the Properties-Explorer, go to the Image Manager field, where you should be able to see the data sources for image you setup earlier. Put a checkmark on the image sources you want available for your RTE.
In the image below, we have two data sources enabled for the RTE image insert.
Inserting HTML stubs
To add the ability to insert HTML stubs in your RTE configuration, do the following:
Add the insert-stub module in the
<rteModules>.Add insertStub to one of the toolbars:
<toolbarItems1>Add the stubs you’d like to be able to insert when using the RTE inside the tags
<rteStubs>and for each stub, put it inside the<stub>tags. Here is an example:1<rteStubs> 2 <stub> 3 <name>Service Tout</name> 4 <description>Promo Tout</description> 5 <thumbnail>pathgoes.gif</thumbnail> 6 <stylesheet></stylesheet> 7 <prototype><![CDATA[<div class="centered service"> 8 <div class="circle-border zoom-in"><img class="img-circle" src="/static-assets/images/1-gear.png" alt="service 3" /></div> 9 <h3>HEADER</h3> 10 <p>DESCRIPTION</p> 11 </div>]]> 12 </prototype> 13 </stub> 14 15 <stub> 16 <name>Customer Quote</name> 17 <description>Quote</description> 18 <thumbnail>pathgoes.gif</thumbnail> 19 <stylesheet></stylesheet> 20 <prototype><![CDATA[<div class="testimonial" style="width: 400px; margin: 10px; color: white;"> 21 <p>"QUOTE"</p> 22 <div class="whopic"> 23 <div class="arrow"><br /></div> 24 <img class="centered" src="/static-assets/images/1-gear.png" alt="client 2" /> 25 <strong>PERSON QUOTED<br /><small>ORG NAME</small> </strong> 26 </div> 27 </div>]]> 28 </prototype> 29 </stub> 30</rteStubs>
Inserting Layouts
To add the ability to insert layouts in your RTE configuration, do the following:
Add the insert-layout module in the
<rteModules>.Add insertLayout to one of the toolbars:
<toolbarItems1>Add the layouts you’d like to be able to insert when using the RTE, inside the tags
<rteLayouts>and for each layout, put it inside the<layout>tags. Here is an example:1<rteLayouts> 2 <layout> 3 <name>Four Column Layout</name> 4 <description>Four column layout</description> 5 <thumbnail>pathgoes.gif</thumbnail> 6 <stylesheet>/table.css</stylesheet> 7 <prototype><![CDATA[ 8 <table width="100%"><tr><td> 9 <div class="layoutWrapper4col"> 10 <div class="layoutColumn4">Column 1</div> 11 <div class="layoutColumn4">Column 2</div> 12 <div class="layoutColumn4">Column 3</div> 13 <div class="layoutColumn4">Column 4</div> 14 </div> 15 </td></tr></table>]]></prototype> 16 </layout> 17 <layout> 18 <name>Three Column Layout</name> 19 <description>Three Column Layout</description> 20 <thumbnail>pathgoes.gif</thumbnail> 21 <stylesheet>/table.css</stylesheet> 22 <prototype><![CDATA[ 23 <table width="100%"><tr><td> 24 <div class="layoutWrappe3ecol"> 25 <div class="layoutColumn3">Column 1</div> 26 <div class="layoutColumn3">Column 2</div> 27 <div class="layoutColumn3">Column 3</div> 28 </div> 29 </td></tr></table>]]></prototype> 30 </layout> 31 <layout> 32 <name>Two Column Layout</name> 33 <description>Two Column Layout</description> 34 <thumbnail>pathgoes.gif</thumbnail> 35 <stylesheet>/table.css</stylesheet> 36 <prototype><![CDATA[ 37 <table width="100%"><tr><td> 38 <div class="layoutWrapper2col"> 39 <div class="layoutColumn">Column 1</div> 40 <div class="layoutColumn">Column 2</div> 41 </div> 42 </td></tr></table>]]></prototype> 43 </layout> 44</rteLayouts>
Notice in the configuration example below, that you can setup the looks of your layouts inside the <rteStyleOverride> tags, where the looks for layoutColumn, layoutColumn3 and layoutColumn4 is setup.
Inserting Crafter Components
To add the ability to insert Crafter Components in your RTE configuration, do the following:
Add the insert-component module in the
<rteModules>.Add insertComponent to one of the toolbars:
<toolbarItems1>Add the Crafter components you’d like to be able to insert when using the RTE inside the tags
<rteWidgets>and for each component, put it inside the<widget>tags. Here is an example:1<rteWidgets> 2 <widget> 3 <name>Contact</name> 4 <description>Contact</description> 5 <contentIdField>entityId</contentIdField> 6 <contentIdType>path</contentIdType> 7 <contentPath>/site/components/greeting</contentPath> 8 <contentType>/component/component-greeting</contentType> 9 <includeJs /> 10 <includeCss /> 11 </widget> 12</rteWidgets>
Follow the instructions here: Using Components in the Rich Text Editor (RTE) to setup the components you wish to insert through the RTE.
Inserting Smart Tables
CrafterCMS provides a plugin for inserting a table that holds its formatting as the user adds rows and columns. To turn on table controls in the RTE, do the following:
Add the insert-predefined-table module in the
<rteModules>.Add predefinedTable and tablecontrols to one of the toolbars:
<toolbarItems1>Add the tables you’d like to be able to insert when using the RTE, inside the tags
<rteTables>and for each table, put it inside the<table>tags. Here is an example:1<rteTables> 2 <table> 3 <name>Sample Table</name> 4 <description>Sample Table</description> 5 <thumbnail>sample-table.jpg</thumbnail> 6 <stylesheet>/sample-table.css</stylesheet> 7 <prototype> 8 <![CDATA[ 9 <table class="cstudioTableLayout" data-smart-table="true" data-smart-table-style="altrowstable"> 10 <tr bgcolor="#d7deee"> 11 <th>Heading</th> 12 <th>Heading</th> 13 <th>Heading</th> 14 </tr> 15 <tr class="odd"> 16 <td >content</td> 17 <td >content</td> 18 <td >content</td> 19 </tr> 20 <tr class="even"> 21 <td class="eddrowcolor">content</td> 22 <td class="eddrowcolor">content</td> 23 <td class="eddrowcolor">content</td> 24 </tr> 25 <tr class="odd"> 26 <td >content</td> 27 <td >content</td> 28 <td >content</td> 29 </tr> 30 </table> 31 ]]> 32 </prototype> 33 </table> 34</rteTables>
Define the style script associated to the table. Inside of the tag
rteTablestylesadd the following, if the tag doesn’t exist, create it<style-name> <![CDATA[ /* some script */ ]]> </style-name>
Here’s an example:
 1<rteTablestyles>
 2<!--Simple script to set the corresponding class to each row-->
 3   <altrowstable><![CDATA[
 4      var rows = currentTable.rows;
 5      var row = null;
 6      for (i = 0; i < rows.length; i++) {
 7         row = rows[i];
 8         if(i % 2 != 0){
 9            dom.removeClass(row,"even");
10            dom.addClass(row,"odd");
11         }else{
12            dom.removeClass(row,"odd");
13            dom.addClass(row,"even");
14         }
15      }]]>
16   </altrowstable>
17</rteTablestyles>
Notice the classes we are using in the script, add the classes to your style sheet. Here’s an example:
.odd{
   background-color:#d4e3e5;
}
.even{
   background-color:#c3dde0;
}
Make sure you are calling the style sheet to your RTE
<rteStylesheets>
   <link>
      <loadFromPreview>true</loadFromPreview>
      <url>/static-assets/css/main.css</url>
   </link>
   ....
</rteStylesheets>
Or declaring the styles as override
<rteStyleOverride>
   .odd{
       background-color:#d4e3e5;
   }
   .even{
       background-color:#c3dde0;
   }
   ...
</rteStyleOverride>
Creating an RTE Setup
The RTE’s configuration file looks like this:
  1<?xml version="1.0" encoding="UTF-8"?>
  2<!--
  3  This file configures Studio's Rich Text Editor (RTE), and it supports several configuration profiles, where the
  4  content model selects which profile to use for which RTE field in the forms.
  5-->
  6<config>
  7  <setup>
  8    <id>generic</id> <!-- This starts a profile configuration -->
  9      <rteStylesheets> <!-- This informs the RTE to use the CSS files -->
 10        <link>
 11          <loadFromPreview>true</loadFromPreview>
 12          <url>/static-assets/css/main.css</url>
 13        </link>
 14
 15        <link>
 16          <appliesToChannel>iphonev,iphoneh</appliesToChannel>
 17          <loadFromPreview>true</loadFromPreview>
 18          <url>/static-assets/mobile/css/iphone.css</url>
 19        </link>
 20        <link>
 21          <appliesToChannel>iphonev,iphoneh</appliesToChannel>
 22          <loadFromPreview>true</loadFromPreview>
 23          <url>/static-assets/mobile/css/libs/jquery.mobile-1.0.min.css</url>
 24        </link>
 25      </rteStylesheets>
 26
 27      <rteStyleOverride>
 28        body { background: none; background-color: white; padding: 10px; }
 29        .layoutColumn { border: 1px solid gray; float: left; width: 50%}
 30        .layoutColumn3 { border: 1px solid gray; float: left; width: 33.33%}
 31        .layoutColumn4 { border: 1px solid gray; float: left; width: 25%}
 32
 33        h1 {
 34        color:rgb(61, 68, 73);
 35        font-family:'Roboto Slab';
 36        font-size:44px;
 37        font-weight:bold;
 38        }
 39
 40        h3 {
 41        color:rgb(61, 68, 73);
 42        font-family:'Roboto Slab';
 43        font-size:18px;
 44        }
 45
 46        p {
 47        font-size:14px;
 48        }
 49
 50      </rteStyleOverride>
 51
 52      <toolbarItems1>
 53        formatselect,|,bold,italic,underline,strikethrough,|,sub,sup,charmap,|,outdent,indent,blockquote,|,justifyleft,justifycenter,justifyright,justifyfull,|,bullist,numlist,|,managedImage,link,unlink,anchor,|,edithtml,|,undo,redo
 54      </toolbarItems1>
 55      <toolbarItems2></toolbarItems2>
 56      <toolbarItems3></toolbarItems3>
 57      <toolbarItems4></toolbarItems4>
 58
 59      <rteLinkStyles> <!-- configures HTTP link styles within the RTE (double click a link in the RTE and select the
 60                                            `Class` field. -->
 61        <style>
 62          <!-- first row is the title -->
 63          <name>Link Styles</name>
 64          <value>Link Styles</value>
 65        </style>
 66        <style>
 67          <name>Standard</name>
 68          <value>standard</value>
 69        </style>
 70        <style>
 71          <name>Single</name>
 72          <value>single</value>
 73        </style>
 74        <style>
 75          <name>Hidden</name>
 76          <value>hidden</value>
 77        </style>
 78        <style>
 79          <name>Title link</name>
 80          <value>titleLink</value>
 81        </style>
 82        <style>
 83          <name>Button</name>
 84          <value>mediumButton</value>
 85        </style>
 86      </rteLinkStyles>
 87
 88      <!-- Widgets: These are Crafter components that can be dragged and dropped in the RTE -->
 89      <rteWidgets>
 90        <!--
 91        <widget>
 92          <name />
 93          <description />
 94          <contentIdField />
 95          <contentIdType />
 96          <contentPath />
 97          <contentType />
 98          <includeJs />
 99          <includeCss />
100        </widget>
101        -->
102      </rteWidgets>
103
104      <!-- Modules: -->
105      <rteModules>
106        <module>insert-image</module>
107        <module>channel</module>
108        <module>edit-html</module>
109      </rteModules>
110  </setup>
111</config>
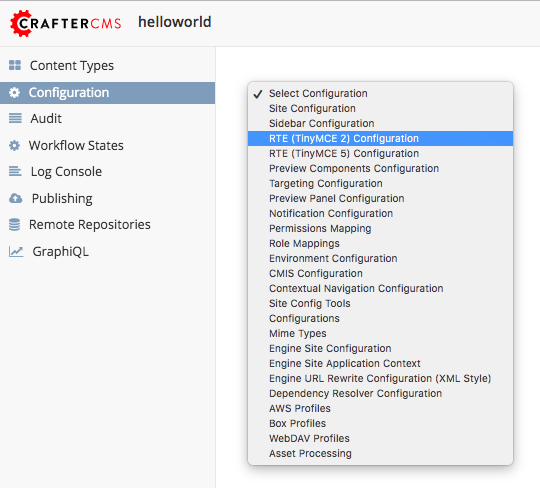
You can access the RTE (TinyMCE 2) Configuration file by going to the Sidebar then clicking on ![]() . In the Site Config, click on Configuration, then from the dropdown list, select
. In the Site Config, click on Configuration, then from the dropdown list, select RTE (TinyMCE 2) Configuration
Inside the <config> tag, there can be multiple <setup> tags. Each represents a possible RTE configuration that can be specified to be used by a RTE control. Each possible RTE configuration contains:
An
<id>tag with the name that must be specified for an RTE control to use this configuration.
<rteStylesheets>tag that contains multiple<link>tags. Each link tag represents a link to a CSS stylesheet that will be used so that the RTE matches the look and feel of the site.<link> <appliesToChannel>iphonev,iphoneh</appliesToChannel> <loadFromPreview>true</loadFromPreview> <url>/static-assets/mobile/css/libs/jquery.mobile-1.0.min.css</url> </link>
<appliesToChannel>is optional. If it’s missing, it will apply to every channel.
<toolbarItems1>and similar contain the toolbar buttons in the RTE. You can specify any plugin as named in Tiny MCE Plugins List. We have provided above a list of plugins. They will be featured in the same order as specified here, and separators can be specified with|.
<rteModules>is used to specify which external plugins to include, the list of which is available in Crafter Studio’s Git repo.
For example, to use the edit-html editor, you’ll have to add <module>edit-html</module> to <rteModules> and place edithtml somewhere in a toolbar <toolbarItems1> similar to this link,unlink,anchor,|,edithtml,|,undo,redo</toolbarItems1>
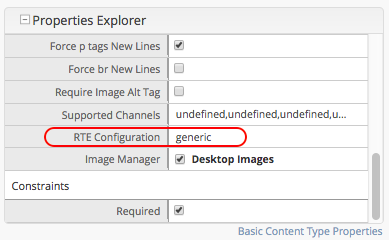
Attaching an RTE in a Form to an RTE Setup
To attach an RTE setup to an RTE in a form, open the content type that you want to add an RTE to, then go to the Properties Explorer and click on RTE Configuration and type in an RTE setup name.
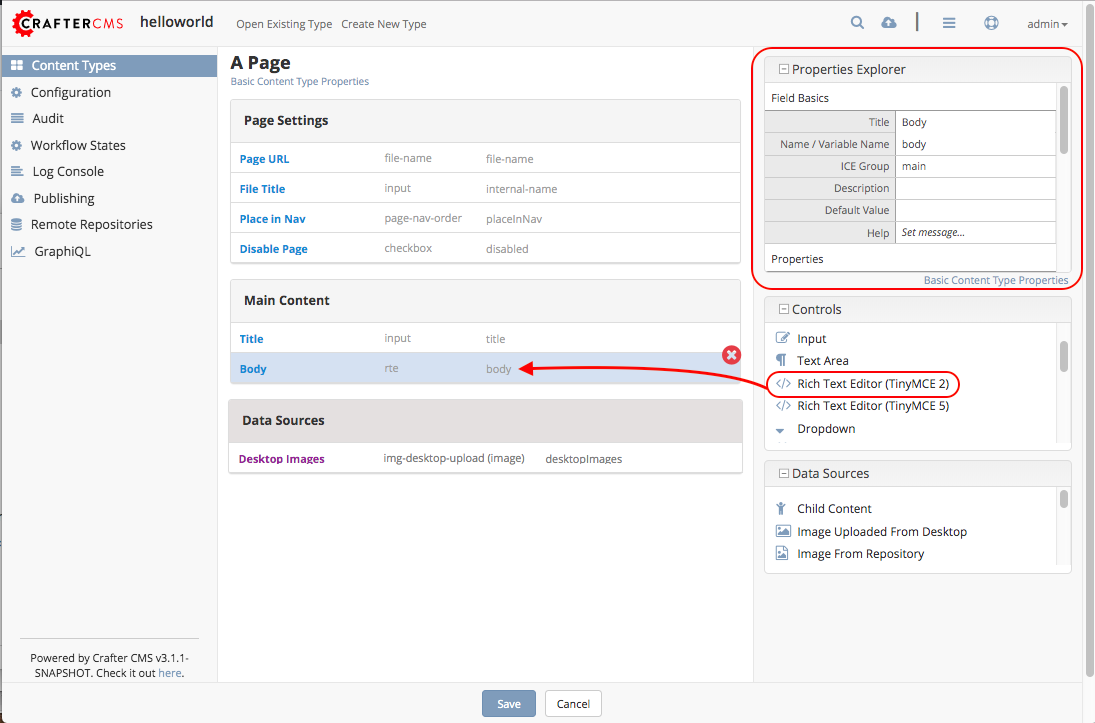
In the image below, the RTE setup name used is generic. Please see the section above on how to create an RTE Setup, where the example shows an RTE Setup named generic.