Using the Proxy Configuration
A proxy server, or proxy for short, is an application or system that acts as a middleman between requests from clients for resources such as a file or web page for example, and the server that provides those resources. Whenever a request is made by a client, the request gets sent to the proxy that then evaluates the request and then performs the required transactions. Proxies forwards web requests, act as a firewall and web filter, provide shared network connections, and cache data to speed up common requests. It helps to simplify/control the complexity of the request, and can provide additional benefits such as load balancing, privacy or security.
CrafterCMS supports a proxy system to proxy GraphQL, Engine, NodeJS or other application delivery systems. Whenever Crafter Engine receives a request, it is matched against the patterns of each server and the first match would then get the request sent to the server with the matching pattern. In some systems, multiple servers are used for Elasticsearch, Studio, etc. Using the proxy helps simplify the system.
One of the benefits of using the proxy in CrafterCMS is that it can connect to any remote server as the preview server, which allows for easier authoring of sites built with other programming languages and technology. For example, you would like to work on a React application within Studio. What is normally included inside Studio is the build output of the React application, so that a user making edits to the React code would need to build the React code then copy it into Studio in order to preview the changes. This becomes cumbersome when developing, as many edits are normally done before reaching the final version of the React app. Using the proxy, the user can preview the React app in Studio and is able to work on both the React app and CrafterCMS.
Let’s take a look at an example of setting up the proxy for a React application.
Example
We’ll look at the video center blueprint, a React application available from the public marketplace, that runs on localhost:3000, then setup the Studio proxy so we can preview the React application inside Studio. Finally, we’ll make some changes in the React application and view the changes made inside Studio.
Let’s begin:
Setup the React application.
Clone the video center blueprint by running
git clone https://github.com/craftercms/video-center-blueprint.git➜ git clone https://github.com/craftercms/video-center-blueprint.git Cloning into 'video-center-blueprint'... remote: Enumerating objects: 6433, done. remote: Total 6433 (delta 0), reused 0 (delta 0), pack-reused 6433 Receiving objects: 100% (6433/6433), 77.12 MiB | 4.92 MiB/s, done. Resolving deltas: 100% (4041/4041), done.
Run the React application
Inside the video center blueprint folder that we just cloned above, navigate to
video-center-blueprint/sources/app. We needyarninstalled in your system. Runningyarnwith no command will runyarn install. In the example below, yarn is already installed in the system➜ app git:(master) yarn yarn install v1.22.4 [1/4] 🔍 Resolving packages... success Already up-to-date. ✨ Done in 0.68s.
Build the React application by running
yarn start➜ app git:(master) yarn start yarn run v1.22.4 $react-scripts start Compiled successfully! You can now view video-center-blueprint in the browser. Local: http://localhost:3000/ On Your Network: http://192.168.1.135:3000/ Note that the development build is not optimized. To create a production build, use yarn build.
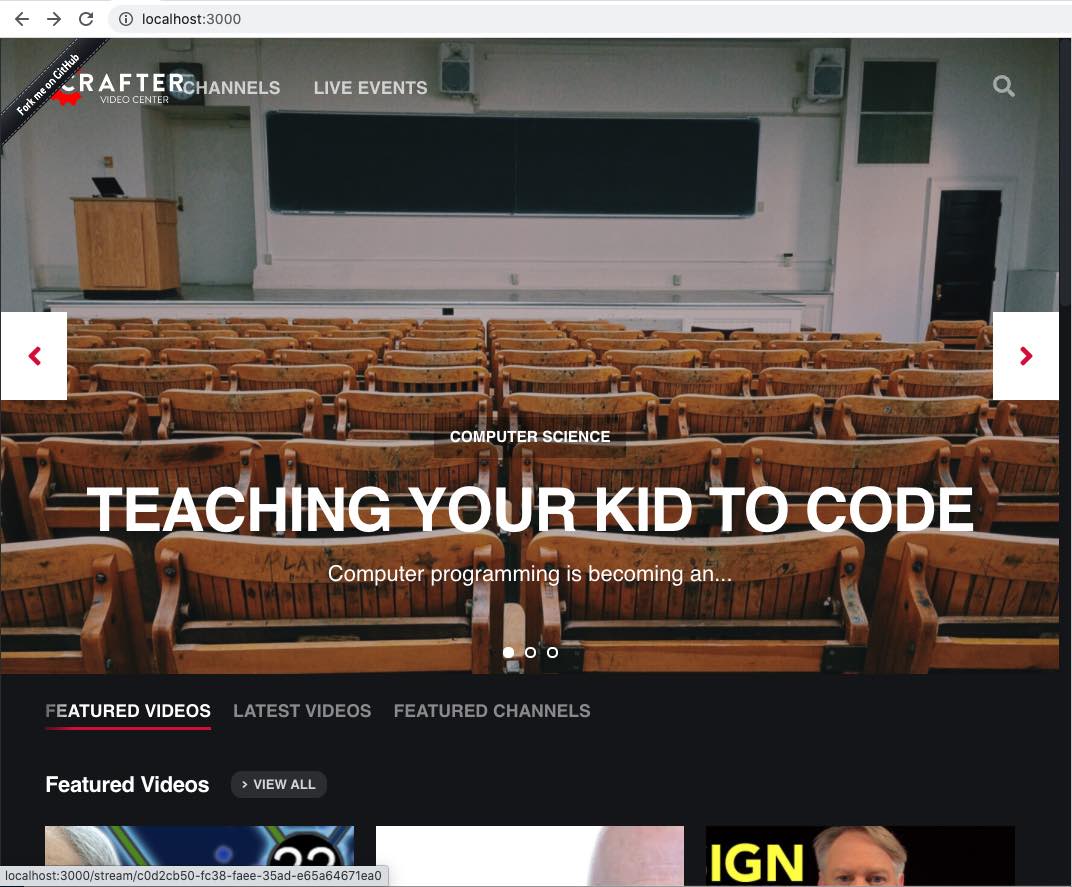
The command above will open a browser window where we can view the app
Edit the base url in your React app to the server we are using for development, which in our case, is the Studio server, on
localhost:8080, and the websocket port for hot module reloading (Crafter does not proxy websocket so you will need to point to the origin server of the websocket), then save the changes and restart the React server.To edit the base url, navigate to
video-center-blueprint/sources/appthen open the.env.developmentfile using your favorite editor and set the following variables:REACT_APP_BASE_URLandWDS_SOCKET_PORTvideo-center-blueprint/sources/app/.env.development# A blank REACT_APP_SITE_NAME variable will make the app # try to find the crafterSite cookie which, provided you're # running both your local crafter and node dev web server for # the app are the same, it should be set for you when you created # the site. Manually set the here otherwise. REACT_APP_BASE_URL=http://localhost:8080 # If you're using the CrafterCMS's Preview Proxy to view the dev mode app inside Preview, # configuring the port makes live reload work inside the CrafterCMS Preview frame. # If you're using any other port to run your webpack dev server, you should adjust this to # that port too. WDS_SOCKET_PORT=3000
For Windows users on Docker, add
DANGEROUSLY_DISABLE_HOST_CHECK=trueto the.env.developmentfile.
Setting the environment variableDANGEROUSLY_DISABLE_HOST_CHECKtotruedisables the host check, which allows us to pretend that the the host header of the request and the listening address of the host are running on the same host and port which is important since browsers block cross-origin requests. If not set, the user will see anInvalid Host headermessage in Studio. Remember that disabling the host check is insecure and should only be used in a development environment.Remember to restart the React server for the settings to take effect.
Note
If you’re using the create-react-app, please note that
react-scriptsversions earlier than 3.4.0 does not support custom sockjs pathname for hot reloading the server. Make sure that yourreact-scriptsversion used is 3.4.0 or above for the live reload work inside CrafterCMS to work.
Setup Studio
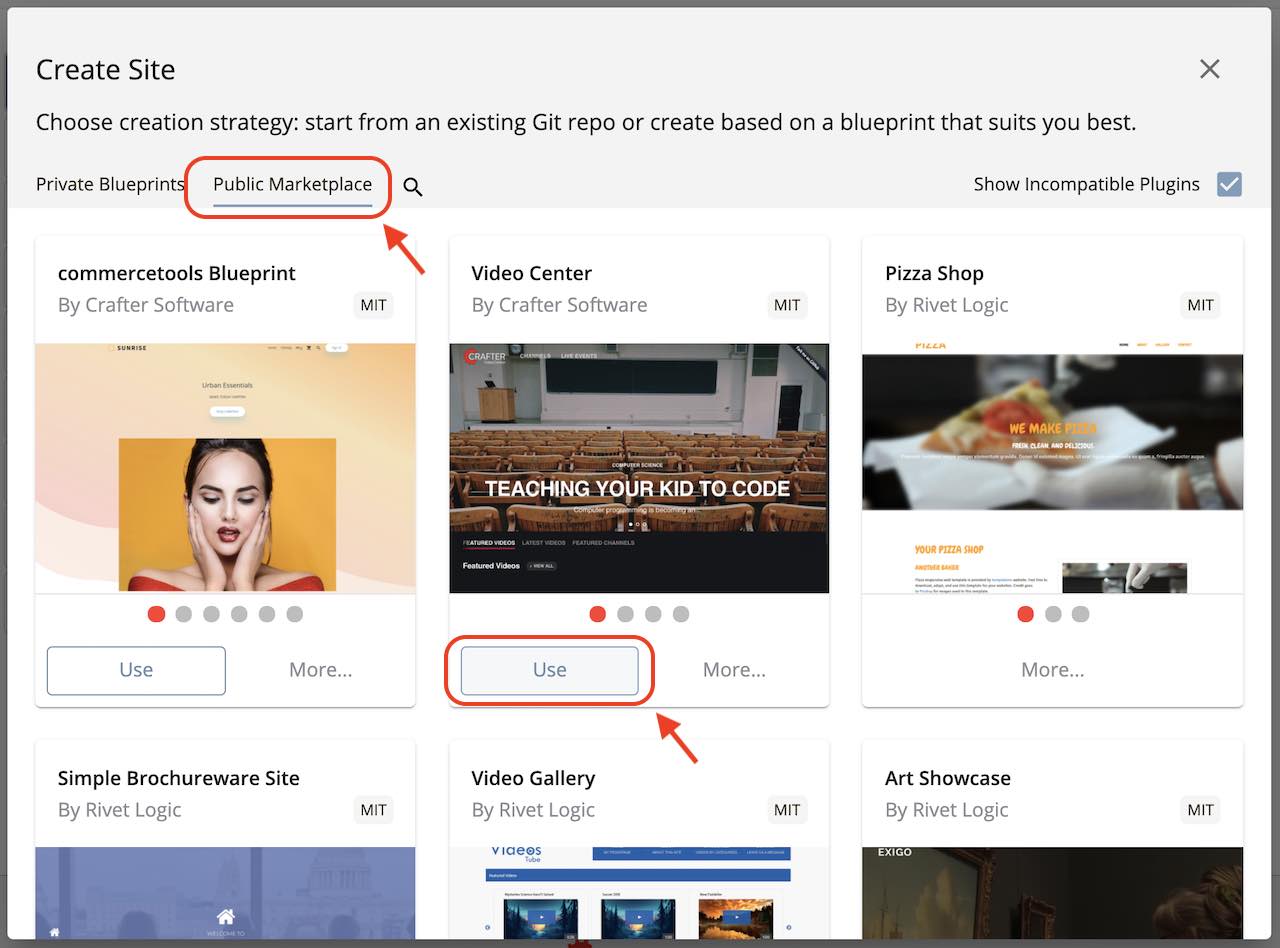
Create a site using the video center blueprint from the Public Marketplace.
From the Main Menu, click on Sites, then click on the Create Site button. This will open the Create Site dialog. Click on the Public Marketplace tab. Look for Video Center, then click on the Use button, fill in the required information then click on the Review button, then finally the Create Site button. This Video Center blueprint we selected from the Marketplace is the same react application
Setup the proxy for the video center React application we started above
Open the Sidebar, click on
 , then click on Configuration. Select Proxy Config from the dropdown menu.
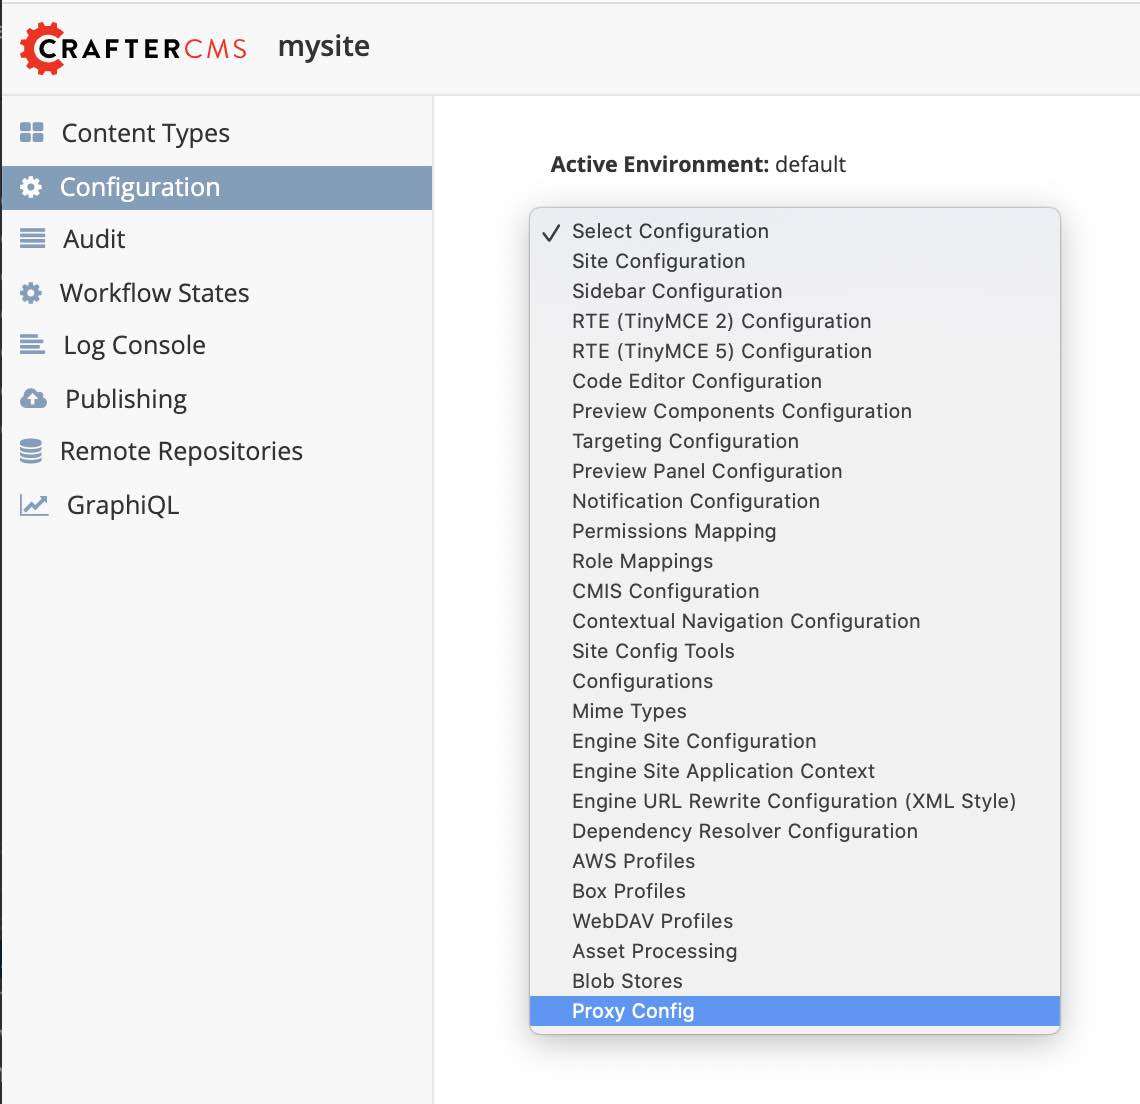
Scroll down to the
previewserver and edit theurlto point to the url used for the React application (localhost:3000) we setup in the beginning. Save your changes.CRAFTER_HOME/data/repos/sites/sandbox/SITENAME/sandbox/config/engine/proxy-config.xml<server> <id>preview</id> <url>http://localhost:3000</url> <patterns> <pattern>.*</pattern> </patterns> </server>
For users running Studio on Docker, use
http://host.docker.internal:3000for theurlof the React application. Docker containers can access local services running on the host by connecting tohost.docker.internal. See https://docs.docker.com/docker-for-windows/networking/#use-cases-and-workarounds for more information on connecting from a container to a service on the host.At this point, the preview we are seeing in Studio should be the one from our React application.
Modify the React application then verify that we can preview the changes made inside Studio.
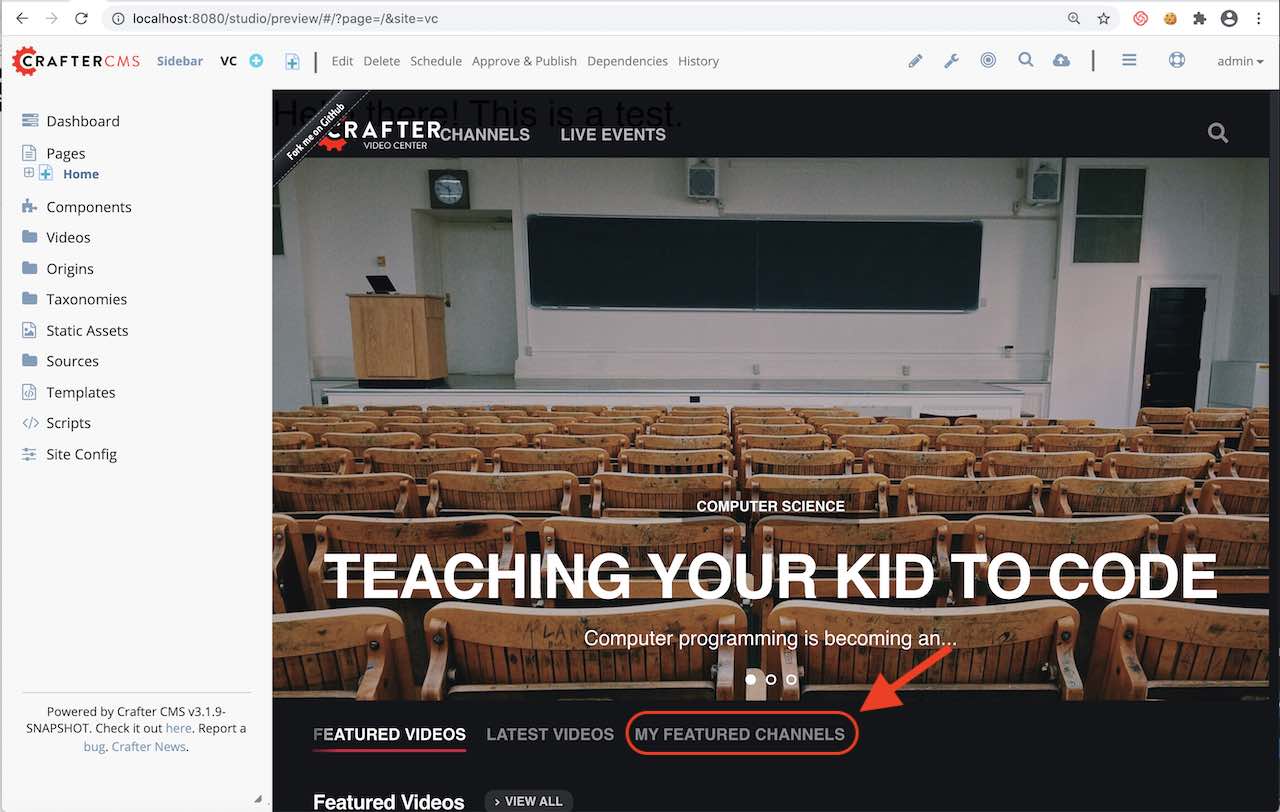
For this part, we’ll change the text
Featured Channelsin the home page toMy Featured Channels. Using your favorite editor, in your React app, navigate tovideo-center-blueprint/sources/app/src/containers/Homeand open theHome.jsfile. Scroll down to the line withkey: 'featured-channels'and edit thevalue:{ key: 'featured-channels', value: 'My Featured Channels', type: 'channel-card-alt', ...
Save your changes. Notice that in the React app preview (localhost:3000), the page is reloaded with our changes now visible. Now let’s take a look at Studio. Notice that Studio preview has reloaded and the changes we made in the React app is now visible.