
Installation
This section describes the various ways of installing CrafterCMS.
First we’ll take a look at the requirements and supported platform for installing and setting up CrafterCMS.
Requirements
To run CrafterCMS, the following are required:
Java 17
8+ Gig of memory to JVM (additional memory may be required depending on the size and number of your web experiences)
Git 2.20.1 and later
Docker (if running in Docker or MacOS)
Please note that CrafterCMS does not require any external databases for the core system to run and deliver fully dynamic experiences. MongoDB is used by Crafter Profile and Crafter Social which are optional components that provide external (non-author) user management and social features.
Supported Platforms
Operating System/Environment (All components)
The following Operating Systems and environments are supported (64Bit only for all OSs)
Docker
Linux (Ubuntu, RHEL)
macOS (10.12 and later)
Windows via WSL 2
JVMs (All components)
The following JVMs are supported:
OpenJDK 17
Oracle JDK (HotSpot) 17
Verify Java Version
Ensure that you are running Java 17. To check, run the following command at the command prompt and make sure that the version displayed is Java 17:
java -version
The command above should output something like this:
openjdk version "17.0.6"
Verify JAVA_HOME environment variable is set correctly
Make sure that you have a JAVA_HOME environment variable that points to the root of the JDK install directory. To check the value set for JAVA_HOME, enter the following command at the command prompt:
env | grep JAVA_HOME
How to set the JAVA_HOME environment variable
To set JAVA_HOME
Korn and bash shells:
export JAVA_HOME=jdk-install-dir
export PATH=$JAVA_HOME/bin:$PATH
Bourne shell:
JAVA_HOME=jdk-install-dir
export JAVA_HOME
PATH=$JAVA_HOME/bin:$PATH
export PATH
C shell:
setenv JAVA_HOME jdk-install-dir
export JAVA_HOME
PATH=$JAVA_HOME/bin:$PATH
export PATH
setenv PATH $JAVA_HOME/bin:$PATH
export PATH=$JAVA_HOME/bin:$PATH
Prerequisites
MacOS Prerequisite
For MacOS users, the following applies:
The latest
opensslformula needs to be installed via homebrew:brew install openssl
Docker is used to run OpenSearch and needs to be installed. Follow the instructions here to install Docker.
Linux Prerequisite
The library
libaiois required by the Authoring install. Please note that some Linux distributions does not install the librarylibaioby default and so, may need to be installed. You may get the following error when starting up Studio:error while loading shared libraries: libaio.so.1: cannot open shared object file: No such file or directory
To install
libaiofor Debian-based Linux distros:sudo apt install libaio1To install
libaiofor RedHat-based Linux distros:yum install libaioFor Linux users, some of the scripts uses
lsof. Please note that some Linux distributions does not come withlsofpre-installed and so, may need to be installed.To install
lsoffor Debian-based Linux distros:apt-get install lsofTo install
lsoffor RedHat-based Linux distros:yum install lsofThe library
libncurses5is required by the Authoring install due to the embedded MariaDB. You may get the following error when running an Authoring install or the restore script without thelibncurses5library installed:error while loading shared libraries: libncurses.so.5: cannot open shared object file: No such file or directory
To install the library
libncurses5, use the following commands:On Debian-based Linux distros:
For Ubuntu 24.04 and later versions,
libncurses5was removed starting in version 24.04. To installlibncurses5, run the following commands:wget http://archive.ubuntu.com/ubuntu/pool/universe/n/ncurses/libtinfo5_6.4-2_amd64.deb && sudo dpkg -i libtinfo5_6.4-2_amd64.deb && rm -f libtinfo5_6.4-2_amd64.deb wget http://archive.ubuntu.com/ubuntu/pool/universe/n/ncurses/libncurses5_6.4-2_amd64.deb && sudo dpkg -i libncurses5_6.4-2_amd64.deb && rm -f libncurses5_6.4-2_amd64.deb sudo apt install lib32ncurses5-dev libncurses5 libncurses5-dev -y
All other versions of Debian-based linux distro:
sudo apt install libncurses5
On RHEL, CentOS:
For versions 8 and later, the EPEL repository needs to be added in order to install the
ncurses-compat-libs. To add the EPEL repository, do the following:Enable the CodeReady Linux Builder repository
CentOS:sudo dnf config-manager --set-enabled crb
RHEL:sudo subscription-manager repos --enable codeready-builder-for-rhel-9-$(arch)-rpmsNext, install the EPEL RPM:
sudo dnf install https://dl.fedoraproject.org/pub/epel/epel-release-latest-8.noarch.rpmFinally, we can now install
ncurses-compat-libs:sudo dnf install ncurses-compat-libs
All other versions of RHEL, CentOS:
sudo yum install ncurses-compat-libs
On Fedora 22 and newer version:
sudo dnf install ncurses-compat-libs
Windows Prerequisite
For Windows users, WSL 2 needs to be installed. All CrafterCMS scripts/commands to be executed and items that needs to be downloaded and installed needs to be in WSL 2.
Follow the instructions here to install WSL 2.
Installation
CrafterCMS provides the following methods for installation depending on your environment. There are various installation methods:
We’ll go through these one by one.
SaaS
You can sign up for Crafter Cloud.
Docker
Quick Start for Evaluation in Docker
For a quick start to evaluate CrafterCMS, you follow these simple instructions. If you have Docker installed, you can get started with CrafterCMS in a few minutes. Simply run the following command:
docker run -p 8080:8080 craftercms/authoring_local:latest
Then point your browser to http://localhost:8080/studio and you will be presented with the Crafter Studio login page. The default username is admin and the default password is admin.
Docker Compose
To run CrafterCMS in a set of Docker containers using Docker Compose, make sure the following are installed in your local system:
Docker (https://docs.docker.com/install/)
Docker Compose (https://docs.docker.com/compose/install/)
Git 2.20.1 or later
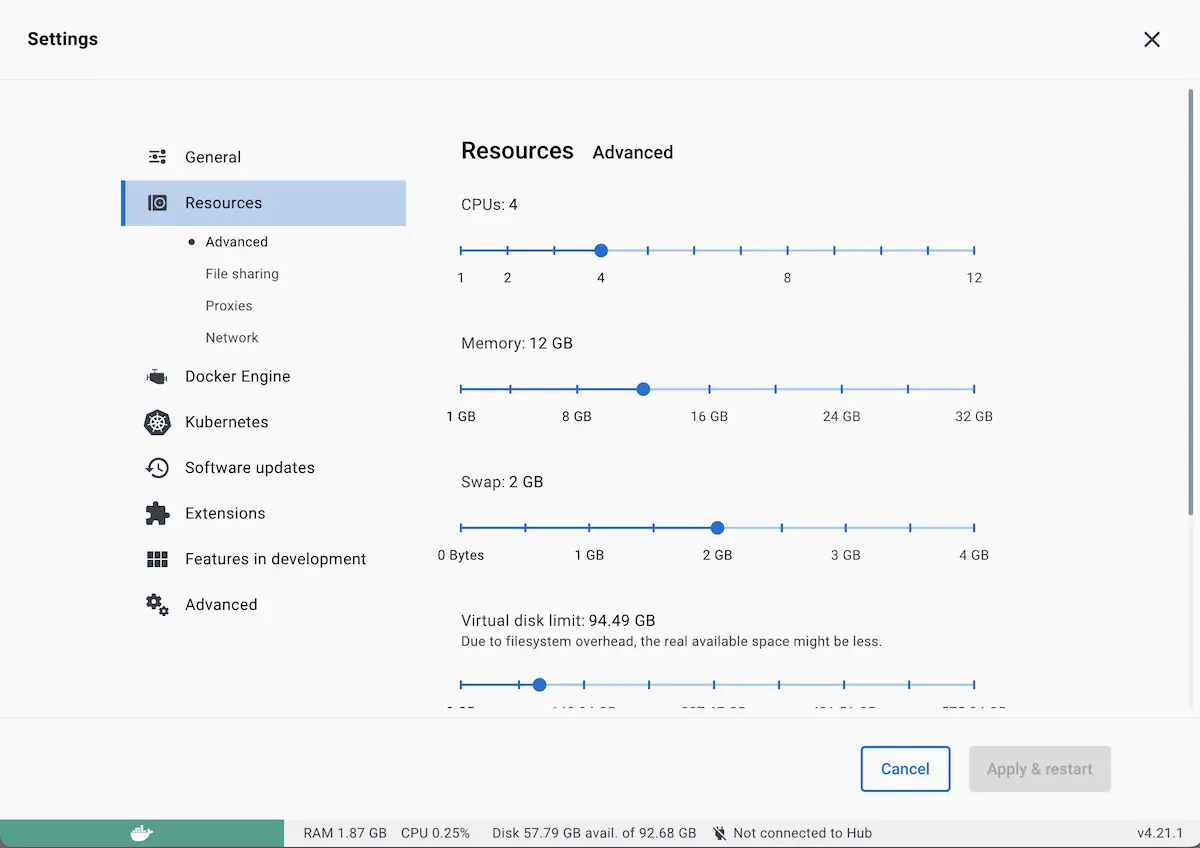
For Windows and Mac, we recommend you give Docker Desktop at least 12GB of RAM (6GB of RAM per environment) and 4 CPUs. To do this, go to Docker Desktop’s Preferences > Resources > Advanced, and then change the resource limits.
Clone the CrafterCMS Docker Compose repo from GitHub
➜ git clone https://github.com/craftercms/docker-compose.git
If you are a developer and want to use your local IDE and other tools, follow this documentation to configure your docker container to support access to your projects via local IDE.
Go into the authoring folder, then start the container by running
docker-compose upConsole output when starting the container➜ docker-compose git:(master) cd authoring ➜ authoring git:(master) docker-compose up [+] Running 9/9 ✔ Network authoring_default Created 0.1s ✔ Volume "crafter_authoring_temp" Created 0.0s ✔ Volume "crafter_authoring_data_search" Created 0.0s ✔ Volume "crafter_authoring_logs_search" Created 0.0s ✔ Volume "crafter_authoring_data" Created 0.0s ✔ Volume "crafter_authoring_logs" Created 0.0s ✔ Container authoring-search-1 Created 0.1s ✔ Container authoring-deployer-1 Created 0.1s ✔ Container authoring-tomcat-1 Created 0.1s Attaching to authoring-deployer-1, authoring-search-1, authoring-tomcat-1 ... authoring-tomcat-1 | 11-Aug-2023 11:28:25.535 INFO [main] org.apache.coyote.AbstractProtocol.start Starting ProtocolHandler ["http-nio-8080"] authoring-tomcat-1 | 11-Aug-2023 11:28:25.579 INFO [main] org.apache.catalina.startup.Catalina.start Server startup in [68028] milliseconds
You may now login to Crafter Studio at http://localhost:8080/studio. The default username is admin and the default password is admin.
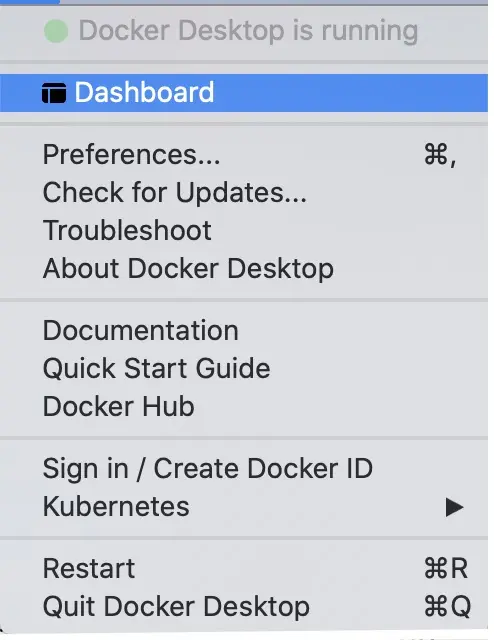
The console output when you start the container (as shown above) contains useful information that you can use to debug or monitor the status of CrafterCMS. To view more of the logs, the Docker Desktop Dashboard provides a runtime view of all your containers and applications, including logs for monitoring/debugging CrafterCMS. To access the Docker Desktop Dashboard, from the Docker menu, select Dashboard.
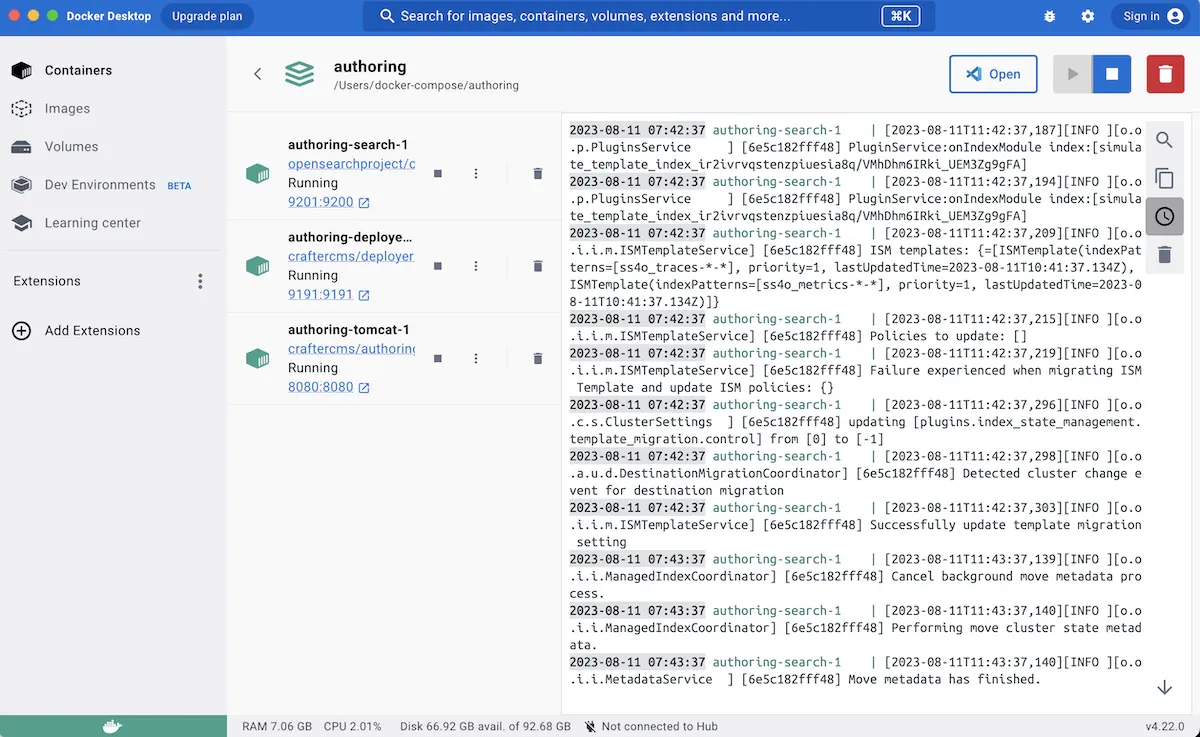
This will open a dialog displaying the running application with a list of containers running inside the application when you expand the application
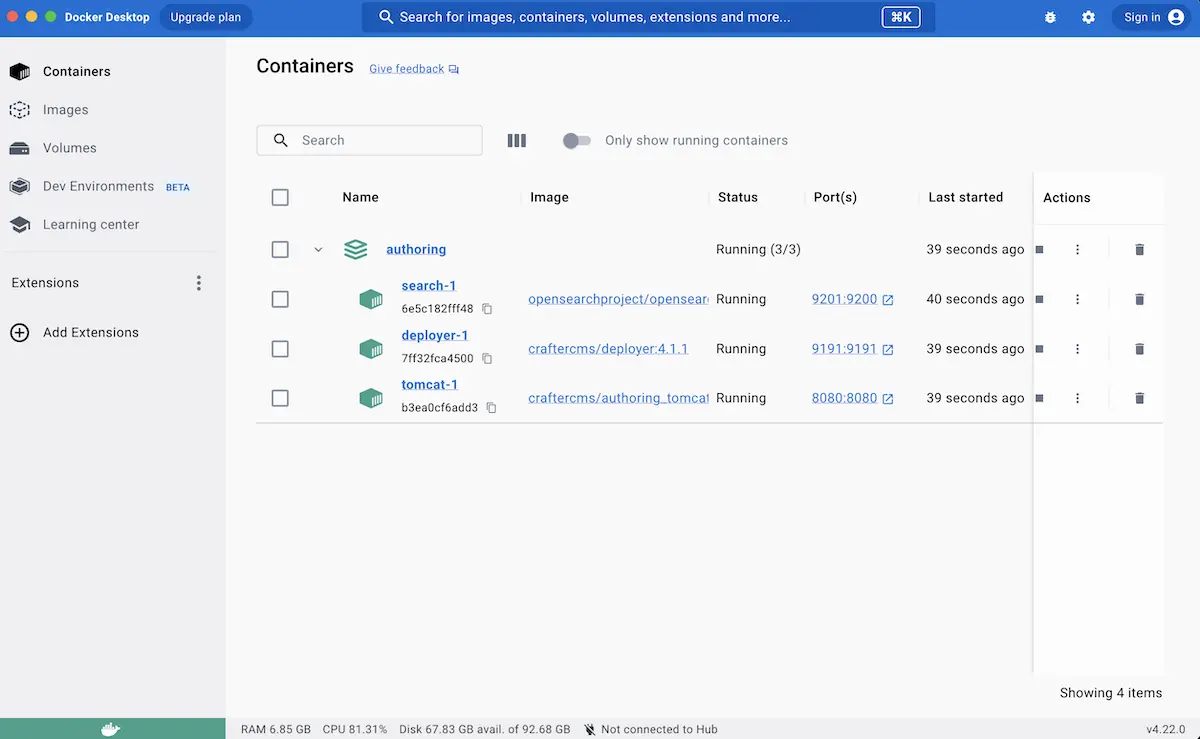
When the authoring application displayed above is selected, the application view will open and list all the containers running on the application and display a detailed logs view
To configure working on projects in Docker via a local IDE follow the instructions here.
For more information on Docker Desktop Dashboard, see https://docs.docker.com/desktop/dashboard/
For more information on CrafterCMS Docker Compose, please see: https://github.com/craftercms/docker-compose.
Images
CrafterCMS provides Docker images on dockerhub for the latest release versions
and snapshots of versions in development. The CrafterCMS Docker images may be pulled by using the tag for a release
version, e.g. craftercms/authoring_tomcat:4.1.5, the latest release, e.g. craftercms/authoring_tomcat:latest
or the tag for a snapshot of a version in development, e.g. craftercms/authoring_tomcat:4.1.6-SNAPSHOT
As mentioned, CrafterCMS is open source and you can always build Docker images from source code here
Kubernetes
CrafterCMS provides Kubernetes example deployments, which can be found here: https://github.com/craftercms/kubernetes-deployments.
This article will describe examples of deploying CrafterCMS in Kubernetes.
Simple Delivery Kubernetes Deployment
CrafterCMS has an example Kubernetes deployment for a Delivery with a single instance, which you can get from https://github.com/craftercms/kubernetes-deployments/tree/master/delivery/simple. This guide covers how to install this example in a Kubernetes cluster.
Important
This guide assumes you have a working understanding of Kubernetes
Requirements
You need to have a Kubernetes cluster, and the kubectl command-line tool must be configured to communicate with your cluster. If you do not already have a cluster, you can create one by using Minikube: https://github.com/kubernetes/minikube.
The nodes in your cluster should at least have 4 CPUs and 16 GB of space, to avoid performance issues and out of memory errors. In Minikube, to start a node with this characteristics, you can run a command similar to the following:
minikube start --cpus 4 --memory 16384.
In addition to that, you need an Authoring pod with a project published to live to pull site content from.
Important
If you need to setup an Authoring environment, refer to Simple Authoring With a Single Instance Kubernetes Deployment. DO NOT use Setup Studio Clustering with Kubernetes Deployment , which is not compatible with this guide.
Setup Kubernetes Secrets
The deployment files cloned from https://github.com/craftercms/kubernetes-deployments/ have a folder set aside for placing confidential information, kubernetes-deployments/delivery/simple/resources/secrets.
If you previously setup Authoring with Git SSH access:
Copy the
id_rsaandid_rsa.pubfiles fromkubernetes-deployments/authoring/simple/resources/secrets/git-ssh-servertokubernetes-deployments/delivery/simple/resources/secrets/git-ssh-server
If you previously setup Authoring with Git HTTPS access:
Copy the
server.crtfile fromkubernetes-deployments/authoring/simple/resources/secrets/git-https-servertokubernetes-deployments/delivery/simple/resources/secrets/git-https-server
Please also make sure that you uncomment the Kubernetes configuration lines under kubernetes-deployments/delivery/simple that start with Uncomment if using the Git (HTTPS|SSH) server (comment the configuration related to the other protocol).
Start the Deployment
Create the craftercms namespace if it doesn’t exist yet.
➜  kubectl create namespace craftercms
namespace/craftercms created
If using minikube, pre-pull the Authoring and OpenSearch images to avoid context deadline exceeded errors (change CRAFTERCMS_VERSION for the actual Crafter version, e.g. 4.1.1).
➜  minikube image pull craftercms/delivery_tomcat:4.0.2
➜  minikube image pull opensearchproject/opensearch:2.8.0
Go to kubernetes-deployments/delivery/simple then run kubectl apply -k .
➜  kubectl apply -k .
kubectl apply -k .
secret/ssh-keys-h5244t449m created
service/delivery-svc-headless created
statefulset.apps/delivery created
Check the status of the Delivery StatefulSet by running kubectl get -n craftercms deployments, and the status of the Pods by running kubectl get -n craftercms pods.
➜  kubectl get -n craftercms statefulsets
NAME        READY   AGE
authoring   1/1     20m
delivery    1/1     2m10s
➜ kubectl get -n craftercms pods NAME READY STATUS RESTARTS AGE authoring-0 4/4 Running 0 21m delivery-0 3/3 Running 0 3m25s
Once it comes up, you will see the new pod in RUNNING status, with 3 containers READY.
You can tail the logs of the tomcat and deployer containers, with the kubectl command:
kubectl logs -n craftercms -f -c CONTAINER_NAME POD_NAME
For example: kubectl logs -n craftercms -f -c tomcat authoring-0
Bootstrap the Site in Delivery
You will need to run the init-site.sh in order to setup the project in Delivery. Either of the following commands will create the Deployer site target and create the index in Elasticsearch.
If Authoring is running with the Git SSH server container:
Run
kubectl exec -n craftercms -it delivery-0 --container deployer -- gosu crafter ./bin/init-site.sh -k /opt/crafter/data/ssh/id_rsa SITE_NAME ssh://authoring-svc-headless/opt/crafter/data/repos/sites/SITE_NAME/published➜ kubectl exec -n craftercms -it delivery-0 --container deployer -- gosu crafter ./bin/init-site.sh -k /opt/crafter/data/ssh/id_rsa mysite ssh://authoring-svc-headless/opt/crafter/data/repos/sites/mysite/published Creating Deployer Target... SLF4J: Failed to load class "org.slf4j.impl.StaticLoggerBinder". SLF4J: Defaulting to no-operation (NOP) logger implementation SLF4J: See http://www.slf4j.org/codes.html#StaticLoggerBinder for further details. Target created successfully
Note
Remember that when using private key SSH authentication, the private key path must be set explicitly using the
-koption. Here’s an example:init-site -k ~/.ssh/jdoe_key myeditorial ssh://myserver/opt/crater/sites/myeditorial
If Authoring is running with the Git HTTPS server container:
Run
kubectl exec -n craftercms -it delivery-0 --container deployer -- gosu crafter ./bin/init-site.sh -u crafter -p crafter SITE_NAME https://authoring-svc-headless/repos/sites/SITE_NAME/published➜ kubectl exec -n craftercms -it delivery-0 --container deployer -- gosu crafter ./bin/init-site.sh -u crafter -p crafter mysite https://authoring-svc-headless/repos/sites/mysite/published Creating Deployer Target... SLF4J: Failed to load class "org.slf4j.impl.StaticLoggerBinder". SLF4J: Defaulting to no-operation (NOP) logger implementation SLF4J: See http://www.slf4j.org/codes.html#StaticLoggerBinder for further details. Target created successfully
Important
The example configuration files include the Git HTTPS credentials in plain text, for simplicity. If setting up Delivery in production, make sure to properly create the credentials as Secrets.
After a minute or two, the Deployer should have pulled the project content from Authoring (you can check it by getting the Delivery Deployer log: kubectl logs -n craftercms -c deployer delivery-0).
You can now access the project in Delivery, by forwarding a local port to port 8080 of the pod, with the kubectl port-forward command:
kubectl port-forward -n craftercms pods/POD_NAME LOCAL_PORT:POD_PORT
Here’s an example of forwarding local port 9080 to the 8080 port of the delivery-0 pod:
➜  kubectl port-forward -n craftercms pods/delivery-0 9080:8080
Forwarding from 127.0.0.1:9080 -> 8080
Forwarding from [::1]:9080 -> 8080
We can now view the project in Delivery from the pod by entering localhost:9080?crafterSite=mysite in your browser.
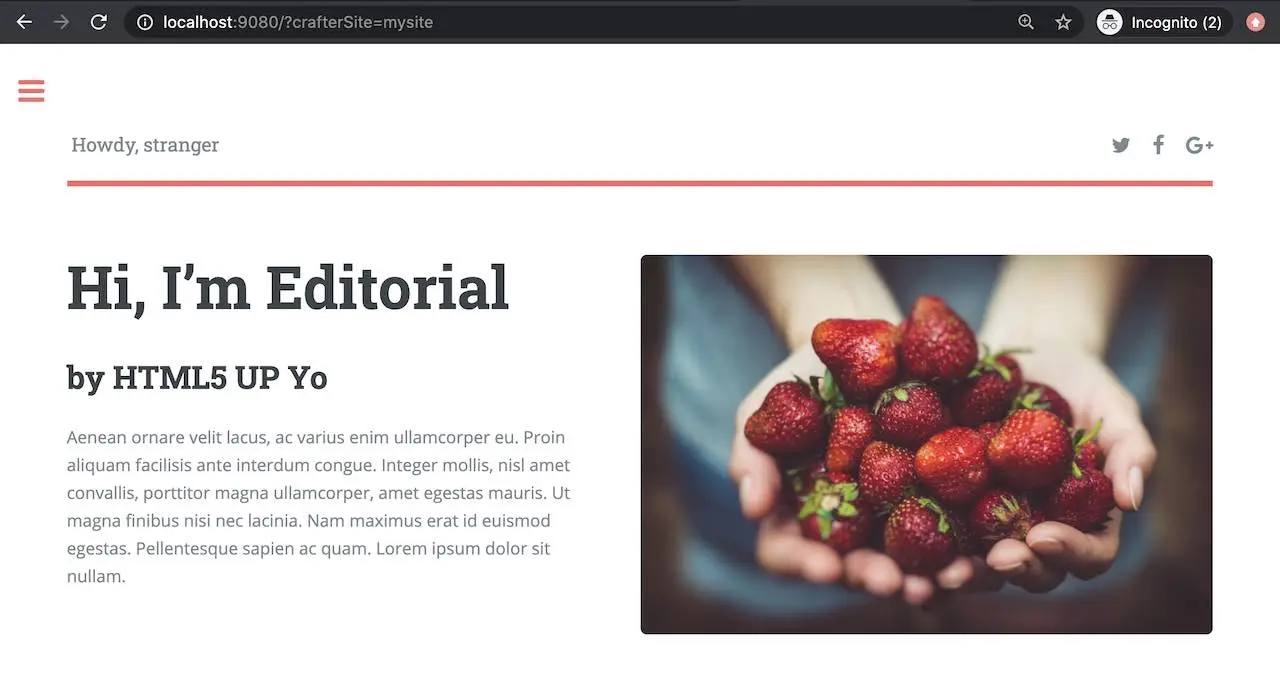
Also, now when making a change in Authoring and publishing it, the change will be reflected in Delivery after a minute.
Setup Studio Clustering with Kubernetes Deployment 
CrafterCMS has an example Kubernetes deployment for a Studio cluster with 2 nodes, which you can get from https://github.com/craftercms/kubernetes-deployments/tree/master/authoring/cluster. This guide covers how to install this example in a Kubernetes cluster.
Important
This guide assumes you have a working understanding of Kubernetes
Requirements
You will need an AWS EKS cluster, with the AWS Load Balancer Controller installed (https://docs.aws.amazon.com/eks/latest/userguide/aws-load-balancer-controller.html), in order to use the cluster example as-is.
If you can’t use an EKS cluster, your Kubernetes infrastructure needs to provide Load Balancers or some other kind of Ingress that is able to handle an active-passive deployment, where the active pod that should receive all traffic returns HTTP 200 on its healthcheck, while the passive pods that are on standby return HTTP 202. The Load Balancer should be able to also seamlessly switch between pods when an active becomes passive (200 -> 202) and a passive becomes active (202 -> 200).
Each Authoring cluster node is a StatefulSet Pod in Kubernetes, and requires at least 4 CPUs and 16 GB of space, to avoid performance issues and out of memory errors. So we recommend having Kubernetes nodes of a similar size to the Pod requirements, in different availability zones, so one Pod runs per availability zone.
If you’re using bigger nodes that are capable of running multiple Pods, make sure that the Authoring Pods are spread evenly through availability zones by specifying Pod Affinity/Anti-Affinity (you will need to modify the example configuration): https://kubernetes.io/docs/concepts/scheduling-eviction/assign-pod-node/#affinity-and-anti-affinity
Remember to have the following ports open:
8080for http
3306for the DB
5701for hazelcast
Setup Kubernetes Secrets
The repository https://github.com/craftercms/kubernetes-deployments/ has a folder set aside for placing required Kubernetes Secrets: kubernetes-deployments/authoring/cluster/resources/secrets
This is where we will place the enterprise license to be used by the images in the deployment. Remember to name your license file crafter.lic
Also, you will need an SSL certificate and private key valid for the Authoring Pods cluster addresses. Each Pod’s address is specified in the CLUSTER_NODE_ADDRESS environment variable in authoring.yaml. In the example, this
value is $(POD_NAME).authoring-svc-headless.craftercms, which is a standard FQDN for a Kubernetes StatefulSet Pod: pod-hostname.headless-service-name.namespace. For more information on Kubernetes DNS, see
https://kubernetes.io/docs/concepts/services-networking/dns-pod-service/.
Warning
Our DB cluster limits the DB node addresses to be no longer than 60 characters, so even though $(POD_NAME).authoring-svc-headless.craftercms.svc.cluster.local is another cluster node address alternative,
it can’t be used.
In order to generate a valid self-signed SSL certificate, you can do the following:
Go into the
kubernetes-deployments/authoring/cluster/resources/secrets/git-https-serverfolder.Run
openssl req -x509 -nodes -days 365 -newkey rsa:2048 -keyout server.key -out server.crtand follow the prompts. It’s up to you what to enter in each field, EXCEPT for the Common Name (CN). This should match the Pods’ base domain name. If following the example, the CN value should be*.authoring-svc-headless.craftercms.
Start the Cluster
Go to kubernetes-deployments/authoring/cluster, then run kubectl apply -k .
This should deploy all necessary resources in Kubernetes. You can monitor the status of the cluster nodes by running kubectl get -n craftercms pods.
Each Pod has 4 containers, and initially only some of those containers will appear as ready:
➜  ~ kubectl get -n craftercms pods
NAME          READY   STATUS    RESTARTS   AGE
authoring-0   1/4     Running   0          21s
authoring-1   1/4     Running   0          21s
When all containers show as ready (both Pods show `READY 4/4), then the cluster is fully initialized:
➜  ~ kubectl get -n craftercms pods
NAME          READY   STATUS    RESTARTS   AGE
authoring-0   4/4     Running   0          8m43s
authoring-1   4/4     Running   0          8m43s
Another way to monitor the Pods is by tailing the Tomcat container log with the kubectl logs -n craftercms -f tomcat authoring-0 command and look for the Server startup in [XXXXX] milliseconds message:
[INFO] 2022-10-17T19:59:31,135 [main] [cluster.StudioPrimaryReplicaUtils] | This server is a replica node in a cluster, it will not perform any write                                                                                                                                                                                                                            │
17-Oct-2022 19:59:31.152 INFO [main] org.apache.catalina.startup.HostConfig.deployWAR Deployment of web application archive [/usr/local/tomcat/webapps/studio.war] has finished in [139,582] ms                                                                                                                                                                                  │
17-Oct-2022 19:59:31.157 INFO [main] org.apache.coyote.AbstractProtocol.start Starting ProtocolHandler ["http-nio-8080"]                                                                                                                                                                                                                                                         │
17-Oct-2022 19:59:31.170 INFO [main] org.apache.catalina.startup.Catalina.start Server startup in [168732] milliseconds
Access Studio
You can easily access Studio through the Authoring load balancer. To get the load balancer address, run kubectl get -n craftercms ingress. The load balancer address is the one in the ADDRESS column of the authoring-ingress.
➜  ~ kubectl get -n craftercms ingress
NAME                          CLASS   HOSTS   ADDRESS                                                                            PORTS   AGE
authoring-git-https-ingress   alb     *       internal-k8s-crafterc-authorin-8830e79fae-1816184747.us-east-1.elb.amazonaws.com   80      24m
authoring-ingress             alb     *       k8s-crafterc-authorin-2f4ed3b88b-532889167.us-east-1.elb.amazonaws.com             80      24m
Setup Delivery (optional)
You can use the Delivery Simple example under https://github.com/craftercms/kubernetes-deployments/tree/master/delivery/simple with this Authoring cluster example:
The Authoring Cluster example creates an internal load balancer that can be used by the Delivery Deployer to pull the published content from Authoring. The load balancer will need to have a valid domain name and SSL certificate. Follow the next steps to setup a DNS record and a certificate for the load balancer in AWS:
Create a Route 53 CNAME record for the domain name. The record needs to be in a Private Hosted Zone (https://docs.aws.amazon.com/Route53/latest/DeveloperGuide/hosted-zones-private.html), since the load balancer is internal, and the zone needs to be associated to the VPC of the EKS cluster where you deployed the Authoring Cluster example. If the hosted zone is in a different account than where the VPC resides, see this guide: https://aws.amazon.com/premiumsupport/knowledge-center/route53-private-hosted-zone/.
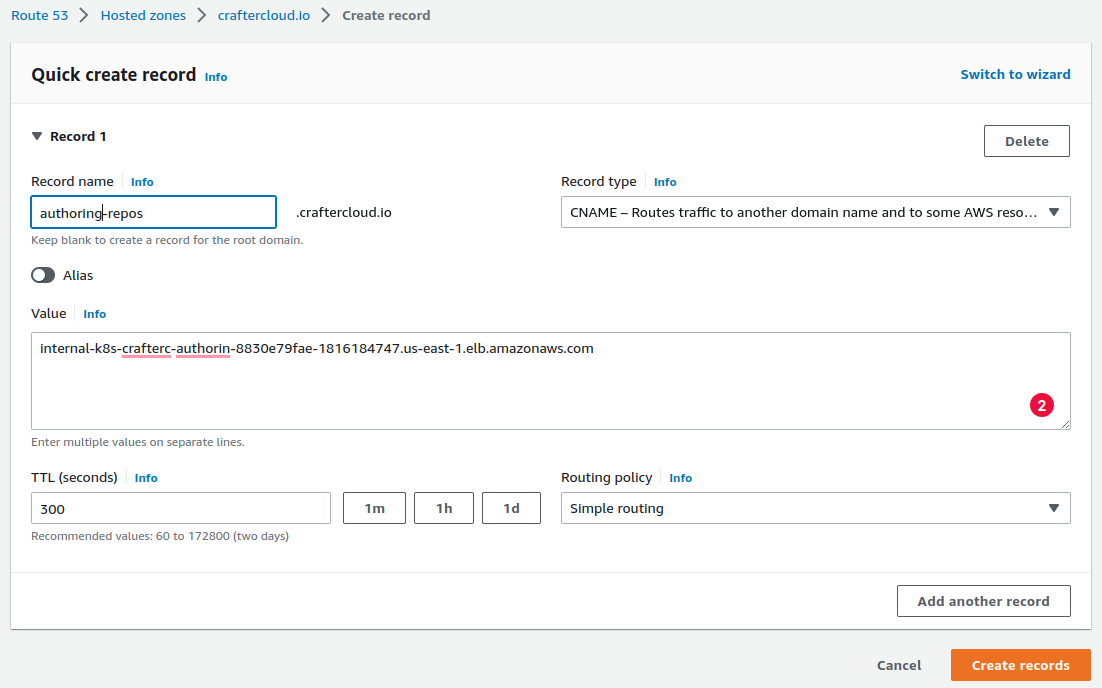
Create a certificate in the AWS Certificate Manager. Enter the domain name used in the previous step and make sure you select DNS validation as the validation method.
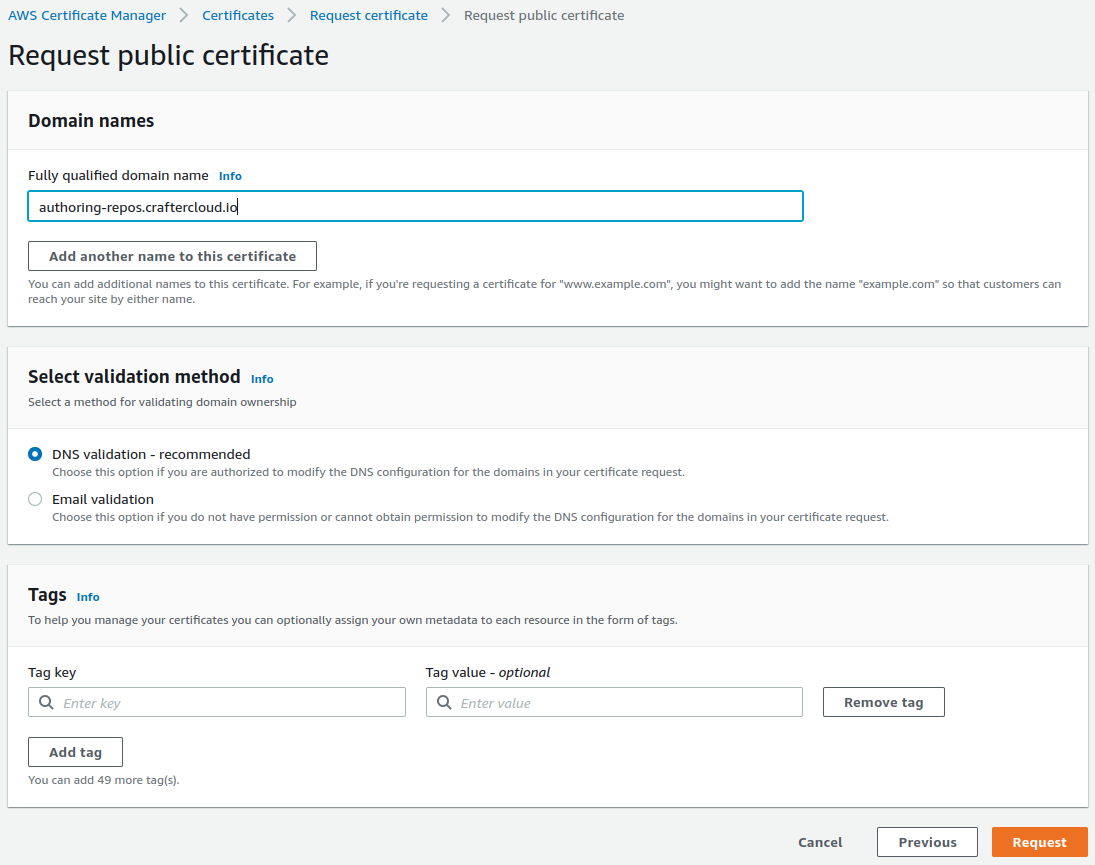
Click on the Certificate ID to open the details of the certificate. On the Domains section, you will see a CNAME name and CNAME value. You will need to copy those and create a Route 53 record in the Public Hosted Zone (not the Private Hosted Zone mentioned previously) of the domain so that the certificate is validated.

In the
kubernetes-deployments/authoring/cluster/authoring-deployment.yamlfile, uncomment the commented lines under theauthoring-git-https-ingressconfiguration, and fill the value ofalb.ingress.kubernetes.io/certificate-arnwith the ARN of the certificate just created. After that, runkubectl apply -k .in the folder to apply the changes.
# alb.ingress.kubernetes.io/listen-ports: '[{"HTTP": 80}, {"HTTPS":443}]'
# alb.ingress.kubernetes.io/ssl-redirect: '443'
# alb.ingress.kubernetes.io/certificate-arn: ''
Create a project in Authoring and make sure it’s fully published
Run
kubectl apply -k .inkubernetes-deployments/delivery/simple. Monitor the Pods coming up withkubectl get -n craftercms pods. There should only be one Delivery Pod.After the Delivery Pod has started, run
kubectl exec -n craftercms -it delivery-0 -c deployer -- gosu crafter bashto open a Bash shell to the Deployer container.Run
./bin/init-site.sh -u crafter -p crafter editorial https://<domain-name>/repos/sites/<site-name>/publishedto create a Deployer target that will pull the published content for the recently created project. Before executing the command, make sure to replace<domain-name>with the internal LB domain name and<site-name>with the name of the project.Note
Remember that when using private key SSH authentication, the private key path must be set explicitly using the
-koption. Here’s an example:init-site -k ~/.ssh/jdoe_key myeditorial ssh://myserver/opt/crater/sites/myeditorial
Get the Delivery LB address with
kubectl get -n craftercms ingressand access the project by enteringhttp://<delivery-lb-address>?crafterSite=<site-name>(replacing the<>placeholders of course).
Updating and Shutting Down the Cluster
The Authoring Cluster’s StatefulSet is configured with .spec.updateStrategy OnDelete. This means that whenever the Kubernetes configuration for the StatefulSet is updated, you will need to manually delete the Pods to create new Pods in order
for the modifications to be reflected. We prefer this updateStrategy instead of RollingUpdate so administrators can restart the cluster replicas first (by killing their Pods), wait for them to come up, and finally restart the primary, whenever a small
update to the configuration needs to be applied (like changing a small flag in one of the Crafter configuration files under /opt/crafter/bin/apache-tomcat/shared/classes).
For bigger updates, like a version upgrade or any other update that could cause modifications to the project content or the database, progressively scaling down the StatefulSet is recommended, by running
kubectl scale statefulsets authoring --replicas=<current-replicas-minus-1>, waiting until each Pod has been fully terminated before scaling down again, until all Pods are down. Then you can scale the StatefulSet up to the original number of Pods (so that they can all synchronized on startup).
If you just want to shutdown the entire cluster, scale down the StatefulSet as described above.
AWS AMI
Follow the AWS AMI to setup CrafterCMS authoring and delivery using Crafter’s AWS AMIs.
CrafterCMS provides ready-to-run AMIs for Authoring and Delivery available from the AWS marketplace here.
This guide will walk you through the process of launching these instances from the AWS Marketplace.
Setup CrafterCMS Authoring Using Crafter’s AWS AMI
This section details how to setup CrafterCMS authoring using Crafter’s AWS AMI.
Step 1: Launch an AWS EC2 instance using a CrafterCMS Authoring AMI
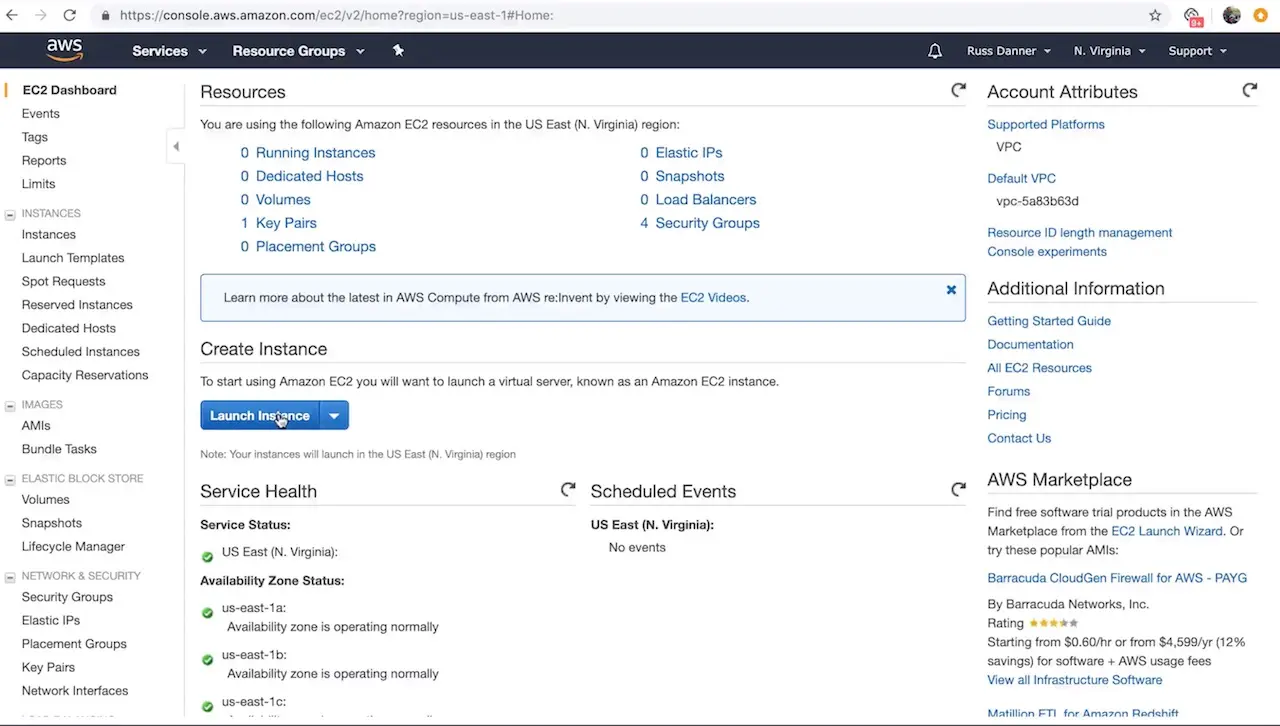
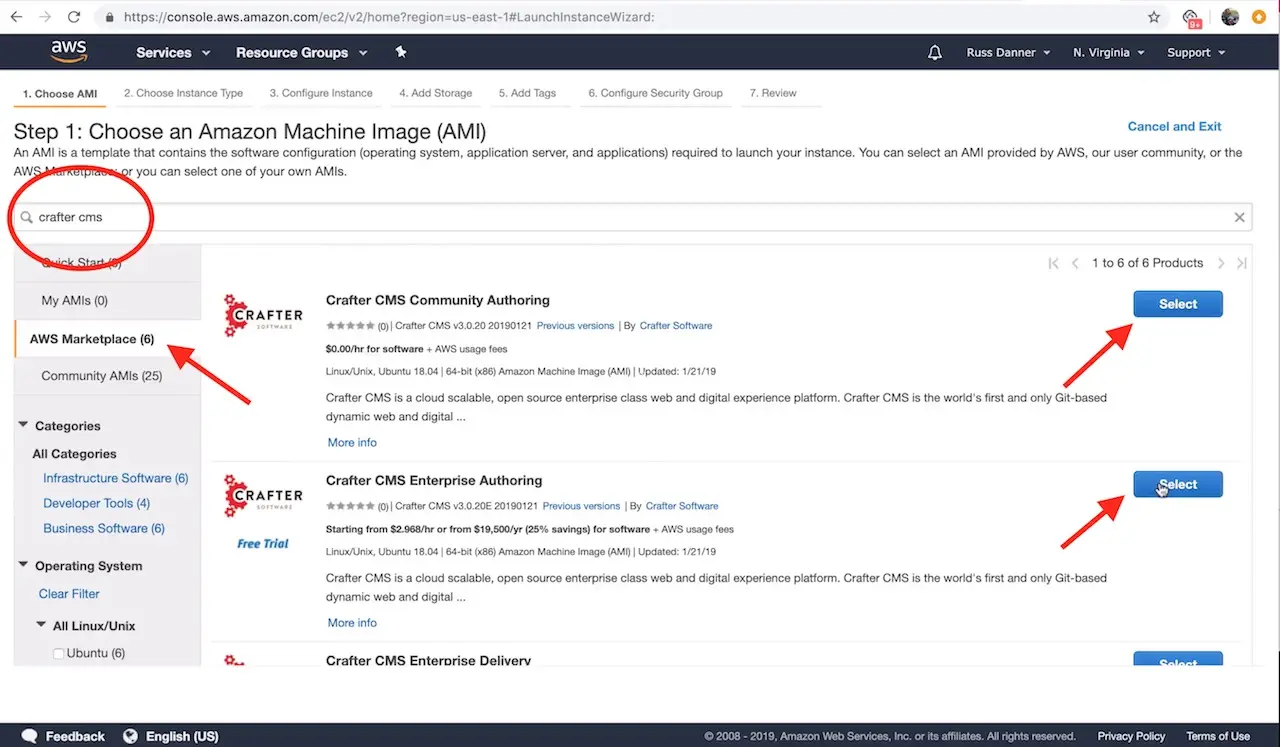
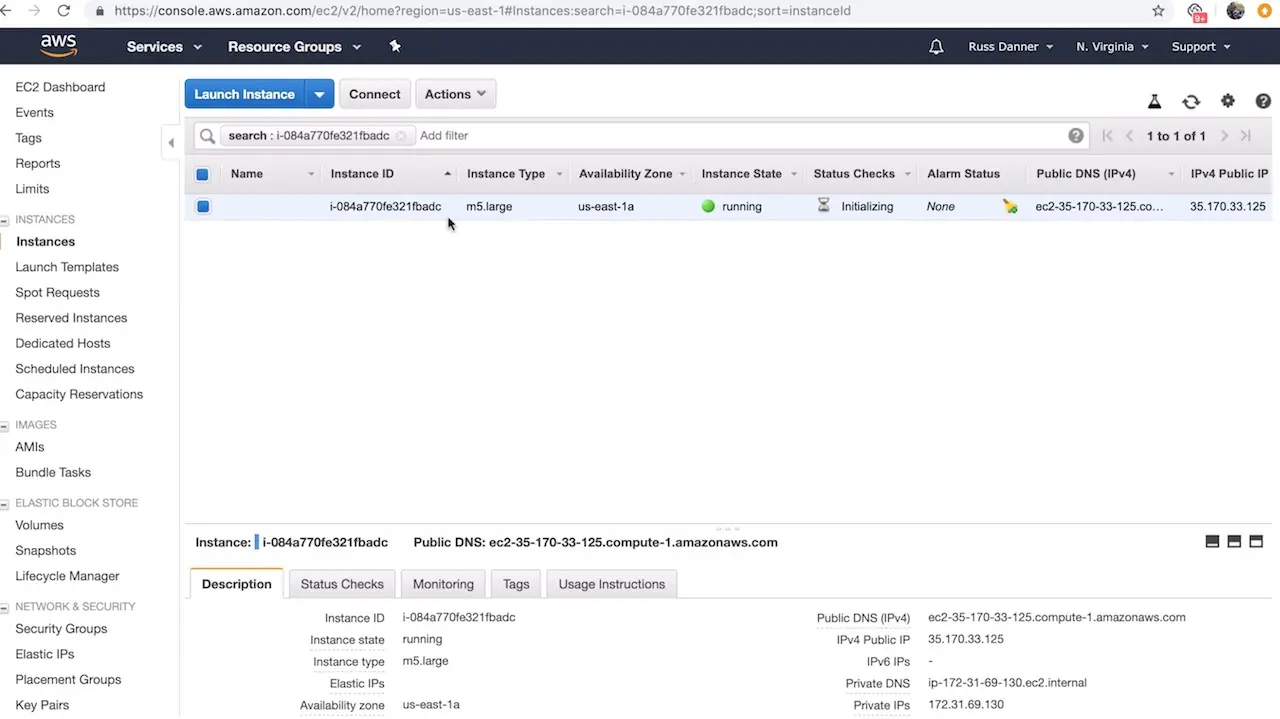
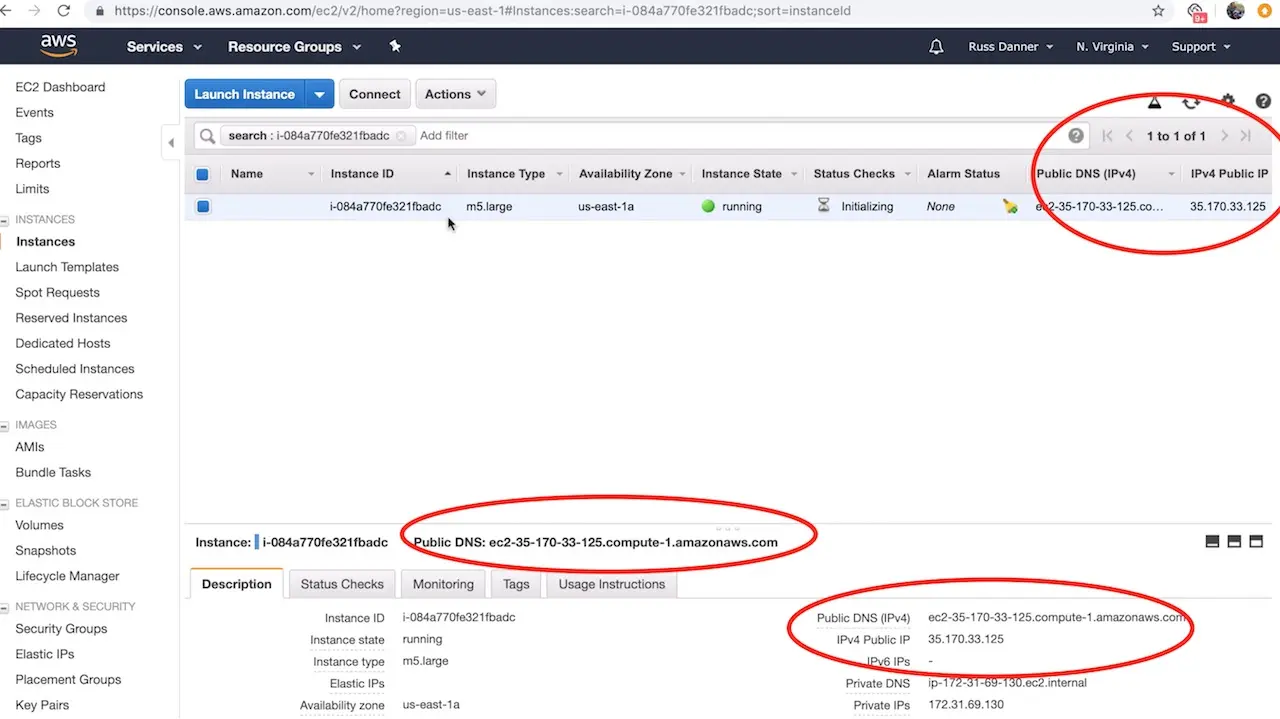
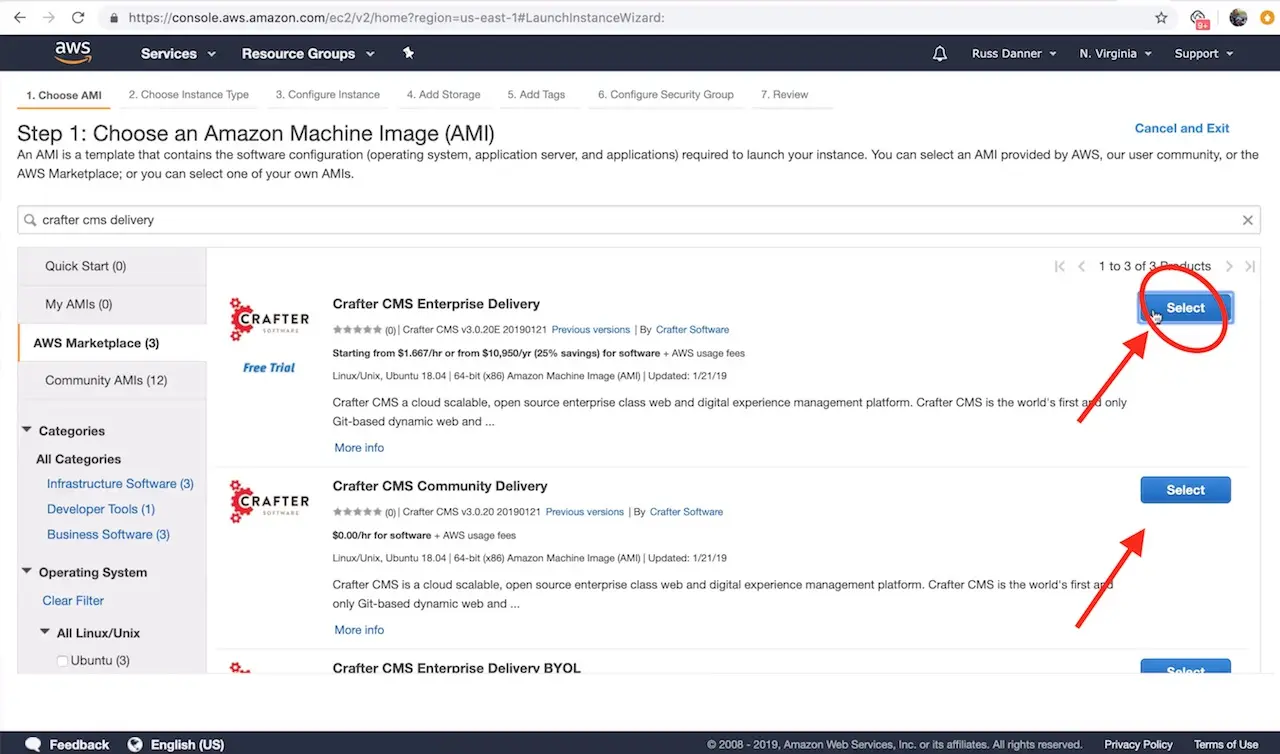
Crafter provides a prebuilt AMI(s) for Crafter Studio, the authoring component of CrafterCMS. In this step we’ll walk you through the initial launch of your instance. To get started, go to your EC2 dashboard and click Launch Instance AWS will prompt you to choose your AMI type/image.
You can find CrafterCMS Authoring by entering the keywords CrafterCMS Authoring in the search box as shown below. You will find a number of options in the search results.
CrafterCMS Community Authoring is our open source version
CrafterCMS Enterprise Authoring is our supported enterprise version
Click Select on the AMI type you want to use and then follow the launch instance/configuration wizard to determine the sizing and networking details for your instance. Please note, we recommend compute optimized / “C-class” machines for best results with typical production use.
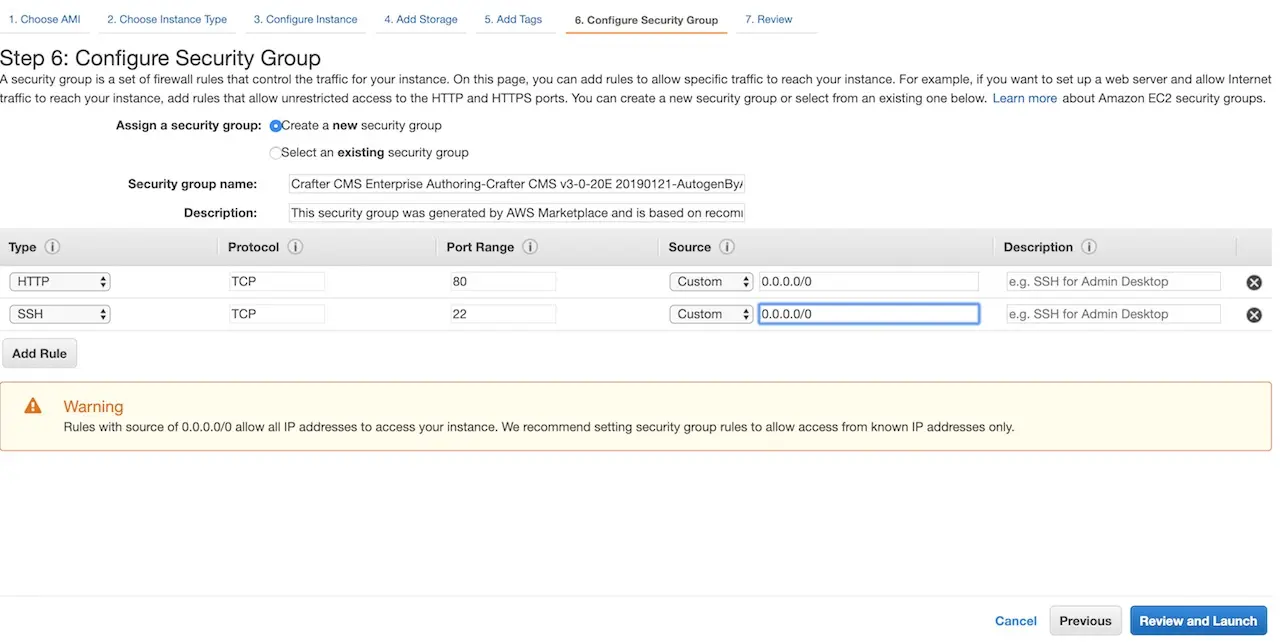
The launch instance wizard gives you the ability to tweak your instance’s configuration details. In the next step we will connect to the machine with SSH via a terminal/console in order to acquire the administrators initial login password for the Crafter Studio web application. You will need to add SSH to your inbound security settings for the instance to complete the next step and acquire the password. To do so, Scroll down to the Network settings section.
To add the rule for SSH, click the Inbound traffic tab and then Add Rule to configure SSH. You can restrict the inbound traffic for SSH in the dropdown box. To allow SSH from anywhere you can enter a CIDR of 0.0.0.0/0. Use the ports and IP masks/policies that align with your needs.
Once you have added SSH access and made any other tweaks you feel are necessary to your instance’s configuration, Look through the Summary panel on the right and then click the Launch Instance button.
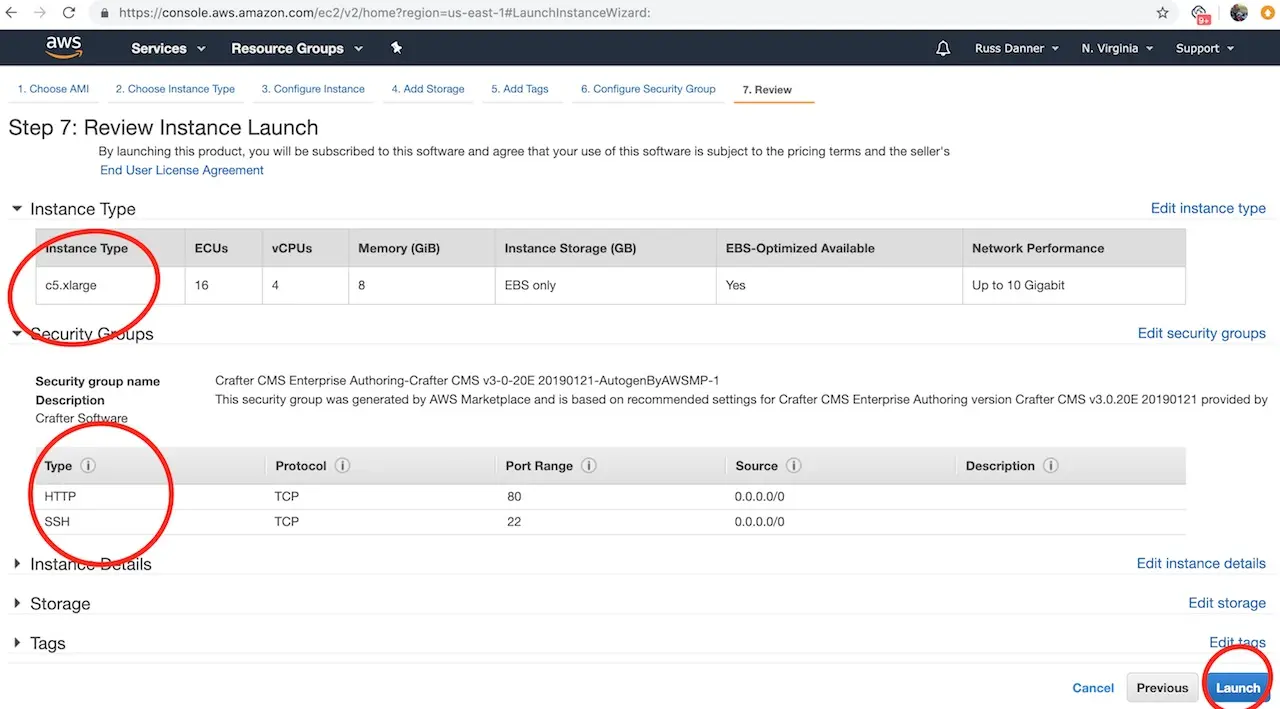
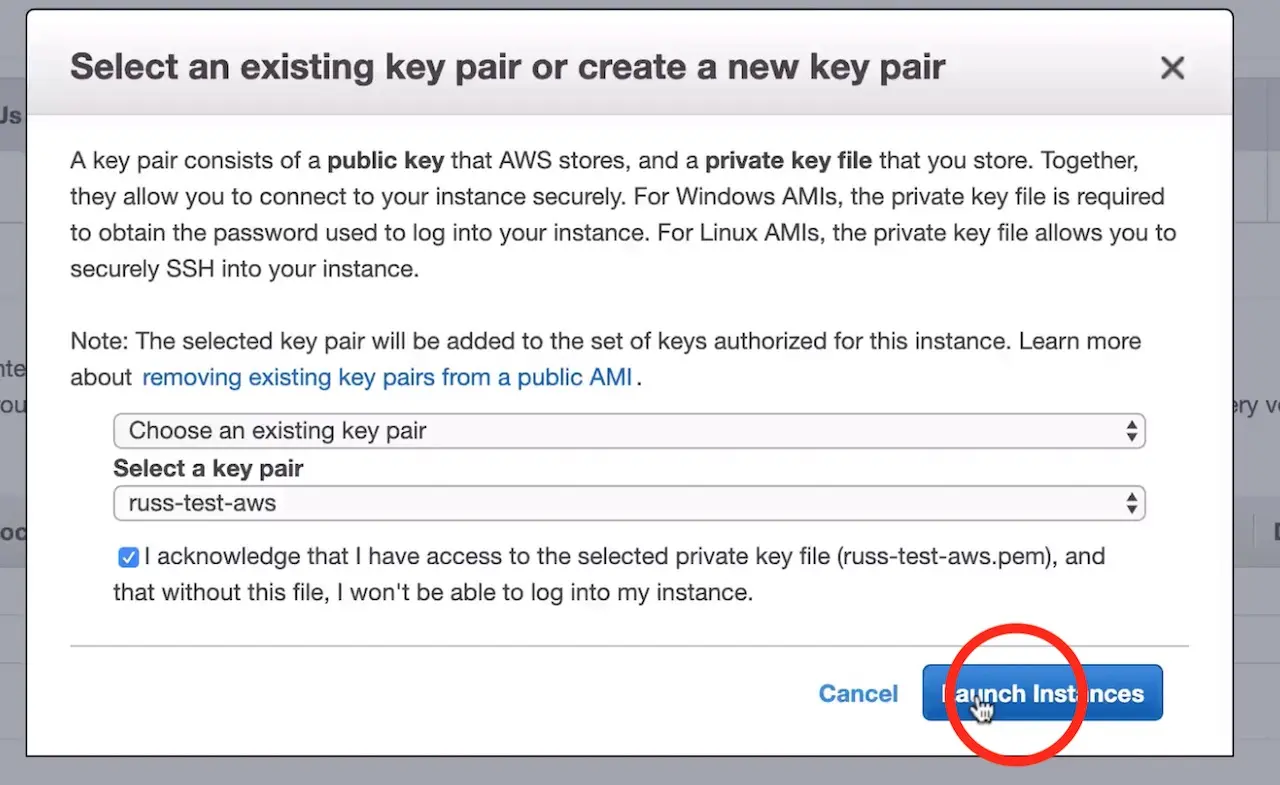
After clicking Launch, AWS will request that you select a public key for administrative console access to the machine. You will need access to this key in the next step in order to retrieve the administrator’s password for Crafter Studio. Create or choose an existing key and click Launch Instances
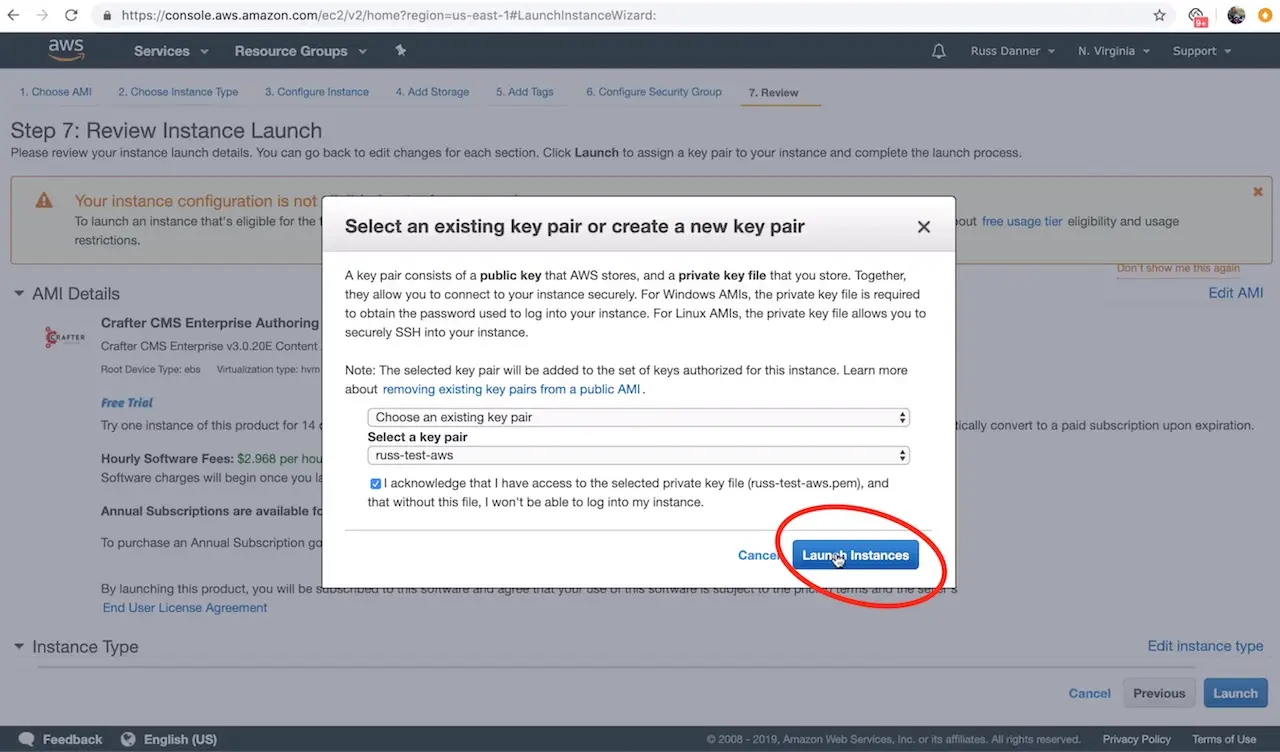
Once you click Launch instances AWS will start and initialize the instance. This may take a minute or two.
Step 2: Access the Crafter Studio login screen
In this step we want to prove that the application is up and running now that our instance has started and initialized fully. To do this, we’re simply going to check that the application login screen shows up when we access it via a web browser.
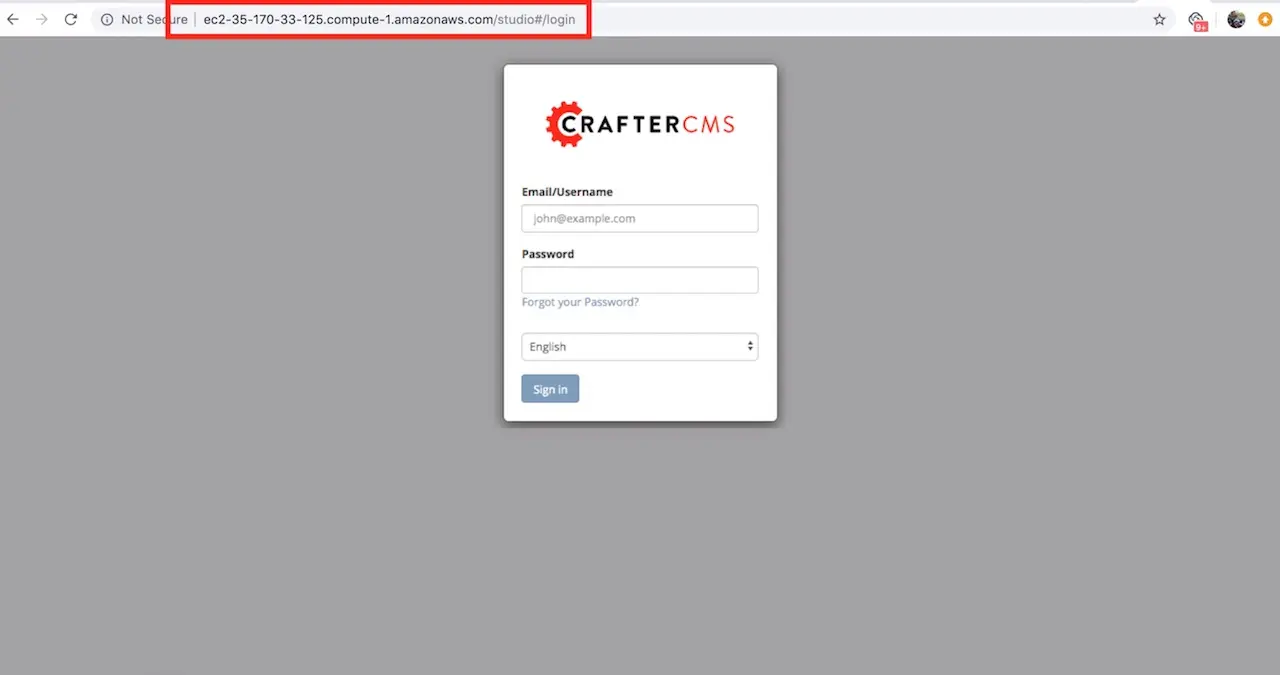
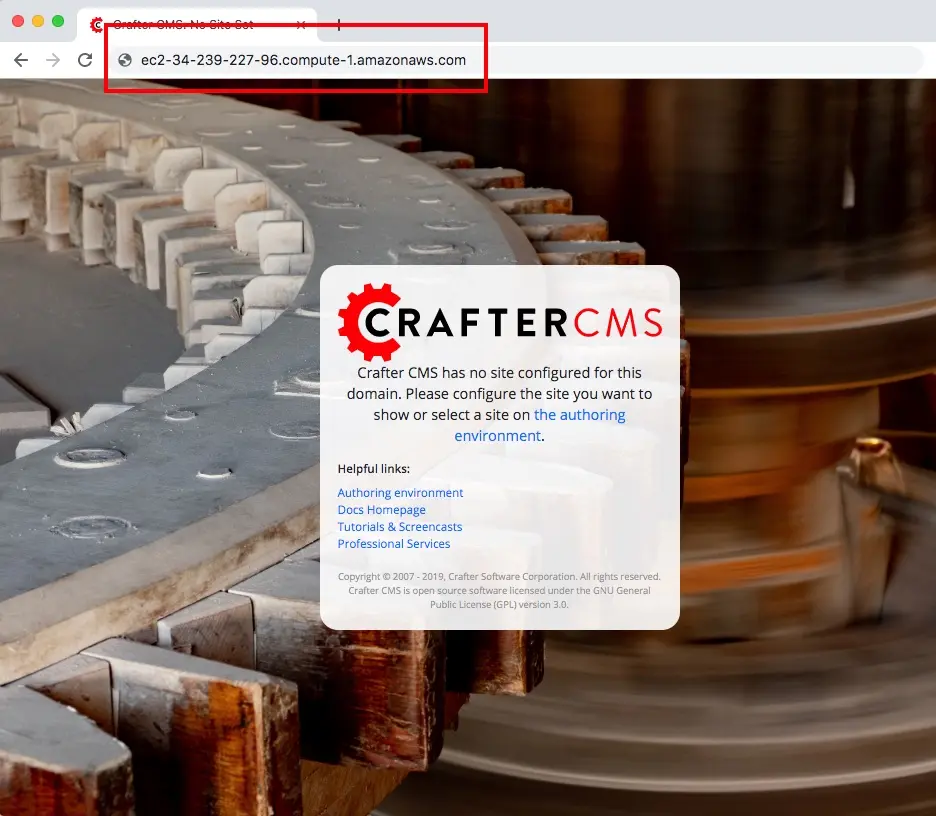
To access the login screen open a web browser and navigate to http://DNS_NAME_OR_IP_ADDRESS/studio.
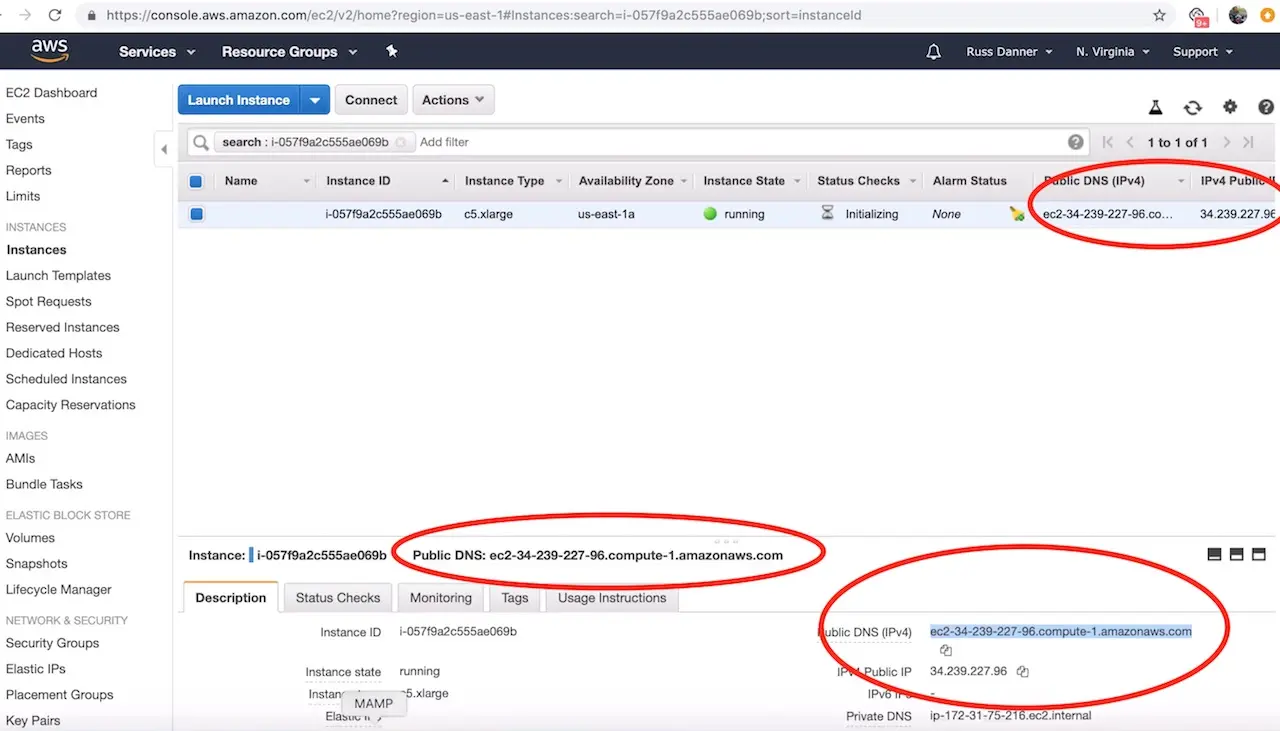
You can find the IP address and/or DNS name in several locations on your AWS administration console shown here:
Step 3: Acquire the Crafter Studio admin user’s password
CrafterCMS randomly generates the admin user’s password for Crafter Studio for each instance you launch. The password can be reset to anything you like after your initial login using the initial password. In this step we’re going to log into the machine and acquire the password.
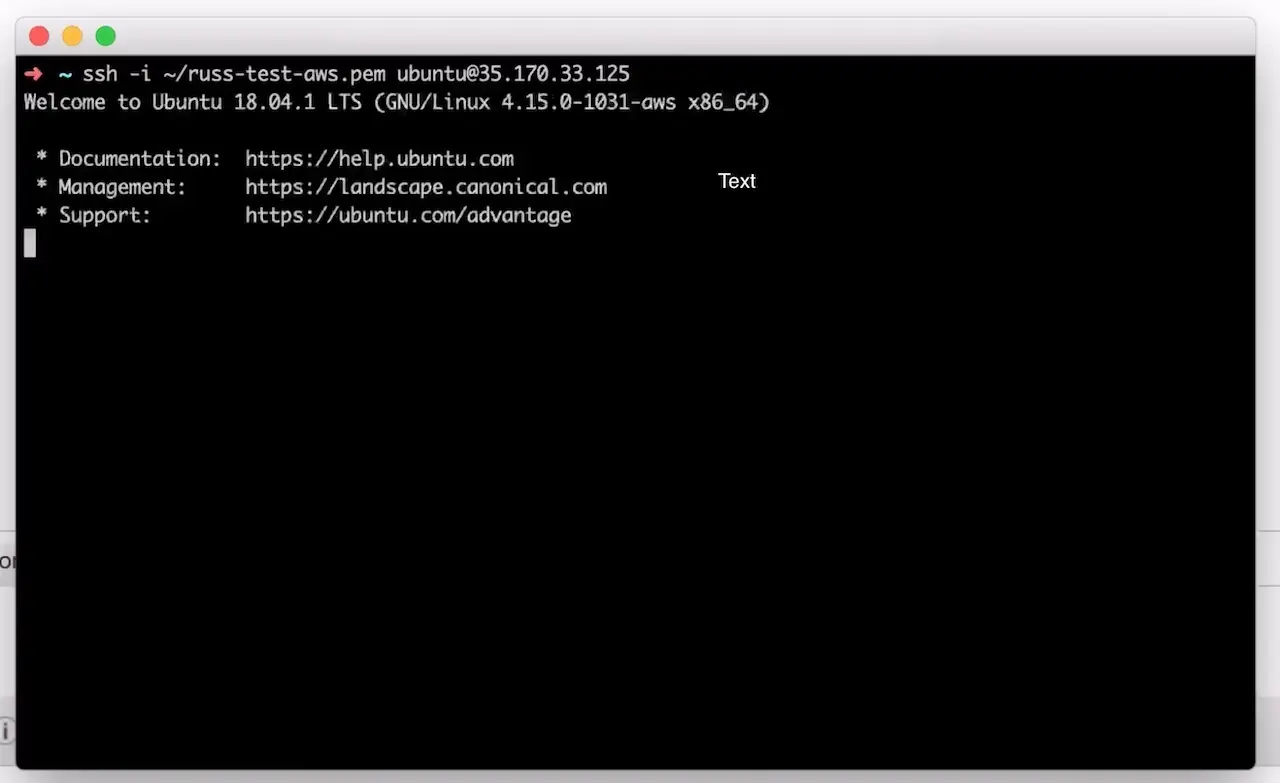
To acquire the initial password you must log in to the instance via SSH. Open a terminal and use the following command to sign in to the instance:
1ssh -i ./PATH/TO/PEM/keys.pem ubuntu@IP-ADDRESS
If SSH times out :
You will need to double check your security policies for the instance to make sure you are using the correct SSH port and that the firewall will accept your traffic from your network. To check these configurations, scroll right and click the Security Settings column for your instance. Follow the steps outlined in step 1 to check or configure your security policies. Once the rule has been added/updated or you have specified the non-standard port (22) in your SSH command (add -p PORT_NUMBER to your command) you will be able to log in.
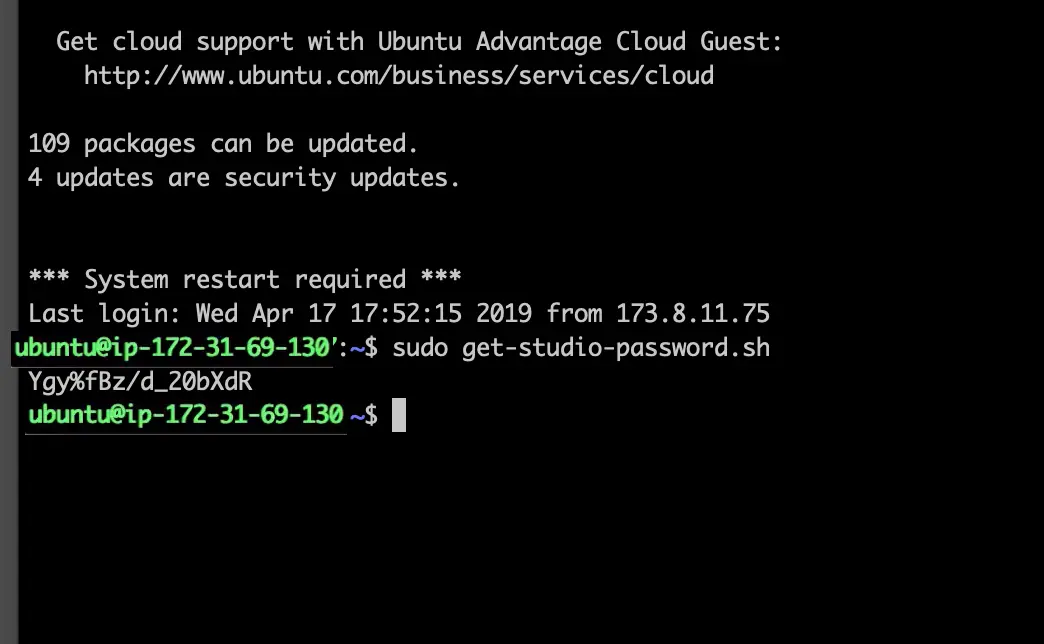
To get the initial administrative password:
Once logged in you will execute a simple script to acquire the password. To do so, from the console prompt of your instance you can execute the following:
1sudo get-studio-password.sh
The password will print out in the console. Copy this password into your clipboard and proceed to the next step.
Step 4: Sign into Crafter Studio
Now that we have the randomly generated admin password for Crafter Studio we can sign in to the application.
In your web browser, navigate to http://DNS_NAME/studio and then enter admin as the Email/Username, paste the password you acquired from Step 3 then click “Sign In.”
Step 5: Setup complete
Welcome to Crafter Studio! Your initial installation and setup is complete.
From here you can create sites, administer users/group and manage your admin user’s account settings.
Follow this guide to create your first website or headless CMS project: Your First Project (templated)
Follow this guide to setup a Delivery instance of CrafterCMS on AWS: Setup CrafterCMS Delivery Using Crafter’s AWS AMI
Setup CrafterCMS Delivery Using Crafter’s AWS AMI
This section details how to setup CrafterCMS delivery using Crafter’s AWS AMI.
Step 1: Launch an AWS EC2 instance using a CrafterCMS Delivery AMI
Crafter provides a prebuilt AMI(s) for Crafter Engine, the delivery component of CrafterCMS. In this step we’ll walk you through the initial launch of your instance. To get started, go to your EC2 dashboard and click Launch Instance AWS will prompt you to choose your AMI type/image.

You can find CrafterCMS Delivery by entering the keywords CrafterCMS Delivery in the search box as shown below. You will find the following in the search results.
CrafterCMS Enterprise Delivery - our supported enterprise version
Click Select on the AMI and then follow the launch instance/configuration wizard to determine the sizing and networking details for your instance. Please note, we recommend “C” class machines for best results with typical production use.
The launch instance wizard gives you the ability to tweak your instance’s configuration details. In the next step we will connect to the machine with SSH via a terminal/console inorder to acquire the administrators initial login password for the Crafter Studio web application. You will need to add SSH to your inbound security settings for the instance to complete the next step and acquire the password. To do so, click the Configure Security Group tab.
To add the rule for SSH, click the Inbound traffic tab and then Add Rule to configure SSH. You can restrict the inbound traffic for SSH in the source column. To allow SSH from anywhere you can enter a CIDR of 0.0.0.0/0. Use the ports and IP masks/policies that align with your needs.
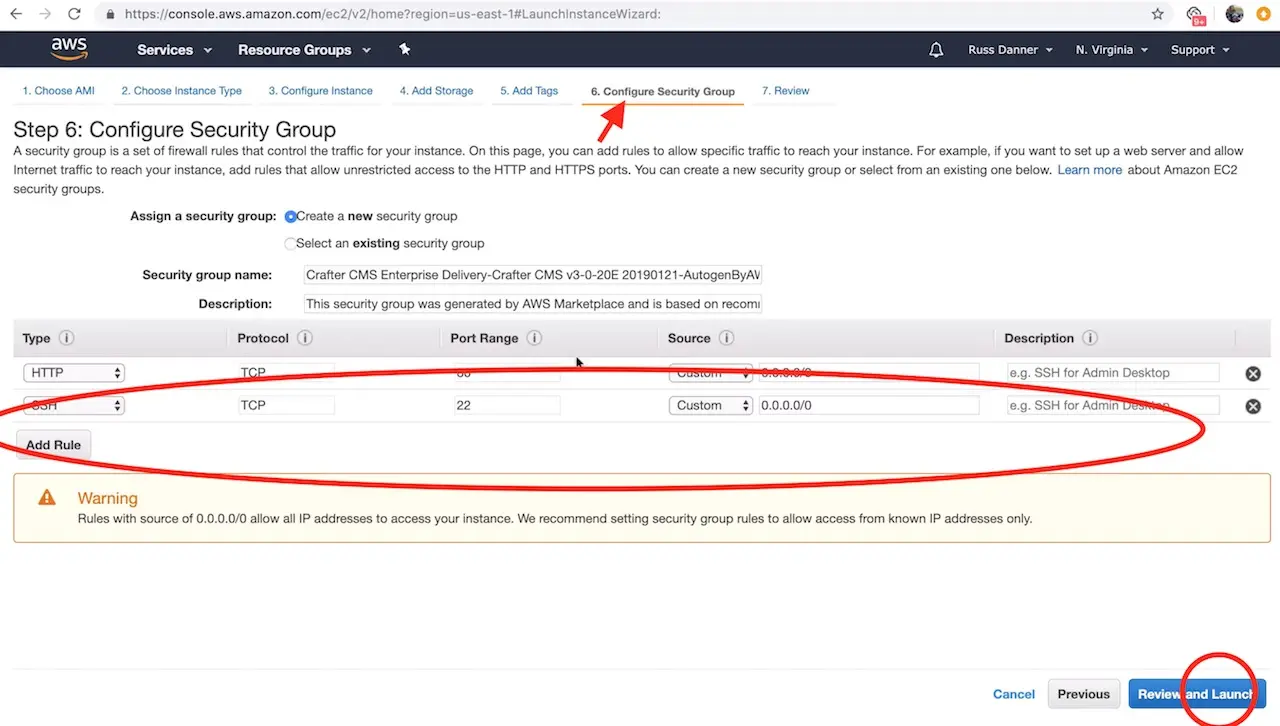
Once you have added SSH access and made any other tweaks you feel are necessary to your instance’s configuration, click the Review tab and then click the Launch button.
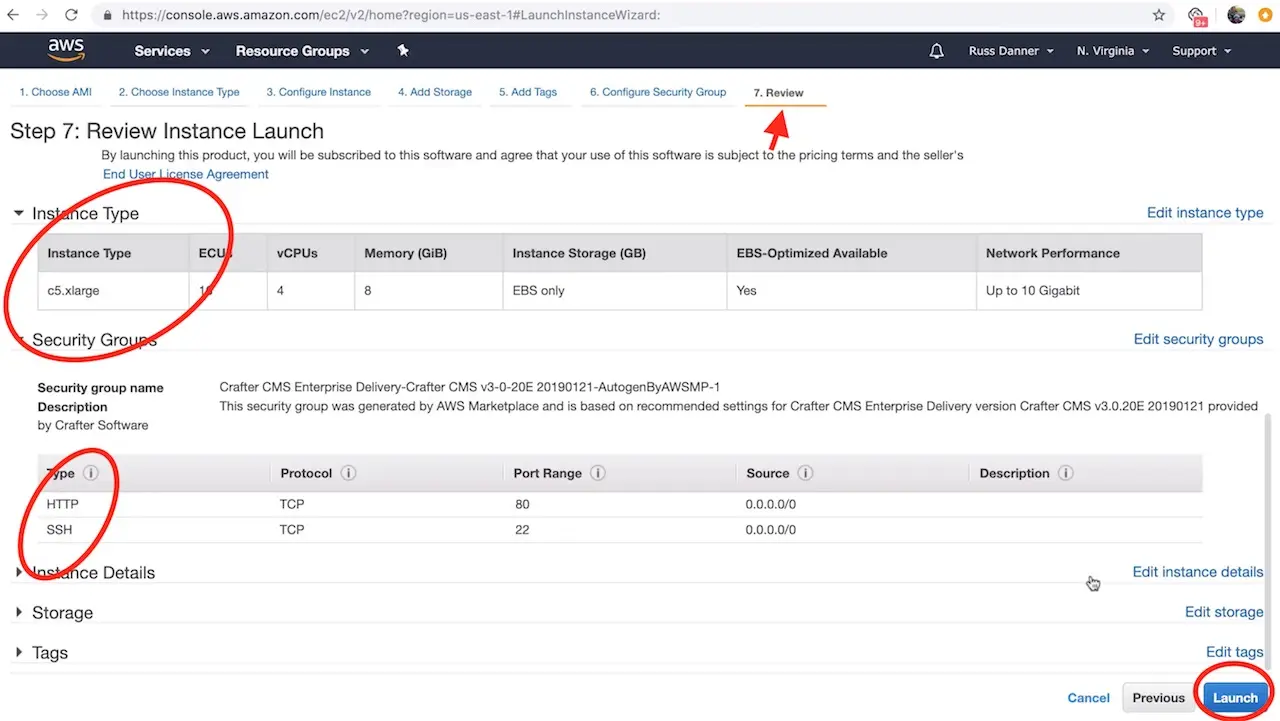
After clicking Launch, AWS will request that you select a public key for administrative console access to the machine. You will need access to this key in the next step in order to retrieve the administrator’s password for Crafter Studio. Create or choose an existing key and click Launch Instances
Once you click Launch instances AWS will start and initialize the instance. This may take a minute or two.

Step 2: Access the Crafter Engine via the Web
In this step we want to prove that the application is up and running now that our instance has started and initialized fully. To do this, we’re simply going to check that the application login screen shows up when we access it via a web browser.
To access the login screen open a web browser and navigate to http://DNS_NAME_OR_IP_ADDRESS.
You can find the IP address and/or DNS name in several locations on your AWS administration console shown here:
Step 3: Configure Crafter Engine to deliver published projects
Crafter Engine is now up and running. However, in order to deliver content, its deployer must be configured to monitor a published repository for one or more projects. A delivery engine is multi-tenant and can deliver many projects. Each project must be configured or “initialized” such that the deployer monitors a Git repository for published updates. CrafterCMS’s delivery tier has a decoupled, shared-nothing architecture that makes it cloud native and elastically scalable. You can read more about this architecture here: General Architecture
In this section we’ll show you how to configure a Crafter Delivery instance to monitor a published Git repository and delivery content for a given project. The simplest topology for this is to directly monitor the published repository of a project on the authoring instance. This is what we will configure. Let’s get started.
Step 3.2: Establish SSH-based communication between the delivery instance and the authoring instance
The delivery instance’s deployer can use any git protocol to communicate with the published repository. SSH is a secure method that is available with no additional set up. We’ll use this approach. SSH requires authentication and the cleanest way to authenticate is via public / private keys. You may use existing key pairs but they must be RSA type keys. For completeness we’ll generate and install keys from scratch.
3.2.1: Create a public / private key pair
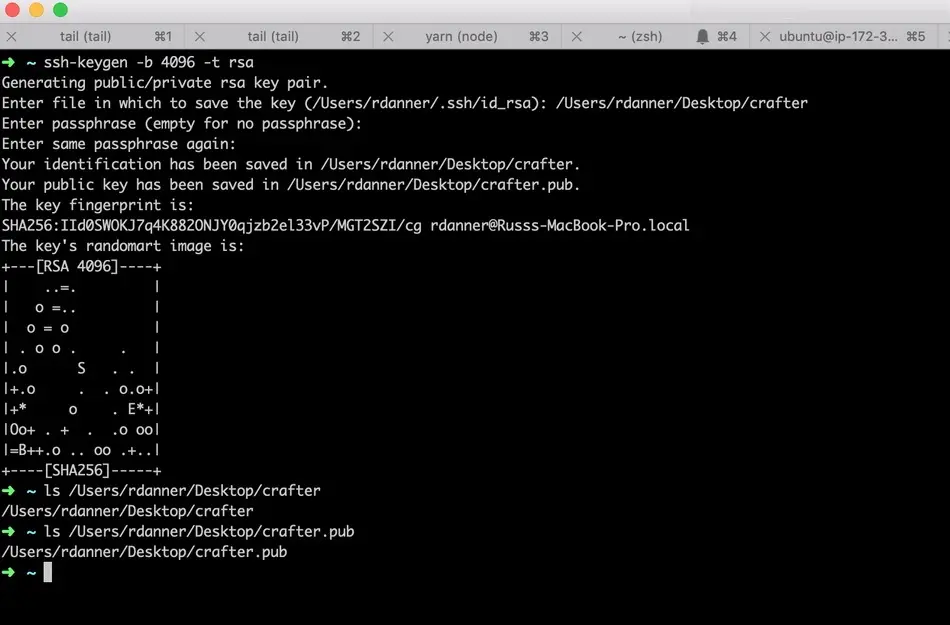
On your local machine, generate a public / private key pair. On a terminal/console execute the following command:
1ssh-keygen -m PEM -b 4096 -t rsa
You will be prompted for the file name and a passphrase. Since Crafter will use this key as part of an automated process, do not enter a passphase (just hit enter when prompted.)
Once the keygen process completes you should find a file at the location you specified. This is your private key. You will find another file at the same location with a .pub extension. This is your public key.
3.2.3: Install the private key on the delivery server(s)
The next step is to upload and install our private key onto the delivery instance.
Upload the private key to the delivery server
You can upload the private key from your local machine to the delivery server by executing a file transfer via the scp command in a terminal window.
The command takes the following form: scp -i [PATH_TO_UBUNTU_USERS_PIVATE_KEY] [PATH_TO_GENERATED_PRIVATE_KEY] ubuntu@[DNS_NAME_OF_DELIVERY_INSTNCE]:~/crafter
Example:
1 scp -i ~/user-test-aws.pem ~/Desktop/crafter ubuntu@ec2-34-293-227-96.compute-1.amazonaws.com:~/crafter
Install the private key on the delivery server
The next step is to log in to the delivery server and install the private key into the crafter user’s account.
To do this, SSH on to the delivery server as the ubuntu user and execute the following commands:
1sudo cp crafter /home/crafter/.ssh/id_rsa
1sudo chown crafter:crafter /home/crafter/.ssh/id_rsa
Step 4: Initialize the project on the delivery server
Now that secure communication is established between the authoring and delivery instances, we can initialize any number of projects to be delivered by the delivery instance. It’s very simple to initialize a project on the delivery instance. To do so:
SSH to the delivery server and execute the following command in the /opt/crafter/bin directory as the crafter user:
1init-site.sh
When the init-site.sh command is executed without any parameters, parameter documentation will be presented.
Note
Remember that when using private key SSH authentication, the private key path must be set explicitly using
the -k option. Here’s an example:
init-site -k ~/.ssh/jdoe_key myeditorial ssh://myserver/opt/crater/sites/myeditorial
We’ll use the following parameters in our example based on our public/private key setup that we did in the previous steps:
1init-site.sh -b live [SITE_ID] ssh://crafter@[DNS_NAME_OF_AUTHORING_SERVER]:/opt/crafter/data/repos/sites/[SITE_ID]/published
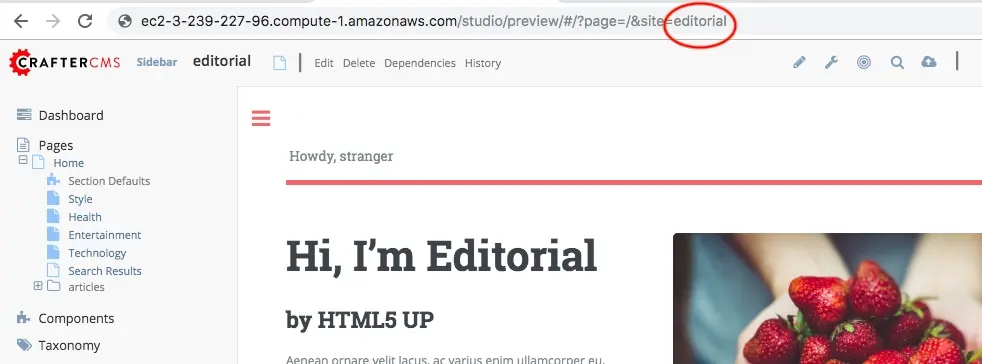
The SITE_ID parameter can be acquired from the authoring server. Log in to Crafter Studio and “Preview” the project you wish to initialize and you will find the SITE_ID in the URL.
Successful execution of this command will produce output similar to the following:
1Creating Deployer Target...
2Target created successfully
Example:
1init-site.sh -b live editorial ssh://crafter@ec2-3-93-34-40.compute-1.amazonaws.com:/opt/crafter/data/repos/sites/editorial/published

You can further verify that the deployment is working by watching the logs. To watch the logs use the following command:
1tail -n 1000 -f /opt/crafter/logs/deployer/crafter-deployer.out
Look for output that is similar to the following:
12019-04-17 21:39:00.001 INFO 4389 --- [pool-5-thread-1] o.c.d.impl.processors.GitPullProcessor : Cloning Git remote repository ssh://crafter@ec2-3-93-34-40.compute-1.amazonaws.com:/opt/crafter/data/repos/sites/editorial/published into /opt/crafter/data/repos/sites/editorial
22019-04-17 21:39:00.806 INFO 4389 --- [pool-5-thread-1] o.c.d.impl.processors.GitPullProcessor : Successfully cloned Git remote repository ssh://crafter@ec2-3-93-34-40.compute-1.amazonaws.com:/opt/crafter/data/repos/sites/editorial/published into /opt/crafter/data/repos/sites/editorial
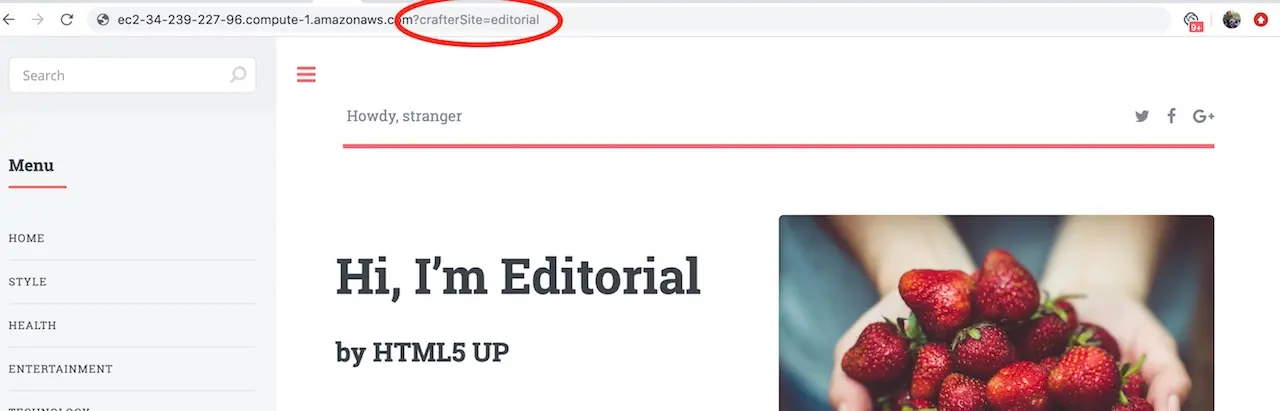
Step 5: View the project on the delivery server from a web browser
Now that project has deployed it can be viewed via web browser. As previously mentioned, Crafter’s delivery tier is multi-tenant. A SITE_ID is used on the URL to indicate which tenant is to be displayed. To preview the project you initialized, open a browser and navigate to the following URL:
http://[DELIVERY_DNS_NAME]?crafterSite=[SITE_ID]
Example:
http://ec2-34-239-227-96.compute-1.amazonaws.com?crafterSite=editorial
Note
The SITE_ID parameter is typically added automatically to all requests for a given project by a webserver “virtual host” configured for each project/tenant that sits in front of Crafter Engine. You can learn more about this here
This configuration and other advanced topology topics such as load balancing are outside the scope of a basic installation.
Step 6: Make an update in authoring and see it published on the delivery server
To further test publishing, log in to Crafter Studio for the given project, make an edit and then approve the edit for publish. In a few moments you will see your updates in the web browser on the delivery server. You can find step by step instructions on editing and publishing here: Your First Project (templated)

Step 7: Setup complete!
Your setup and configuration of your CrafterCMS Delivery on AWS is now complete!
Binary Bundles
CrafterCMS provides pre-built binary bundles for Linux, MacOS x86 and ARM. Follow the instructions below to install CrafterCMS using pe-built binary bundles.
Download the Bundle
Download CrafterCMS binary bundle from https://craftercms.org/downloads
Select your operating system then click on the Download link next to Authoring or Delivery depending on your needs. For the authoring, the file downloaded will be crafter-cms-authoring-*.tar.gz and crafter-cms-delivery*.tar.gz for delivery. The .tar.gz file will install a fully functional authoring/delivery instance. Out of the box, the authoring instance uses a local directory as the repository and an embedded database, which allows a quick and easy set up for local development.
Extract the CrafterCMS binaries
Extract the contents in the desired directory.
tar -zxvf crafter-cms-authoring*.tar.gz -C /tmp/target-unzip-directory/
The extracted files should look like this:
{target-unzip-directory}
|--crafter/
   |--LICENSE
   |--README.txt
   |--bin/
You can then do the same for the delivery bundle.
Start CrafterCMS
To start CrafterCMS, execute the startup script:
{CRAFTER_HOME}/bin/startup.sh
Note
It takes a few seconds for CrafterCMS to startup and takes longer to startup the very first time you startup CrafterCMS.
Stop CrafterCMS
To stop CrafterCMS, execute the shutdown script:
{CRAFTER_HOME}/bin/shutdown.sh
Note
It takes a few seconds for CrafterCMS to stop.
Login to Crafter Studio
To access Crafter Studio, In your browser, go to
http://SERVER:PORT/studio
Note
For local deployments, the URL is http://localhost:8000/studio
Login with the following:
username: admin
password: admin
After logging in, you should be redirected to the Projects screen, and you’re now ready to create your first experience!
Build from Source
CrafterCMS is open source and you can always build and run it from source code here