
Project (Site) Administration
This section details activities related to project administration in CrafterCMS. The content is oriented towards CrafterCMS administration primarily through Crafter Studio.
Most configuration files can be accessed through Crafter Studio through the Sidebar -> ![]() -> Configuration. but can also be modified by accessing the configuration files directly. Please note that it is recommended that changes to configuration files be done through the Crafter Studio UI.
-> Configuration. but can also be modified by accessing the configuration files directly. Please note that it is recommended that changes to configuration files be done through the Crafter Studio UI.
What is a Project/Site?
A project or a site is a collection of related pages/components and assets.
For the project repository, the project structure looks like this:
{REPOSITORY_ROOT}/sites/PROJECTNAME/sandbox/
    config
        engine
        studio
            administration
            content-types
            data-sources
            dependency
            workflow
    scripts
        classes
        components
        pages
        rest
    site
        components
        taxonomy
        website
    static-assets
        css
        fonts
        images
        js
    templates
        system
        web
Credentials may be required in some project configurations. For more information on how to manage/encode your secrets such as AWS credentials, please see Managing Secrets.
Authoring
In this section we discuss various aspects of managing content, UI, security, etc. in an authoring environment.
Configuration
To access the configuration settings in Crafter Studio, click on ![]() in the Sidebar,
in the Sidebar,
then click on Configuration. After clicking on Configuration, you will see a list where you can select which configuration file you’d like to view/modify. Below is one of the configuration files available to be viewed/modified.
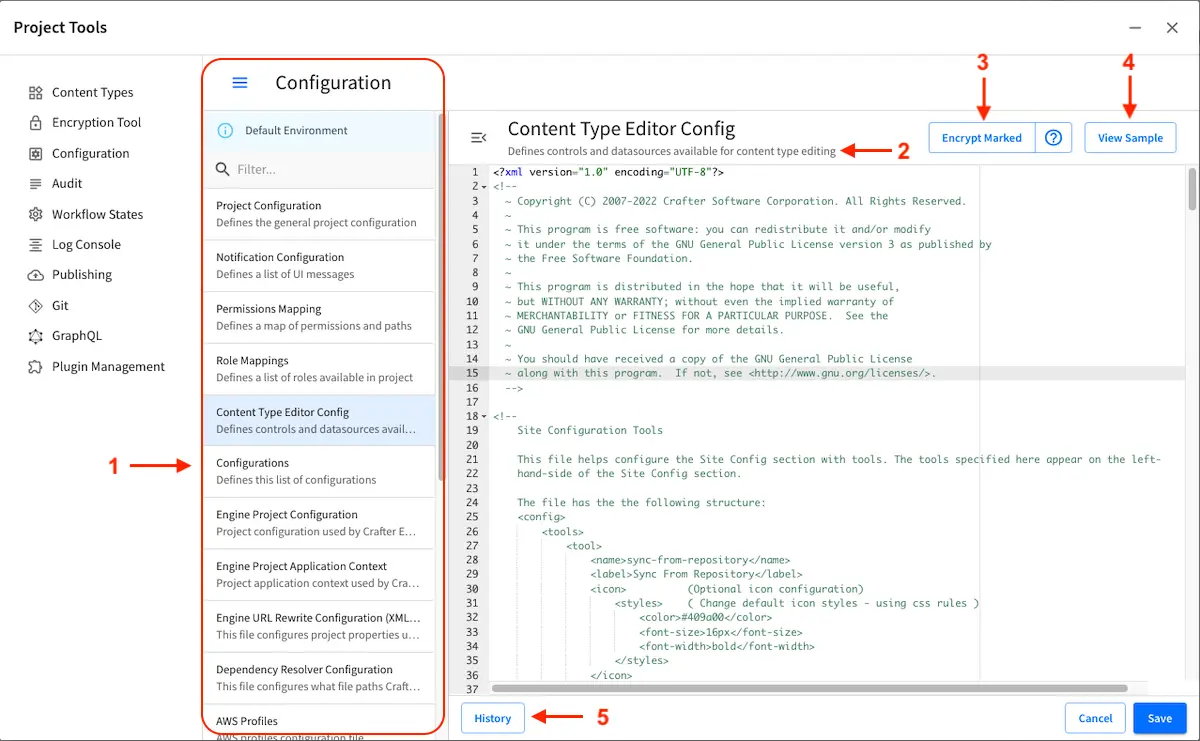
The following items are noted in the image above:
This is the list that contains all the configurations that can be viewed/modified for your project.
This is a short description of the current selected configuration file from the dropdown list.
These are the available actions that can be selected for the current selected configuration file.
This allows the user to encrypt access keys, passwords and other sensitive information required by the current selected configuration file. For more information on how to encrypt sensitive information in a configuration file through Studio, see Automatic Encryption of Secrets in Configuration Files
This allows the user to view the selected configuration’s history
Here are the settings that can be configured through Crafter Studio:
Configuration File |
Description |
More Information |
|---|---|---|
Project Configuration ( |
Defines the general project configuration |
|
Notification Configuration ( |
Defines a list of UI messages to use in notifications |
|
Permissions Mapping ( |
Defines user access permissions to the project |
|
Role Mappings ( |
Maps users and groups to roles within the project |
|
Content Type Editor Config ( |
Defines controls, data sources, and content types for content authoring |
|
Configurations ( |
Configure this list of configuration files |
|
Dependency Resolver Configuration ( |
Configures the dependency resolver |
|
AWS Profiles ( |
Configures the project’s AWS profiles |
|
Box Profiles ( |
Configures the project’s Box profiles |
|
WebDAV Profiles ( |
Configures the project’s WebDAV profiles |
|
Asset Processing Configuration ( |
Configures the project’s asset processing |
|
Blob Stores ( |
Configures the project’s blob stores |
|
Project Policy Configuration ( |
Configures the project policy |
|
User Interface Configuration ( |
Configures the user interface |
|
Proxy Config ( |
Configures the proxy servers for preview |
Crafter Studio supports creating multiple environments with different configuration files for each environment. To setup an environment follow the guide Multi-environment Support.
CrafterCMS supports managing assets in external storage through workflow and publishing mechanics. For more information, see Blob Stores.
Security
There are various ways for securing access to your CrafterCMS project content in an authoring environment.
Role Mapping
A role represents a set of activities allowed. Role mapping allows users to only see items that they have been granted access to based on the permissions granted to the role they have been assigned to.
See Role Mappings for more information.
Permission Mapping
Permission mapping allows you to assign permissions to folders and objects in a project/site giving specific roles rights to the object.
See Permission Mappings for more information.
Authentication with JWT
JWT authentication allows access to Studio APIs.
See JWT Authentication for more information on creating and using a token.
Additional Authentication Mechanisms
There are other ways for configuring security for your authoring install such as authenticating via headers, SAML, etc.
See Studio Security for more information.
UI
Top Toolbar
The toolbar is located at the top of the page and provides contextual workflow and other options relative to the page being previewed, content that have been selected or tool being used.
See here for a description and here for more information on configuring the toolbar.
Dashboards
The dashboards show an overview of the workflow in the project. See here for a description and here for more information on configuring the dashboard.
Localization
Localization is the process of adapting the application/software to a specific culture of end users, such as units of measurements, language, etc., to make the application look and feel natural to the end users.
Project Time Zone
The default dates and times used for displays in Studio is UTC. To customize how dates & times get displayed
on Studio UI for a project, edit the following in the project configuration file, by clicking on ![]() from the Sidebar, then click on Configuration and finally selecting Project Configuration from the list:
from the Sidebar, then click on Configuration and finally selecting Project Configuration from the list:
 1<locale>
 2  <!--
 3  BCP 47 language tag (e.g. en-US) or unicode extension (e.g. "en-US-u-ca-buddhist").
 4  Leave empty for using the user's browser locale (i.e. dates/times will be displayed in each users's system locale).
 5  Specifying a locale code will apply those localization settings to *all* users regardless of their system settings
 6  or location. For example, if "en-US", is specified, all users will see dates as month/day/year instead of day/month/year
 7  regardless of their system (i.e. OS) locale preference.
 8  -->
 9  <localeCode/>
10  <!--
11  Use `dateTimeFormatOptions` to customize how dates & times get displayed on Studio UI.
12  For full list of options and docs, visit: https://developer.mozilla.org/en-US/docs/Web/JavaScript/Reference/Global_Objects/Intl/DateTimeFormat/DateTimeFormat
13  -->
14  <dateTimeFormatOptions>
15  <!--
16  Specifying a time zone (i.e. `timeZone` element) will express dates/times across the UI in the time zone you specify
17  here. Leaving it unspecified, will display dates/times to each user in their own system time zone.
18  -->
19    <!--<timeZone>EST5EDT</timeZone>-->
20    <day>numeric</day>
21    <month>numeric</month>
22    <year>numeric</year>
23    <hour>numeric</hour>
24    <minute>numeric</minute>
25    <!--
26    Set `hour12` to "false" to show times in 24 hour format.
27    -->
28    <hour12>true</hour12>
29  </dateTimeFormatOptions>
30</locale>
Content
Large Assets and External Stores
Git is wonderful for managing and tracking textual content, but it’s not ideal for storing binary files or large assets. There are multiple options for storing these large assets using either Studio’s blob stores or various other external stores
Blob Store
The blob store is a Git-like repository for binary files. See here for more information
AWS S3
AWS S3 is a great option for very large externally managed artifacts. See here for more information
Box
Box is a good option when you need to store media and documents that are quite large. See here for more information
WebDAV
Using WebDAV is another good option for collaborating on assets hosted on another server. See WebDAV Profiles Configuration to learn how to configure WebDAV and review the developer documentation WebDAV Asset Access to learn how to access WebDAV assets.
Rich media processing
Images
CrafterCMS supports automatic image processing that allows you to upload just one image that gets converted to the different sizes or formats required by your project for various display sizes. See here for more information
Video (transcoding)
Crafter Studio allows users to upload and transcode videos using AWS MediaConvert in order for users to be able to show the video in different display sizes. See here for more information
Rich Text Editor (RTE)
The RTE (Rich Text Editor) provides an in-context editing experience from within a form (and through preview via the XB) that allows authors to arrange and style content without needing to know HTML For more information on configuring the RTE, see here
Preview
Preview allows users to see, edit and test the project in a safe authoring sandbox prior to publishing changes.
Proxy Configuration
CrafterCMS supports a proxy system to proxy GraphQL, Engine, NodeJS or other application delivery systems. A proxy server, or proxy for short, is an application or system that acts as a middleman between requests from clients for resources such as a file or web page for example, and the server that provides those resources. Whenever a request is made by a client, the request gets sent to the proxy that then evaluates the request and then performs the required transactions. Proxies forwards web requests, act as a firewall and web filter, provide shared network connections, and cache data to speed up common requests. It helps to simplify/control the complexity of the request, and can provide additional benefits such as load balancing, privacy or security.
See here for an example of setting up the proxy for a React application
Publishing
The publishing tool available from the sidebar under ![]() allows the user to view the
publishing status, and various ways of publishing content.
See here for more information
allows the user to view the
publishing status, and various ways of publishing content.
See here for more information
Notifications
To configure HTML notifications that can be sent at each point in the workflow, see here
Staging
An intermediate publishing target, named staging, is supported by CrafterCMS which allows testing of your project.
See here for more information on how to setup a staging target for your project.
Multi-environment Support
It is often required to have different configurations for different environments. For example, you may want to have developers access different integration services, keys, and configuration than QA, UAT or Prod environments.
CrafterCMS supports environment specific configuration that helps with this, read more about it in the article Multi-environment Support.
Content Monitoring
What is Content Monitoring?
Content Monitoring is a feature that allows you to configure watches and notifications on your project. This will provide an easy way to detect unwanted or outdated content.
The monitoring process always runs in Studio for all existing projects once a day at noon (time zone of the server) and sends notifications indicating the items detected by the content monitors. Content monitors are managed independently for each project and are highly customizable.
All the built-in blueprints in Studio include a default configuration for monitors and users just need to add the field expired_dt in the content type they want monitored. We’ll take a look at an example later on of adding the expired_dt field in one of the content type of a project using the Website Editorial blueprint.
Content Monitor Properties
Each monitor needs to define the following properties:
- name:
General name for the content monitor.
- query:
OpenSearch query used to match documents, can be any valid OpenSearch query.
- paths:
List of paths with notification configurations, there must be at least one path item for each monitor.
Path Properties
Each path item needs to define the following properties:
- name:
General name for the path.
- pattern:
Regular expression describing the path that documents must have to be included in the notifications.
- emailTemplate:
Key of the email template that will be used for the notifications.
- emails:
List of emails to send the notifications, must be separated by commas.
- locale:
Key of the language to search the email template for the notifications. If this property is not defined or the value is not found in the configuration it will fallback to
en.
How to Configure Content Monitoring
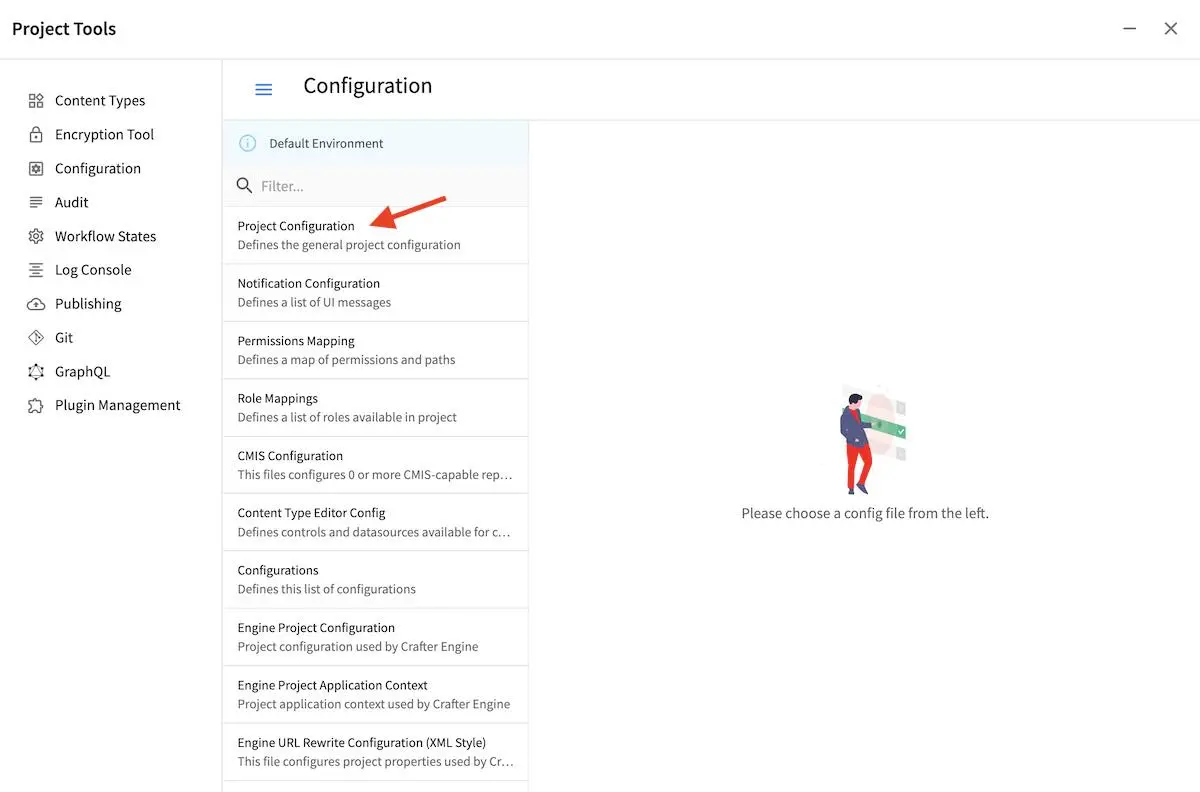
Content monitoring can be configured through Crafter Studio. Go to the Sidebar, then click on Project Tools > Configuration > Project Configuration
The file can also be located in the following path:
CRAFTER_HOME/data/repos/sites/SITENAME/sandbox/config/studio/site-config.xml
<site-config>

  ...

  <contentMonitoring>
    <monitor>
      <name>Content Expiring Tomorrow</name>
      <query>expired_dt:[now+1d/d TO now+2d/d]</query>
      <paths>
        <path>
          <name>All Site</name>
          <pattern>/site/.*</pattern>
          <emailTemplate>contentExpiringSoon</emailTemplate>
          <emails>admin@example.com</emails>
          <locale>en</locale>
        </path>
      </paths>
    </monitor>
    <monitor>
      <name>Content Expiring In One Week</name>
      <query>expired_dt:[now+7d/d TO now+8d/d]</query>
      <paths>
        <path>
          <name>All Site</name>
          <pattern>/site/.*</pattern>
          <emailTemplate>contentExpiringSoon</emailTemplate>
          <emails>admin@example.com</emails>
          <locale>en</locale>
        </path>
      </paths>
    </monitor>
  </contentMonitoring>

  ...

</site-config>
Notification Templates Configuration
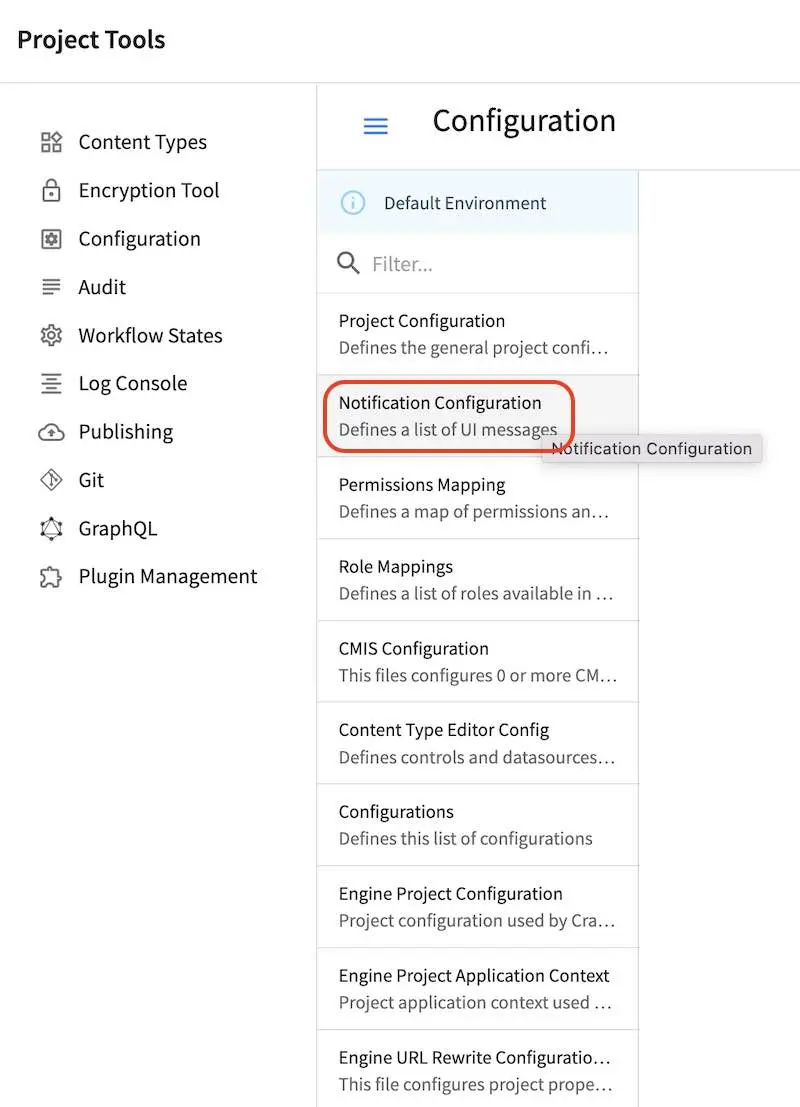
Notification templates can be configured through Crafter Studio. Go to the Sidebar, then click
on ![]() > Configuration > Notification Configuration
> Configuration > Notification Configuration
The file can also be located in the following path:
CRAFTER_HOME/data/repos/sites/SITENAME/sandbox/config/studio/workflow/notification-config.xml
 1<notificationConfig>
 2
 3  ...
 4
 5  <lang name="en">
 6
 7    ...
 8
 9    <emailTemplate key="contentExpiringSoon">
10      <subject>Content Expiring Soon</subject>
11      <body><![CDATA[
12        <html>
13          <head>
14            <meta charset="utf-8"/>
15          </head>
16          <body>
17            <p>
18               ${monitorName} in site '${siteName}':
19               <ul>
20                 <#list items as item>
21                   <#if item.url??>
22                     <li><a href="${item.url}">${item.internalName!item.id}</a></li>
23                   <#else>
24                     <li>${item.internalName!item.id}</li>
25                   </#if>
26                 </#list>
27               </ul>
28            </p>
29          </body>
30        </html>
31      ]]></body>
32    </emailTemplate>
33
34    ...
35
36  </lang>
37
38  ...
39
40</notificationConfig>
The notification templates will have available the following variables:
siteName
liveUrl
previewUrl
authoringUrl
monitorName
items
Each item will have the following properties:
id
internalName
url (only present if the item is a page)
Example Monitoring Queries
Content Expiration
Purpose |
Query |
|---|---|
Warn every day that content is past expiration |
expired_dt:[* TO now] |
Warn 10 days ahead that content will expire |
expired_dt:[now+10d/d TO now+11d/d] |
Warn 10 days ahead AND on expire date |
expired_dt:[now+10d/d TO now+11d/d]or
expired_dt:[now TO now+1d/d] |
Everything that was modified today |
modified_dt:[now-1d/d TO now]or
create_dt:[now-1d/d TO now] |
Content that Contains an Old Trademark |
*:"UNWANTED TRADEMARK" |
For more information on supported time units that you can use for your query, see https://opensearch.org/docs/latest/field-types/supported-field-types/date/
Example Content Monitoring Setup
Let’s take a look at content monitoring for a project created using the Website Editorial blueprint.
Open the Sidebar then click on Project Tools -> Configuration, then select Project Configuration from the drop down. Notice that the monitor is checking for content that’s about to expire by looking at the expired_dt field. The following content monitoring is setup by default in all the built-in blueprints:
<contentMonitoring>
  <monitor>
    <name>Content Expiring Tomorrow</name>
    <query>expired_dt:[now+1d/d TO now+2d/d]</query>
    <paths>
      <path>
        <name>All Site</name>
        <pattern>/site/.*</pattern>
        <emailTemplate>contentExpiringSoon</emailTemplate>
        <emails>admin@example.com</emails>
        <locale>en</locale>
      </path>
    </paths>
  </monitor>
  <monitor>
    <name>Content Expiring In One Week</name>
    <query>expired_dt:[now+7d/d TO now+8d/d]</query>
    <paths>
      <path>
        <name>All Site</name>
        <pattern>/site/.*</pattern>
        <emailTemplate>contentExpiringSoon</emailTemplate>
        <emails>admin@example.com</emails>
        <locale>en</locale>
      </path>
    </paths>
  </monitor>
  <monitor>
    <name>Content Expiring In One Month</name>
    <query>expired_dt:[now+30d/d TO now+32d/d]</query>
    <paths>
      <path>
        <name>All Site</name>
        <pattern>/site/.*</pattern>
        <emailTemplate>contentExpiringSoon</emailTemplate>
        <emails>admin@example.com</emails>
        <locale>en</locale>
      </path>
    </paths>
  </monitor>
  <monitor>
    <name>Content Expiring In Two Months</name>
    <query>expired_dt:[now+60d/d TO now+62d/d]</query>
    <paths>
      <path>
        <name>All Site</name>
        <pattern>/site/.*</pattern>
        <emailTemplate>contentExpiringSoon</emailTemplate>
        <emails>admin@example.com</emails>
        <locale>en</locale>
      </path>
    </paths>
  </monitor>
</contentMonitoring>
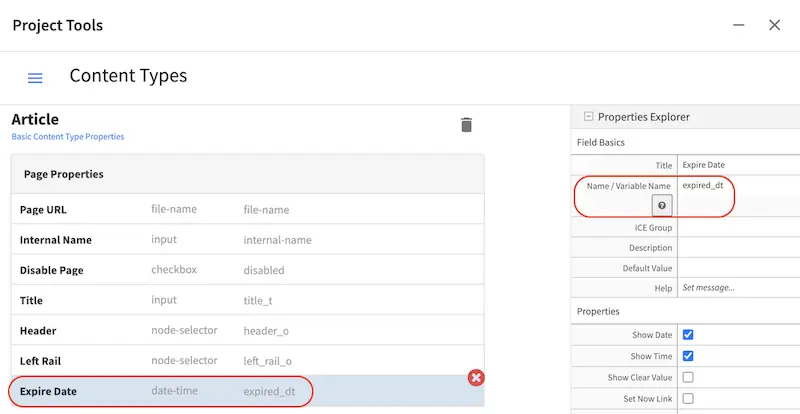
We need to setup the expired_dt field for the content types that we want monitored. For our example, we’ll add the expired_dt field to the Page - Article content type.
Open the Sidebar then click on Project Tools -> Content Types. Select the Article content type. Drag a Date/Time control into the Page Properties form section. Set the Title to Expire Date and the Name/Variable Name to expired_dt. Save your changes.
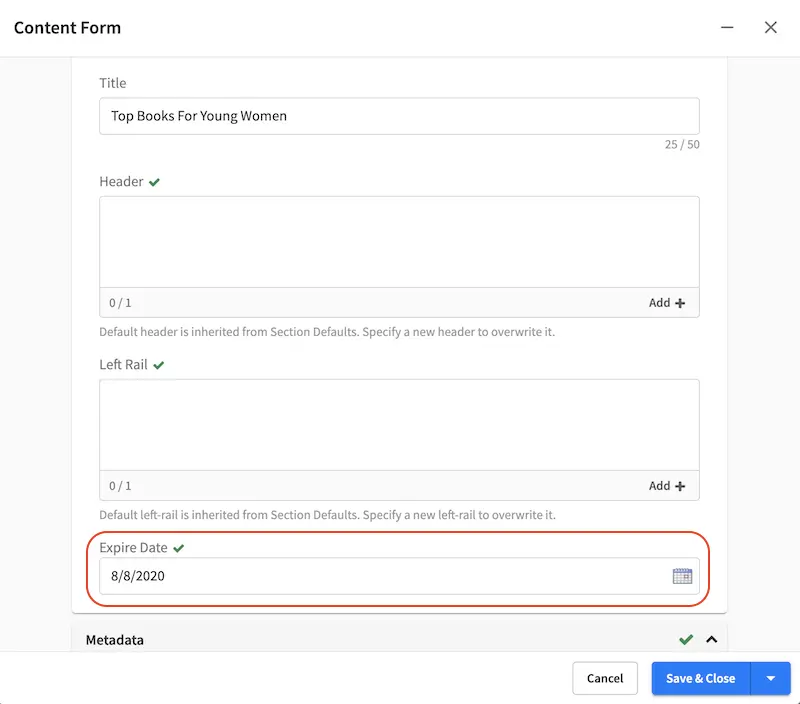
We have a monitor for content expiring tomorrow as shown above. We’ll set one of the articles to expire the next day. For our example. we’ll set the Expire Date of the article Top Books For Young Women
The monitoring process of Studio runs everyday at noon (based on the server time zone). To test right away if the monitors are working as expected, we can call the monitorContent API.
Enter the following in your browser: http://localhost:8080/studio/api/1/services/api/1/site/monitor-content.json
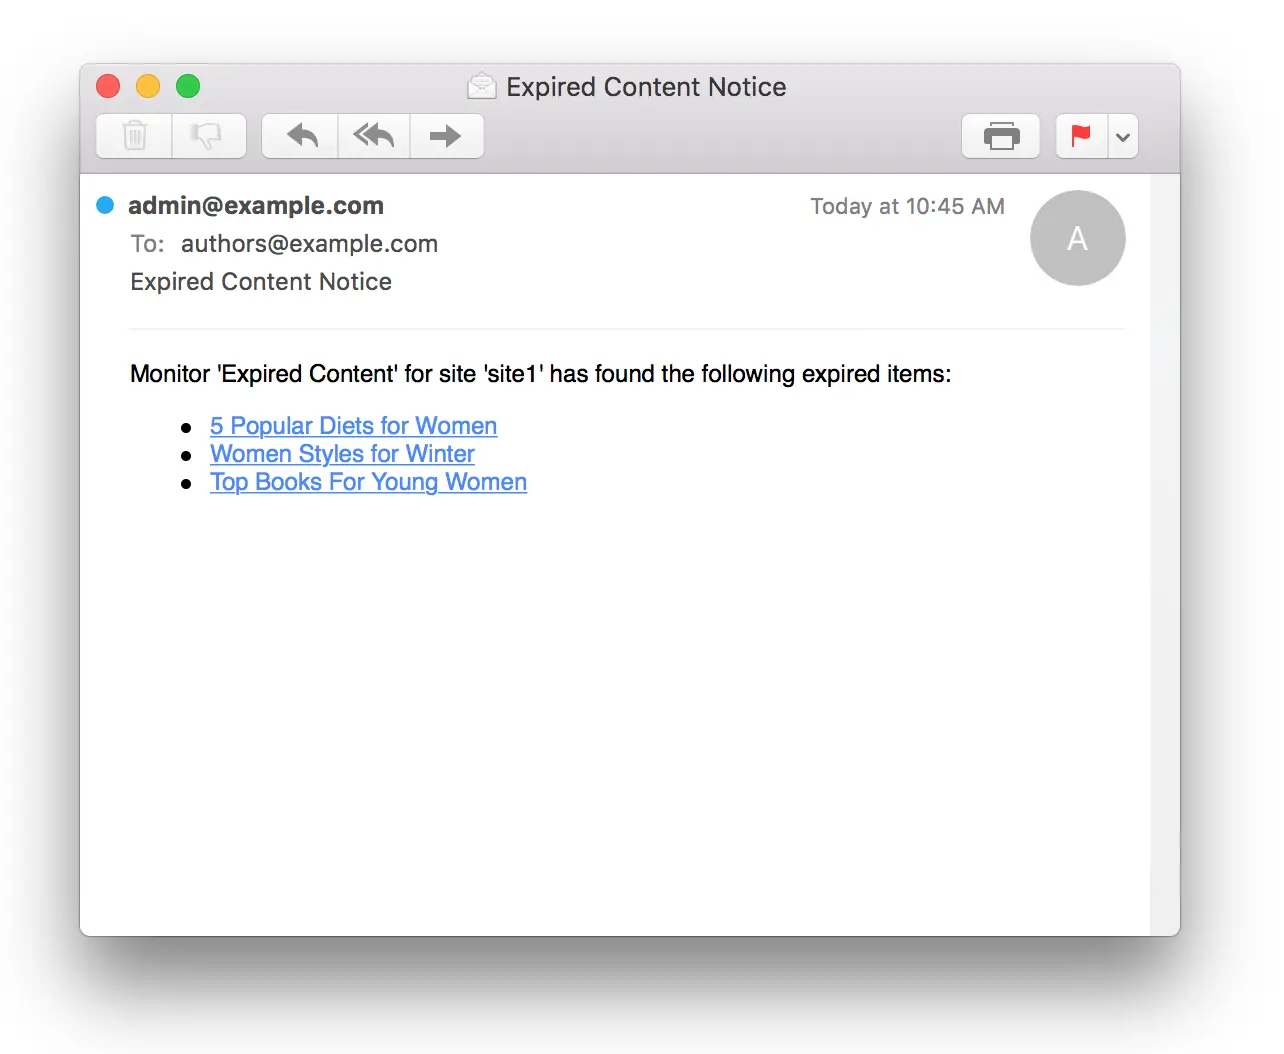
You should see the following response, where the article we set to expire the next day should be listed in the response:
[{"siteId":"mysite","contentMonitoring":{"monitors":[{"name":"All Site","emails":"admin@example.com","items":[{"id":"/site/website/articles/2016/12/top-books-for-young-women/index.xml","internalName":"Top Books For Young Women","url":"http://localhost:8080/preview/#/?page=/articles/2016/12/top-books-for-young-women&site=mysite"}]}]}}]
If you have setup a mail server, you should also receive an email about the article about to expire, similar to the email example shown above.
You can also check the tomcat log to see the results of the monitoring process:
[INFO] 2023-08-07T17:05:09,474 [http-nio-8080-exec-5] [impl.GroovyScript] | executing monitor: Content Expiring Tomorrow
[INFO] 2023-08-07T17:05:10,434 [http-nio-8080-exec-5] [impl.GroovyScript] | content monitor (Content Expiring Tomorrow) found 2 items
[INFO] 2023-08-07T17:05:10,453 [http-nio-8080-exec-5] [impl.GroovyScript] | content monitor: Content Expiring Tomorrow Sending notification (contentExpiringSoon)
[INFO] 2023-08-07T17:05:10,488 [http-nio-8080-exec-5] [impl.GroovyScript] | executing monitor: Content Expiring In One Week
[INFO] 2023-08-07T17:05:10,503 [http-nio-8080-exec-5] [impl.GroovyScript] | content monitor (Content Expiring In One Week) found 0 items
[INFO] 2023-08-07T17:05:10,505 [http-nio-8080-exec-5] [impl.GroovyScript] | executing monitor: Content Expiring In One Month
[INFO] 2023-08-07T17:05:10,516 [http-nio-8080-exec-5] [impl.GroovyScript] | content monitor (Content Expiring In One Month) found 0 items
[INFO] 2023-08-07T17:05:10,518 [http-nio-8080-exec-5] [impl.GroovyScript] | executing monitor: Content Expiring In Two Months
[INFO] 2023-08-07T17:05:10,528 [http-nio-8080-exec-5] [impl.GroovyScript] | content monitor (Content Expiring In Two Months) found 0 items
Delivery
In this section, we discuss managing your project, security, etc. in a delivery environment.
URL Rewrites and Vanity URLs
URL rewriting is important to any Web application. Learn how to configure URL rewriting in Engine URL Rewrite Configuration.
Security
There are various ways for securing access to restricted content in your CrafterCMS project in a delivery environment. See here for more information.
Composable
Blueprints
CrafterCMS supports the ability to extend the functionality of the platform through the use of plugins and blueprints. Projects can be created out of blueprints which can be built-in, pulled from the Marketplace, or custom built. Learn more about blueprints in the article Blueprints.
Plugins
Plugins are extensions that can be installed into a project to add functionality. These can extend the functionality of Crafter Studio for added authoring capabilities, or extend the functionality of the project delivery itself by providing features to your project/site. Learn more about plugins in the article Plugins.
Project Tools
![]() contains project administration tools such as Configurations, Plugin Management, Encryption Tool, etc. Learn more about project tools in the article Project Tools.
contains project administration tools such as Configurations, Plugin Management, Encryption Tool, etc. Learn more about project tools in the article Project Tools.