Adding a New Language
Crafter Studio has been translated into a number of languages. Here’s a list of currently supported languages along with the language codes used in Studio:
en- Englishsp- Spanishde- Germankr- Korean
To reach more users, additional languages may need to be added in Crafter Studio.
Here are the steps to add a new language in Crafter Studio:
Add translations file for the Studio user dashboard
studio-ui/static-assets/scripts/resources/locale-**.jsonAdd the translations file for everything else not in the dashboard
studio-ui/static-assets/components/cstudio-common/resources/**/base.jsAdd the new language to the
get-available-languagesAPIAdd the new language to the react translations manager
Update templates to add the new language imports into the runtime (i.e. via script[src] elements)
Build, deploy and test your changes
where:
** is the language code for the new language being added to Crafter Studio
Before we begin, we need to pick the two letter language code for the new language we are adding for Crafter Studio. You can use ISO 639 language codes for reference. So, say, we are adding Japanese, from the ISO 639 language codes, we will be using ja
Let’s begin adding the language Japanese to Crafter Studio:
1. Add translations file for the Studio user Dashboard
To add a new language for the user dashboard, in your
studio-uicode, under the folderstudio-ui/static-assets/scripts/resources/, create a new filelocale-**.jsonwhere**is the two letter language code. We’ll usejafor Japanese as our example here.Copy the contents from one of the existing json files,
locale-en.jsonand paste it into the new file,locale-ja.json.Start translating the content in your
locale-ja.jsonfile, then save your changesstudio-ui/static-assets/scripts/resources/locale-ja.json1{ 2 "dashboard": { 3 "login": { 4 "EMAIL": "Eメール", 5 "USERNAME": "Username", 6 ...
2. Add the translations file for everything else not in the Dashboard
To add the translations file for everything else not in the dashboard, in your
studio-uicode, navigate tostudio-ui/static-assets/components/cstudio-common/resources/. Create a folder using the two letter language code for the new language being added,studio-ui/static-assets/components/cstudio-common/resources/jaCopy the file
studio-ui/static-assets/components/cstudio-common/resources/en/base.jsand paste it into the newly created folderStart translating the content in
studio-ui/static-assets/components/cstudio-common/resources/ja/base.jsand save your changesstudio-ui/static-assets/components/cstudio-common/resources/ja/base.js1CStudioAuthoring.Messages.registerBundle("siteDashboard", "ja", { 2dashboardTitle: "ダッシュボード", 3 4dashboardCollapseAll: "Collapse All", 5...
Remember to change the language code in the all the registerBundle calls in the base.js file
CStudioAuthoring.Messages.registerBundle("dialogs", "ja", {
3. Add the new language to the get-available-languages API
To add the new language to the
get-available-languagesAPI (/studio/api/1/services/api/1/server/get-available-languages.json), in yourstudiocode, navigate tostudio/src/main/webapp/default-site/scripts/rest/api/1/serverand open theget-available-languages.get.groovyfileAdd the new language to the file:
 1def result = []
 2   result[0] = [:]
 3   result[0].id = "en"
 4   result[0].label = "English"
 5   result[1] = [:]
 6   result[1].id = "es"
 7   result[1].label = "español"
 8   result[2] = [:]
 9   result[2].id = "kr"
10   result[2].label = "한국어"
11   result[3] = [:]
12   result[3].id = "de"
13   result[3].label = "Deutsch"
14   result[4] = [:]
15   result[4].id = "ja"
16   result[4].label = "日本語"
17return result
4. Add the new language to the react translations manager
To add the new language to the react translations manager, in your
studio-uicode, navigate tostudio-ui/ui/app/scriptsfolder then open the filei18n.jsAdd the new language code to the
languageslist and save your changesstudio-ui/ui/app/scripts/i18n.js1manageTranslations({ 2 messagesDirectory: './src/translations/src', 3 translationsDirectory: './src/translations/locales/', 4 whitelistsDirectory: './src/translations/whitelists', 5 languages: ['en', 'es', 'de', 'ko', 'ja'] 6});
Open the command line and navigate to
studio-ui/ui/app/scriptsfolder and run the following commands to update and generate theja.jsonfile:yarn i18n:extract
yarn i18n:manage
Here’s some of the output when running the above commands:
1➜  scripts git:(develop) ✗ yarn i18n:extract
2yarn run v1.13.0
3$ NODE_ENV=production babel ./src --extensions '.ts,.tsx' --out-file /dev/null
4✨  Done in 3.15s.
5➜  scripts git:(develop) ✗ yarn i18n:manage
6yarn run v1.13.0
7$ node scripts/i18n.js
After generating the
ja.jsonlocale file from above, open the file in yourstudio-uicode by navigating to/studio-ui/ui/app/src/translations/locales/, then open theja.jsonfile and start translating the content{ "blueprint.by": "バイ", "blueprint.crafterCMS": "CrafterCMS", "blueprint.license": "ライセンス", ...
5. Update templates to add the new language imports into the runtime
We now need to update templates to add the new language imports into the runtime (i.e. via script[src] elements). In your
studio-uicode, navigate tostudio-ui/templates/web/. The following templates need to be updated:preview.ftl
form.ftl
site-config.ftl
Add the new language imports
<script src="/studio/static-assets/components/cstudio-common/resources/ja/base.js?version=${UIBuildId!.now?string('Mddyyyy')}"></script>into the files listed above:studio-ui/templates/web/preview.ftl1<#include "/templates/web/common/page-fragments/head.ftl" /> 2<script src="/studio/static-assets/components/cstudio-common/resources/en/base.js?version=${UIBuildId!.now?string('Mddyyyy')}"></script> 3<script src="/studio/static-assets/components/cstudio-common/resources/kr/base.js?version=${UIBuildId!.now?string('Mddyyyy')}"></script> 4<script src="/studio/static-assets/components/cstudio-common/resources/es/base.js?version=${UIBuildId!.now?string('Mddyyyy')}"></script> 5<script src="/studio/static-assets/components/cstudio-common/resources/de/base.js?version=${UIBuildId!.now?string('Mddyyyy')}"></script> 6<script src="/studio/static-assets/components/cstudio-common/resources/ja/base.js?version=${UIBuildId!.now?string('Mddyyyy')}"></script>
6. Build, deploy and test your changes
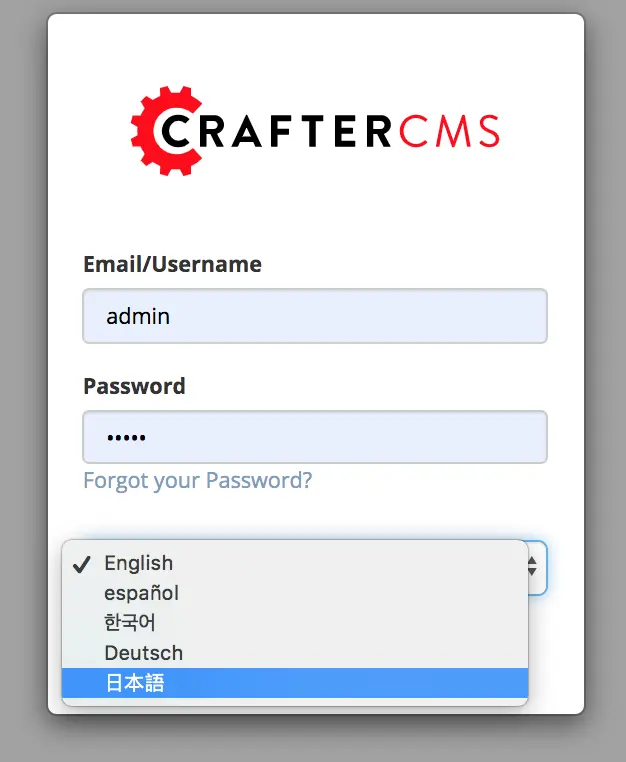
Don’t forget to build and deploy. To test your changes, from the login screen, click on the language dropdown box, and you should see the new language we just added.
