
Logging
Log files from several sources are created when running CrafterCMS. These log files are useful for
checking the status of CrafterCMS, for example, the success of actions/requests, warnings and error
messages. These logs can be used to provide more information about potential issues in the system
or for debugging errors. The log files can be found in $CRAFTER_DIR/crafter-authoring/logs/ or
in $CRAFTER_DIR/crafter-delivery/logs/ depending on which environment you are running. Effective
use of these logs is an important part of maintaining your projects and are useful for keeping track
of your system performance. To that end, please make sure that you rotate the logs.
CrafterCMS ships with a Tomcat Application Server, and MongoDB included in the binary archive. There are three folders used by CrafterCMS for the log files,
tomcat
deployer
mongodb
Tailing Log Files From a Shell/Command Line
The most recent messages from the log files may be displayed by tailing the log files. Here are the log files and locations of the log files:
Log File
|
Location
|
|---|---|
Tomcat log file
|
$CRAFTER_LOGS_DIR/tomcat/catalina.out |
Tomcat historical log files
|
$CRAFTER_LOGS_DIR/tomcat/catalina.%Y-%M-%D.log |
Crafter Deployer log file
|
$CRAFTER_LOGS_DIR/deployer/crafter-deployer.out |
Crafter Deployer
projects log files
|
$CRAFTER_LOGS_DIR/deployer/%SITE-preview.log |
MongoDB log files
|
$CRAFTER_LOGS_DIR/mongodb/ |
For the Authoring environment:
$CRAFTER_LOGS_DIR = $CRAFTER_DIR/crafter-authoring/logs
For the Delivery environment:
$CRAFTER_LOGS_DIR = $CRAFTER_DIR/crafter-delivery/logs
Log File Descriptions
Tomcat Log Files
File: catalina.out
This log file contains all messages pertaining to all java packages run by CrafterCMS. It is used for tracking the success of requests/actions and logging helpful warning and error messages. You’ll also notice that in the same folder are the catalina historical log files, which are useful for checking logs for a certain date. There are other log files created in the same folder that may be of interest to you depending on what you are investigating/debugging, but, the log file catalina.out is the one we usually look at to check the status of our system.
To tail the catalina log file in the authoring environment:
tail -f crafter-authoring/logs/tomcat/catalina.out
To tail the catalina log file in the delivery environment:
tail -f crafter-delivery/logs/tomcat/catalina.out
Deployer Log Files
File: crafter-deployer.out
This log file contains all messages pertaining to Crafter Deployer. In the same folder where the crafter-deployer.out log file is, you will find all the project specific deployer logs as described in the table above.
To tail the log file in the authoring environment:
tail -f crafter-authoring/logs/deployer/crafter-deployer.out
To tail the log file in the delivery environment:
tail -f ./crafter-delivery/logs/deployer/crafter-deployer.out
Changing the Data and Logs Folder Location
The data folder and logs folder is by default located in {Crafter-CMS-install-directory}/{Crafter-ENV}/data and {Crafter-CMS-install-directory}/{Crafter-ENV}/logs. To change the location of the data and logs folder,
Open the file {Crafter-CMS-install-directory}/{Crafter-ENV}/crafter-setenv.sh
Change the following lines to your desired location for your data (“$CRAFTER_ROOT/data”) and logs (“$CRAFTER_ROOT/logs”) folder:
# Locations variables
export CRAFTER_LOGS_DIR=${CRAFTER_LOGS_DIR:="$CRAFTER_ROOT/logs"}
export CRAFTER_DATA_DIR=${CRAFTER_DATA_DIR:="$CRAFTER_ROOT/data"}
Overriding Logging Levels
There are 6 log levels defined in CrafterCMS which determine what messages will be logged. Below are the log levels available from the lowest to the highest:
all: displays all levels of logging including custom logging levels that have been defined
trace: displays more information to debug level logs
debug: displays things useful for debugging
info: displays informational messages like progress of the application, etc
warn: displays potentially harmful situations that might cause problems
error: displays anything that may be fatal to the operation/causes a problem
The lower your logging levels are set, the more verbose your logs will be. CrafterCMS comes with classes and packages set to logging level INFO out of the box.
There are times when you’d like to see more log details, say when there are problems, so you can narrow down what is happening and address it. Overriding the logging levels allows you to see more or less details in your installation depending on your needs.
To change the logging levels of your CrafterCMS installation, you can do one of the following:
Temporarily Set Logging Levels
Logging levels may be set temporarily in authoring via the UI.
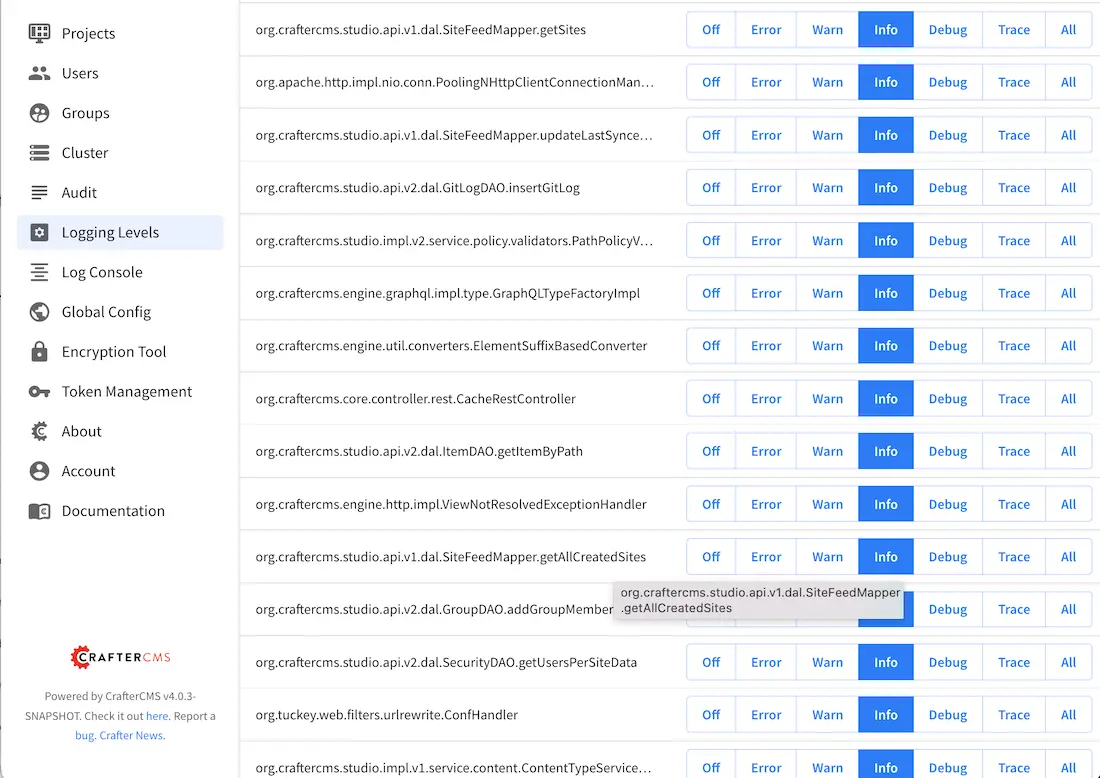
To temporarily set the logging levels for specific classes through Studio’s Navigation Menu:
From the Global menu, click on Logging Levels
Find the class/package you want to change the log level, then set the level by selecting the desired log level.
Note
Remember that changes to the logging levels through Studio only live from one restart of the application to the next.
Permanently Set Logging Levels
To permanently change the logging levels you will need to update some configuration in your
installation on the server. To make changes, you’re going to add/modify the logging configuration
file CRAFTER_HOME/bin/apache-tomcat/shared/classes/crafter/{module}/extension/logging.xml,
where {module} can be one of the following: studio, engine, profile or social.
- Step 1: Identify the package/class you want to modify logging levels for
The first step is identifying the package or class you want to change the levels for. Specifying the logging level at the package granularity e.g.:
org.craftercms.studio.api.v1.dal.DependencyMapper, will modify all classes under that package. Specifying logging levels at the class granularity, e.g.:org.craftercms.studio.api.v1.dal.DependencyMapper.calculatePublishingDependenciesForList, modifies only the levels for that specific class.- Step 2: Add the override configuration you require to the logging configuration file
CRAFTER_HOME/bin/apache-tomcat/shared/classes/crafter/studio/extension/logging.xml. Available logging levels are all, trace, debug, info, warn, error, off. All is the lowest logging level and Error is the highest. The lower your logging levels are set, the more verbose your logs will be.
To set a specific class to a higher log level (giving us less detail in the logs), add the following lines:
CRAFTER_HOME/bin/apache-tomcat/shared/classes/crafter/studio/extension/logging.xml<Logger name="org.craftercms.studio.api.v1.dal.DependencyMapper.calculatePublishingDependenciesForList" level="debug"/>
To set an entire package:
CRAFTER_HOME/bin/apache-tomcat/shared/classes/crafter/studio/extension/logging.xml<Logger name="org.craftercms.studio.api.v1.dal.DependencyMapper" level="debug"/>
- Step 3: Your changes to logging levels are now set
Changes in the logging configuration file is automatically applied after a few seconds.
To learn more about the log levels defined in CrafterCMS, see: Log Console
Using Custom Appenders
All CrafterCMS components use Apache Log4j2 for logging and you can easily include custom configurations to change the logging behavior. If you want to use any of the built-in appenders from Log4j2 such as the JDBC or SMTP appenders you only need to add them in the appropriate configuration file. For more details on the provided appenders you can visit the official documentation.
Logging Configurations
You can update the logging configuration depending on the CrafterCMS component that you need to change:
Crafter Engine:
$CRAFTER_HOME/bin/apache-tomcat/shared/classes/crafter/engine/extension/logging.xmlCrafter Studio:
$CRAFTER_HOME/bin/apache-tomcat/shared/classes/crafter/studio/extension/logging.xmlCrafter Search:
$CRAFTER_HOME/bin/apache-tomcat/shared/classes/crafter/search/extension/logging.xmlCrafter Profile:
$CRAFTER_HOME/bin/apache-tomcat/shared/classes/crafter/profile/extension/logging.xmlCrafter Social:
$CRAFTER_HOME/bin/apache-tomcat/shared/classes/crafter/social/extension/logging.xmlCrafter Deployer:
$CRAFTER_HOME/bin/crafter-deployer/logging.xml
Warning
It is highly recommended to only add new appenders or do small changes to existing ones, if existing appenders are removed or the configuration is broken some CrafterCMS components could stop working.
Add a Custom Appender
To add a custom appender you can follow these steps:
Place the required JAR files in the appropriate location:
for Engine, Studio, Search, Profile or Social use
$CRAFTER_HOME/bin/apache-tomcat/shared/libfor Deployer use
$CRAFTER_HOME/bin/crafter-deployer/lib
Update the required logging configuration to add the custom appender, for example if the custom appender name is
AwesomeAppenderand the class is under the packagecom.custom.loggingthe configuration will be like this:
<Configuration packages="com.custom.logging">
  <Appenders>
    <!-- existing appenders -->
    <AwesomeAppender name="AwesomeAppender" someConfig="true" otherParam="5"/>
  </Appenders>
  <Loggers>
    <!-- existing loggers -->
    <Root level="info">
      <!-- existing refs -->
      <AppenderRef ref="AwesomeAppender" />
    </Root>
  </Loggers>
</Configuration>
Note
In order for custom appenders to be loaded properly all dependencies should be included in the JAR file or also
copy the required JARs along. Most of the time you will need to copy the log4j-api-{version}.jar and
log4j-core-{version}.jar too.
Warning
Because Log4j2 only loads classes during initialization if there is a change in the custom appender JAR those will not be caught by the reconfiguration feature and you must restart the app context or tomcat.
crafter.sh Script Logging
To capture the output of the crafter.sh script in a log file, set the environment variable
CRAFTER_SCRIPT_LOG to point to a log file like below:
export CRAFTER_SCRIPT_LOG=${CRAFTER_SCRIPT_LOG:="/your/path/output-file.log}"