
Setup Studio Clustering with Kubernetes Deployment 
CrafterCMS has an example Kubernetes deployment for a Studio cluster with 2 nodes, which you can get from https://github.com/craftercms/kubernetes-deployments/tree/master/authoring/cluster. This guide covers how to install this example in a Kubernetes cluster.
Important
This guide assumes you have a working understanding of Kubernetes
Requirements
You will need an AWS EKS cluster, with the AWS Load Balancer Controller installed (https://docs.aws.amazon.com/eks/latest/userguide/aws-load-balancer-controller.html), in order to use the cluster example as-is.
If you can’t use an EKS cluster, your Kubernetes infrastructure needs to provide Load Balancers or some other kind of Ingress that is able to handle an active-passive deployment, where the active pod that should receive all traffic returns HTTP 200 on its healthcheck, while the passive pods that are on standby return HTTP 202. The Load Balancer should be able to also seamlessly switch between pods when an active becomes passive (200 -> 202) and a passive becomes active (202 -> 200).
Each Authoring cluster node is a StatefulSet Pod in Kubernetes, and requires at least 4 CPUs and 16 GB of space, to avoid performance issues and out of memory errors. So we recommend having Kubernetes nodes of a similar size to the Pod requirements, in different availability zones, so one Pod runs per availability zone.
If you’re using bigger nodes that are capable of running multiple Pods, make sure that the Authoring Pods are spread evenly through availability zones by specifying Pod Affinity/Anti-Affinity (you will need to modify the example configuration): https://kubernetes.io/docs/concepts/scheduling-eviction/assign-pod-node/#affinity-and-anti-affinity
Setup Kubernetes Secrets
The repository https://github.com/craftercms/kubernetes-deployments/ has a folder set aside for placing required Kubernetes Secrets: kubernetes-deployments/authoring/cluster/resources/secrets
This is where we will place the enterprise license to be used by the images in the deployment. Remember to name your license file crafter.lic
Also, you will need an SSL certificate and private key valid for the Authoring Pods cluster addresses. Each Pod’s address is specified in the CLUSTER_NODE_ADDRESS environment variable in authoring.yaml. In the example, this
value is $(POD_NAME).authoring-svc-headless.craftercms, which is a standard FQDN for a Kubernetes StatefulSet Pod: pod-hostname.headless-service-name.namespace. For more information on Kubernetes DNS, see
https://kubernetes.io/docs/concepts/services-networking/dns-pod-service/.
Warning
Our DB cluster limits the DB node addresses to be no longer than 60 characters, so even though $(POD_NAME).authoring-svc-headless.craftercms.svc.cluster.local is another cluster node address alternative,
it can’t be used.
In order to generate a valid self-signed SSL certificate, you can do the following:
Go into the
kubernetes-deployments/authoring/cluster/resources/secrets/git-https-serverfolder.Run
openssl req -x509 -nodes -days 365 -newkey rsa:2048 -keyout server.key -out server.crtand follow the prompts. It’s up to you what to enter in each field, EXCEPT for the Common Name (CN). This should match the Pods’ base domain name. If following the example, the CN value should be*.authoring-svc-headless.craftercms.
Start the Cluster
Go to kubernetes-deployments/authoring/cluster, then run kubectl apply -k .
This should deploy all necessary resources in Kubernetes. You can monitor the status of the cluster nodes by running kubectl get -n craftercms pods.
Each Pod has 4 containers, and initially only some of those containers will appear as ready:
➜  ~ kubectl get -n craftercms pods
NAME          READY   STATUS    RESTARTS   AGE
authoring-0   1/4     Running   0          21s
authoring-1   1/4     Running   0          21s
When all containers show as ready (both Pods show `READY 4/4), then the cluster is fully initialized:
➜  ~ kubectl get -n craftercms pods
NAME          READY   STATUS    RESTARTS   AGE
authoring-0   4/4     Running   0          8m43s
authoring-1   4/4     Running   0          8m43s
Another way to monitor the Pods is by tailing the Tomcat container log with the kubectl logs -n craftercms -f tomcat authoring-0 command and look for the Server startup in [XXXXX] milliseconds message:
[INFO] 2022-10-17T19:59:31,135 [main] [cluster.StudioPrimaryReplicaUtils] | This server is a replica node in a cluster, it will not perform any write                                                                                                                                                                                                                            │
17-Oct-2022 19:59:31.152 INFO [main] org.apache.catalina.startup.HostConfig.deployWAR Deployment of web application archive [/usr/local/tomcat/webapps/studio.war] has finished in [139,582] ms                                                                                                                                                                                  │
17-Oct-2022 19:59:31.157 INFO [main] org.apache.coyote.AbstractProtocol.start Starting ProtocolHandler ["http-nio-8080"]                                                                                                                                                                                                                                                         │
17-Oct-2022 19:59:31.170 INFO [main] org.apache.catalina.startup.Catalina.start Server startup in [168732] milliseconds
Access Studio
You can easily access Studio through the Authoring load balancer. To get the load balancer address, run kubectl get -n craftercms ingress. The load balancer address is the one in the ADDRESS column of the authoring-ingress.
➜  ~ kubectl get -n craftercms ingress
NAME                          CLASS   HOSTS   ADDRESS                                                                            PORTS   AGE
authoring-git-https-ingress   alb     *       internal-k8s-crafterc-authorin-8830e79fae-1816184747.us-east-1.elb.amazonaws.com   80      24m
authoring-ingress             alb     *       k8s-crafterc-authorin-2f4ed3b88b-532889167.us-east-1.elb.amazonaws.com             80      24m
Setup Delivery (optional)
You can use the Delivery Simple example under https://github.com/craftercms/kubernetes-deployments/tree/master/delivery/simple with this Authoring cluster example:
The Authoring Cluster example creates an internal load balancer that can be used by the Delivery Deployer to pull the published content from Authoring. The load balancer will need to have a valid domain name and SSL certificate. Follow the next steps to setup a DNS record and a certificate for the load balancer in AWS:
Create a Route 53 CNAME record for the domain name. The record needs to be in a Private Hosted Zone (https://docs.aws.amazon.com/Route53/latest/DeveloperGuide/hosted-zones-private.html), since the load balancer is internal, and the zone needs to be associated to the VPC of the EKS cluster where you deployed the Authoring Cluster example. If the hosted zone is in a different account than where the VPC resides, see this guide: https://aws.amazon.com/premiumsupport/knowledge-center/route53-private-hosted-zone/.
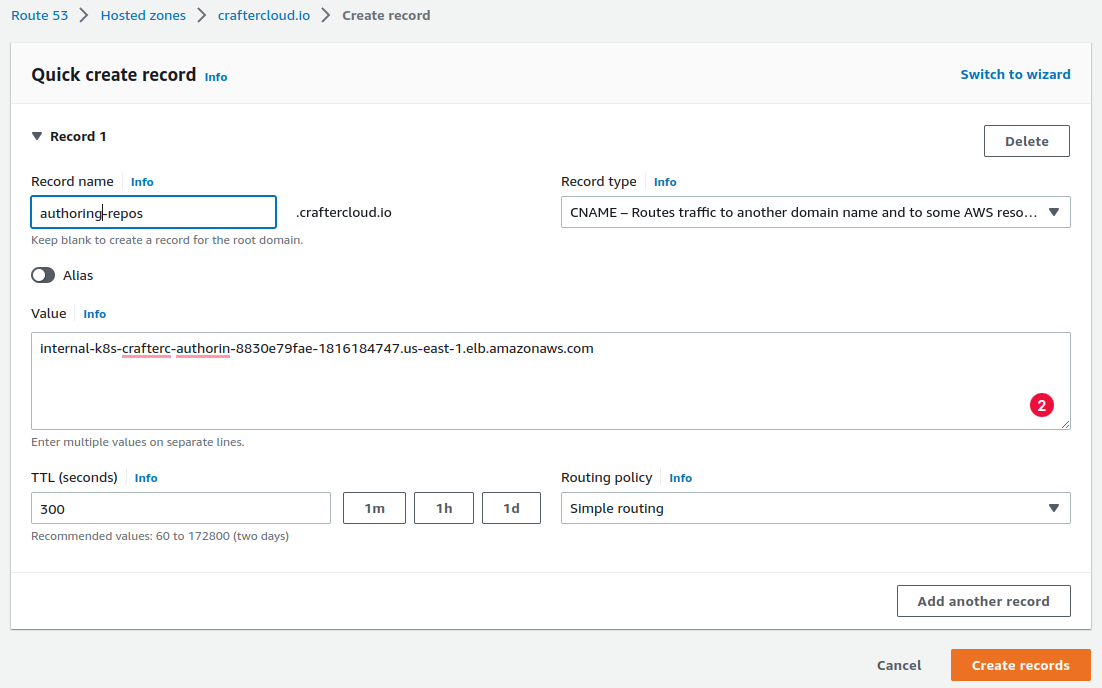
Create a certificate in the AWS Certificate Manager. Enter the domain name used in the previous step and make sure you select DNS validation as the validation method.
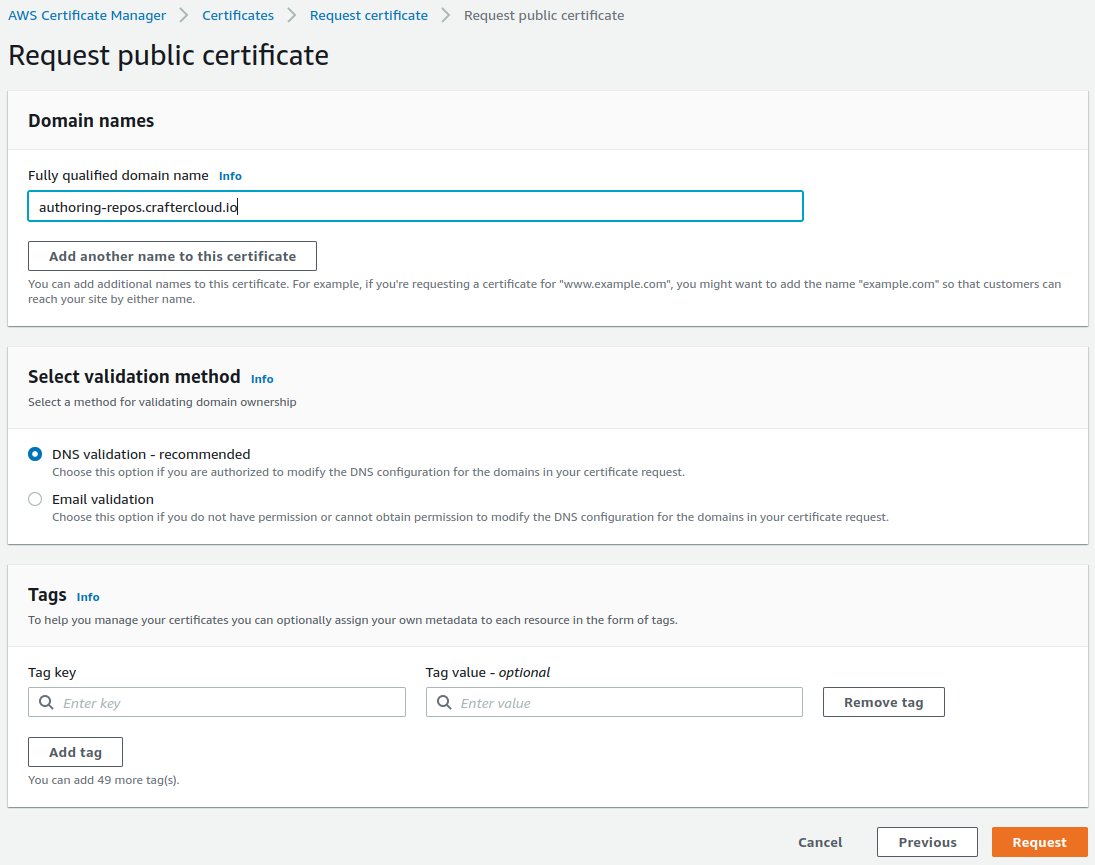
Click on the Certificate ID to open the details of the certificate. On the Domains section, you will see a CNAME name and CNAME value. You will need to copy those and create a Route 53 record in the Public Hosted Zone (not the Private Hosted Zone mentioned previously) of the domain so that the certificate is validated.

In the
kubernetes-deployments/authoring/cluster/authoring-deployment.yamlfile, uncomment the commented lines under theauthoring-git-https-ingressconfiguration, and fill the value ofalb.ingress.kubernetes.io/certificate-arnwith the ARN of the certificate just created. After that, runkubectl apply -k .in the folder to apply the changes.
# alb.ingress.kubernetes.io/listen-ports: '[{"HTTP": 80}, {"HTTPS":443}]'
# alb.ingress.kubernetes.io/ssl-redirect: '443'
# alb.ingress.kubernetes.io/certificate-arn: ''
Create a project in Authoring and make sure it’s fully published
Run
kubectl apply -k .inkubernetes-deployments/delivery/simple. Monitor the Pods coming up withkubectl get -n craftercms pods. There should only be one Delivery Pod.After the Delivery Pod has started, run
kubectl exec -n craftercms -it delivery-0 -c deployer -- gosu crafter bashto open a Bash shell to the Deployer container.Run
./bin/init-site.sh -u crafter -p crafter editorial https://<domain-name>/repos/sites/<site-name>/publishedto create a Deployer target that will pull the published content for the recently created project. Before executing the command, make sure to replace<domain-name>with the internal LB domain name and<site-name>with the name of the project.Note
Remember that when using private key SSH authentication, the private key path must be set explicitly using the
-koption. Here’s an example:init-site -k ~/.ssh/jdoe_key myeditorial ssh://myserver/opt/crater/sites/myeditorial
Get the Delivery LB address with
kubectl get -n craftercms ingressand access the project by enteringhttp://<delivery-lb-address>?crafterSite=<site-name>(replacing the<>placeholders of course).
Updating and Shutting Down the Cluster
The Authoring Cluster’s StatefulSet is configured with .spec.updateStrategy OnDelete. This means that whenever the Kubernetes configuration for the StatefulSet is updated, you will need to manually delete the Pods to create new Pods in order
for the modifications to be reflected. We prefer this updateStrategy instead of RollingUpdate so administrators can restart the cluster replicas first (by killing their Pods), wait for them to come up, and finally restart the primary, whenever a small
update to the configuration needs to be applied (like changing a small flag in one of the Crafter configuration files under /opt/crafter/bin/apache-tomcat/shared/classes).
For bigger updates, like a version upgrade or any other update that could cause modifications to the project content or the database, progressively scaling down the StatefulSet is recommended, by running
kubectl scale statefulsets authoring --replicas=<current-replicas-minus-1>, waiting until each Pod has been fully terminated before scaling down again, until all Pods are down. Then you can scale the StatefulSet up to the original number of
Pods (so that they can all synchronized on startup).
If you just want to shutdown the entire cluster, scale down the StatefulSet as described above.