
Studio Security
Authentication
Users are authenticated by Studio through the internal database by default. CrafterCMS can be configured so that users are authenticated using an external authentication protocol such as Lightweight Directory Access Protocol (LDAP), Security Assertion Markup Language (SAML), or integrate with any Single-Sign-On (SSO) solution that can provide headers to Studio to indicate successful authentication.
Here’s a list of security providers supported by CrafterCMS for accessing the repository:
Internal database (users are stored in database)
To configure an external authentication method, please follow one of the guides below:
When using an external authentication method, user accounts are automatically created in the internal database upon each user’s first successful login, using the attributes from the responses received. Users added to the internal database after the user’s first successful login through external authentication are marked as Externally Managed.
Configure Authentication Chain
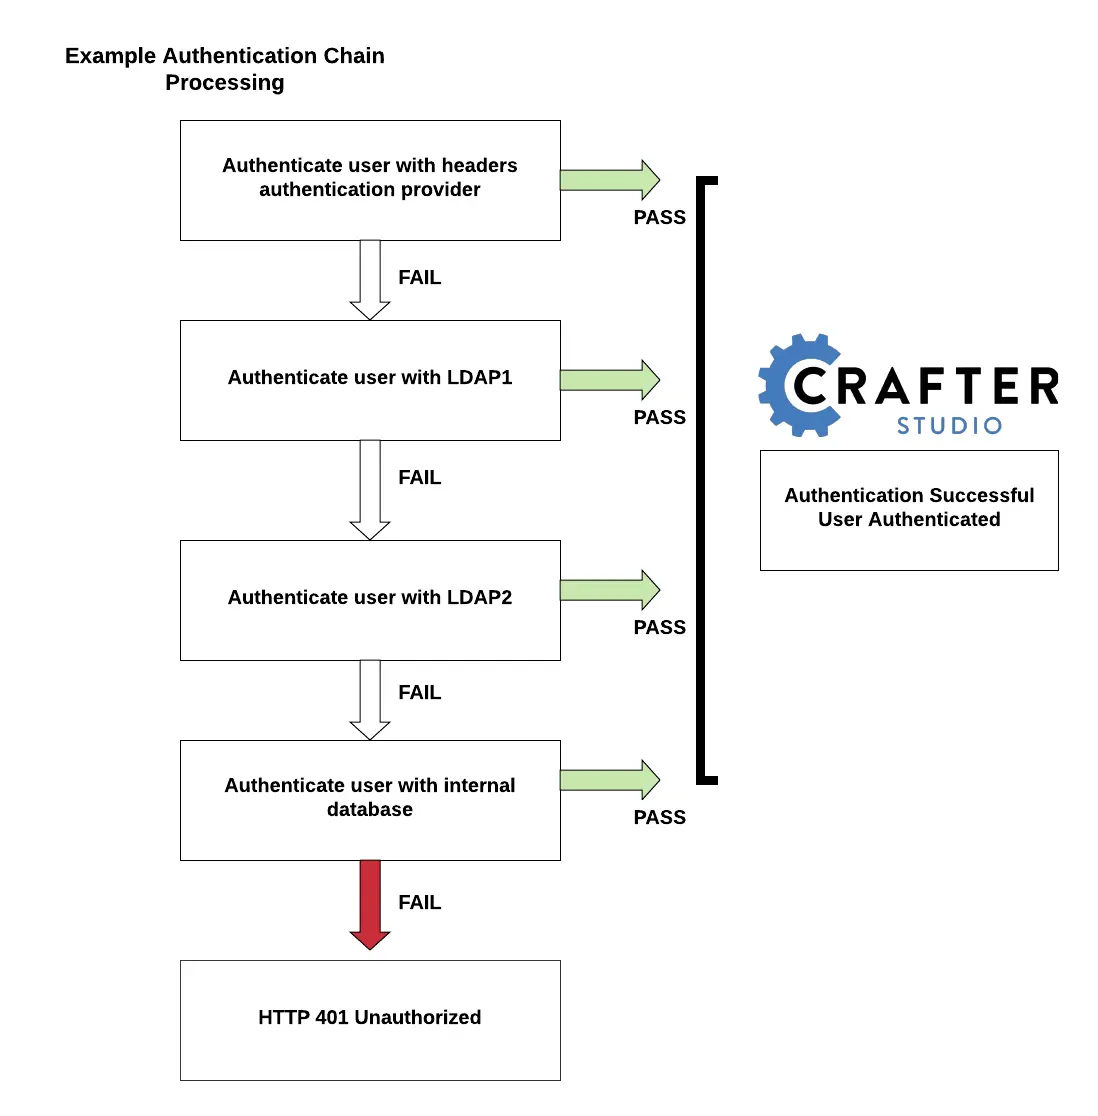
CrafterCMS supports multiple security providers and allows configuration of multiple authentication providers in a chain that are then iterated through until either the user is authenticated and granted access or authentication fails and an HTTP 401 Unauthorized is returned to the user. This allows Studio to support multiple security providers that appears like a single authentication module to users.
The following authentication providers can be configured in a chain:
Headers
LDAP
Internal database
Note
SAML2 authentication cannot be configured in a chain. SAML2 authentication is a standalone authentication provider.
When an authentication chain is configured when a user logs in, Studio will try to authenticate the user using the first security provider in the chain as defined in the studio-config-override.yaml file. If authentication fails, it will then move on to the next authentication provider in the list and try to authenticate the user again. It will continue moving on to the next security provider in the chain until the user is authenticated or the authentication fails.
To set up the authentication chain, open the file studio-config-override.yaml under CRAFTER_HOME/bin/apache-tomcat/shared/classes/crafter/studio/extension. Another way to access the studio-config-override.yaml file is by clicking on the  Navigation Menu from the context nav in Studio, then clicking on
 Global Config.
Below is a sample configuration for the authentication chain. There are four authentication providers in the example below: (1) Headers Authentication, (2) LDAP1, (3) LDAP2 (4) Internal Database.
 1  # Studio authentication chain configuration
 2  studio.authentication.chain:
 3  # Authentication provider type
 4  - provider: HEADERS
 5  # Authentication via headers enabled
 6    enabled: true
 7    # Authentication header for secure key
 8    secureKeyHeader: secure_key
 9    # Authentication headers secure key that is expected to match secure key value from headers
10    # Typically this is placed in the header by the authentication agent
11    secureKeyHeaderValue: secure
12    # Authentication header for username
13    usernameHeader: username
14    # Authentication header for first name
15    firstNameHeader: firstname
16    # Authentication header for last name
17    lastNameHeader: lastname
18    # Authentication header for email
19    emailHeader: email
20    # Authentication header for groups: comma separated list of groups
21    #   Example:
22    #   site_author,site_xyz_developer
23    groupsHeader: groups
24    # Enable/disable logout for headers authenticated users (SSO)
25    # logoutEnabled: false
26    # If logout is enabled for headers authenticated users (SSO), set the endpoint of the SP or IdP logout, which should
27    # be called after local logout. The {baseUrl} macro is provided so that the browser is redirected back to Studio
28    # after logout (https://STUDIO_SERVER:STUDIO_PORT/studio)
29    # logoutUrl: /YOUR_DOMAIN/logout?ReturnTo={baseUrl}
30  # Authentication provider type
31  - provider: LDAP
32    # Authentication via LDAP enabled
33    enabled: false
34    # LDAP Server url
35    ldapUrl: ldap://localhost:389
36    # LDAP bind DN (user)
37    ldapUsername: cn=Manager,dc=my-domain,dc=com
38    # LDAP bind password
39    ldapPassword: secret
40    # LDAP base context (directory root)
41    ldapBaseContext: dc=my-domain,dc=com
42    # LDAP username attribute
43    usernameLdapAttribute: uid
44    # LDAP first name attribute
45    firstNameLdapAttribute: cn
46    # LDAP last name attribute
47    lastNameLdapAttribute: sn
48    # Authentication header for email
49    emailLdapAttribute: mail
50    # LDAP groups attribute
51    groupNameLdapAttribute: crafterGroup
52    # LDAP groups attribute name regex
53    groupNameLdapAttributeRegex: .*
54    # LDAP groups attribute match index
55    groupNameLdapAttributeMatchIndex: 0
56  # Authentication provider type
57  - provider: LDAP
58    # Authentication via LDAP enabled
59    enabled: false
60    # LDAP Server url
61    ldapUrl: ldap://localhost:390
62    # LDAP bind DN (user)
63    ldapUsername: cn=Manager,dc=my-domain,dc=com
64    # LDAP bind password
65    ldapPassword: secret
66    # LDAP base context (directory root)
67    ldapBaseContext: dc=my-domain,dc=com
68    # LDAP username attribute
69    usernameLdapAttribute: uid
70    # LDAP first name attribute
71    firstNameLdapAttribute: cn
72    # LDAP last name attribute
73    lastNameLdapAttribute: sn
74    # Authentication header for email
75    emailLdapAttribute: mail
76    # LDAP groups attribute
77    groupNameLdapAttribute: crafterGroup
78    # LDAP groups attribute name regex
79    groupNameLdapAttributeRegex: .*
80    # LDAP groups attribute match index
81    groupNameLdapAttributeMatchIndex: 0
82  # Authentication provider type
83  - provider: DB
84    # Authentication via DB enabled
85    enabled: true
In the configuration above, when a user tries to authenticate, the user’s credentials will be passed first to the headers authentication provider. If the authentication succeeds, the processing in the chain is done and the user is allowed to proceed. If the authentication fails, the user credentials will then be passed to LDAP1. If authentication is successful, processing in the chain is done, otherwise, the user credentials are then passed on to LDAP2. LDAP2 will then try to authenticate user. If successful, processing in the chain is done, otherwise, the user credentials are then passed to the final provider in the chain, the internal database. The final provider in the chain then determines whether the user is successfully authenticated or rejected and sent an HTTP 401 Unauthorized message. Below is a diagram showing the authentication chain process using the above configuration:
Studio SAML2 Configuration 
Since
4.0.3
Crafter Studio can be configured to support SAML2 SSO out of the box without using any additional plugins.
Important
This document only applies to CrafterCMS version 4.0.3 and later
Please see here for version 4.0.2 and earlier.
Requirements
A SAML2-compatible Identity Provider (IdP) properly configured; this configuration will not be covered here
A private key and certificate. This can be generated like so:
openssl req -newkey rsa:2048 -nodes -keyout rp-private.key -x509 -days 365 -out rp-certificate.crtTake note of the values of the following options used to generate your key and certificate that will be used later for configuring Studio:
keyout: The value used for this option wil be used in the
studio.security.saml.rp.privateKey.locationpropertyout: The value used for this option will be used in the
studio.security.saml.rp.certificate.locationproperty
Note
IdP is the asserting party and SP is the relying party (Studio)
Configure
To configure Studio SAML2, in your Authoring installation, we need to enable SAML security then we’ll setup the required SAML configuration properties.
To enable SAML security, go to CRAFTER_HOME/bin, open the crafter-setenv.sh file, and uncomment the line export SPRING_PROFILES_ACTIVE=crafter.studio.samlSecurity:
# -------------------- Spring Profiles --------------------
...
# Uncomment to enable Crafter Studio SAML2 security
export SPRING_PROFILES_ACTIVE=crafter.studio.samlSecurity
# For multiple active spring profiles, create comma separated list
Next, we’ll set up SAML configuration properties. Go to CRAFTER_HOME/bin/apache-tomcat/shared/classes/crafter/studio/extension and add/uncomment the following lines to studio-config-override.yaml (of course, make any appropriate configuration changes according to your system):
 1###############################################################
 2##               SAML Security                               ##
 3###############################################################
 4# SAML attribute name for email
 5# studio.security.saml.attributeName.email: email
 6# SAML attribute name for first name
 7# studio.security.saml.attributeName.firstName: givenName
 8# SAML attribute name for last name
 9# studio.security.saml.attributeName.lastName: surname
10# SAML attribute name for group
11# studio.security.saml.attributeName.group: Role
12###############################################################
13##         SAML Security Relying Party (SP) configuration    ##
14###############################################################
15# {baseUrl} and {registrationId} are pre-defined macros and should not be modified
16# SAML relying party (SP) registration ID. {registrationId} macro will be replaced with this value
17# studio.security.saml.rp.registration.id: SSO
18# SAML relying party (SP) entity ID
19# studio.security.saml.rp.entity.id: "{baseUrl}/saml/metadata"
20# SAML relying party (SP) login processing url. Must end with {registrationId}
21# studio.security.saml.rp.loginProcessingUrl: "/saml/{registrationId}"
22# SAML relying party (SP) assertion consumer service location. Must end with {registrationId}
23# studio.security.saml.rp.assertion.consumer.service.location: "{baseUrl}/saml/{registrationId}"
24# SAML relying party (SP) assertion consumer service biding (POST or REDIRECT)
25# studio.security.saml.rp.assertion.consumer.service.binding: POST
26# SAML logout URL without prefix /studio
27# studio.security.saml.rp.logoutUrl: /saml/logout
28# SAML relying party (SP) single logout service location
29# studio.security.saml.rp.logout.service.location: "{baseUrl}/saml/logout"
30# SAML relying party (SP) logout service binding (POST or REDIRECT)
31# studio.security.saml.rp.logout.service.binding: POST
32# SAML relying party (SP) metadata endpoint
33# studio.security.saml.rp.metadata.endpoint: /saml/metadata
34# SAML relying party (SP) private key location
35# studio.security.saml.rp.privateKey.location: classpath:crafter/studio/extension/saml/rp-private.key
36# SAML relying party (SP) certificate location
37# studio.security.saml.rp.certificate.location: classpath:crafter/studio/extension/saml/rp-certificate.crt
38###############################################################
39##      SAML Security Asserting Party (IdP) configuration    ##
40###############################################################
41# SAML asserting party (IdP) entity ID:
42# studio.security.saml.ap.entityId: https://ap.example.org/ap-entity-id
43# SAML asserting party (IdP) single sign on service location
44# studio.security.saml.ap.single.signOn.service.location: https://ap.example.org/sso/saml
45# SAML asserting party (IdP) single sign on service binding (POST or REDIRECT)
46# studio.security.saml.ap.single.signOn.service.binding: POST
47# SAML asserting party (IdP) logout service location
48# studio.security.saml.ap.single.logout.service.location: https://ap.example.org/slo/saml
49# SAML asserting party (IdP) logout service binding (POST or REDIRECT)
50# studio.security.saml.ap.single.logout.service.binding: POST
51# SAML asserting party (IdP) want authn request signed
52# studio.security.saml.ap.want.authn.request.signed: false
53# SAML asserting party (IdP) certificate location
54# studio.security.saml.ap.certificate.location: classpath:crafter/studio/extension/saml/idp-certificate.crt
55###############################################################
56##            SAML Security other configuration              ##
57###############################################################
58# SAML Web SSO profile options: authenticate the user silently
59# studio.security.saml.webSSOProfileOptions.passive: false
60# SAML Web SSO profile options: force user to re-authenticate
61# studio.security.saml.webSSOProfileOptions.forceAuthn: false
where
studio.security.saml.enabled: Indicates if SAML2 is enabled or notThe following are attributes that Studio expects from the Identity Provider:
studio.security.saml.attributeName.emailstudio.security.saml.attributeName.firstNamestudio.security.saml.attributeName.lastNamestudio.security.saml.attributeName.group
studio.security.saml.rp.privateKey.location: The path of the relying party (SP) private key in the classpathstudio.security.saml.rp.certificate.location: The path of the relying party (SP) certificate in the classpathstudio.security.saml.ap.entityId: The asserting party (IdP) entity IDstudio.security.saml.ap.single.signOn.service.location: The asserting party (IdP) single sign on URLstudio.security.saml.ap.single.logout.service.location: The asserting party (IdP) single logout URLstudio.security.saml.ap.certificate.location: The path of the asserting party (IdP) certificate in the classpathstudio.security.saml.webSSOProfileOptions.passive: Indicates if user is authenticated silentlystudio.security.saml.webSSOProfileOptions.forceAuthn: Indicates if user will be forced to re-authenticate
The classpath is located in your Authoring installation, under CRAFTER_HOME/bin/apache-tomcat/shared/classes. As shown in the example above, the relying party private key is located in your Authoring installation under CRAFTER_HOME/bin/apache-tomcat/shared/classes/crafter/studio/extension/saml folder.
# SAML relying party (SP) private key location
studio.security.saml.rp.privateKey.location: classpath:crafter/studio/extension/saml/rp-private.key
Restart your Authoring installation after configuring the above.
Configure Header-Based Authentication
Crafter Studio can integrate with any authentication system that sends custom HTTP headers containing information that will be used to authenticate the user in Studio. This section details how to set up Studio for header-based authentication.
Configure Studio for Header-Based Authentication
Configuring Studio for header-based authentication is very simple: in your Authoring installation, go to CRAFTER_HOME/bin/apache-tomcat/shared/classes/crafter/studio/extension and add the following lines to studio-config-override.yaml (of course, make any appropriate configuration changes according to your system):
 1# Studio authentication chain configuration
 2# studio.authentication.chain:
 3  # Authentication provider type
 4  # - provider: HEADERS
 5    # Authentication via headers enabled
 6    # enabled: true
 7    # Authentication header for secure key
 8    # secureKeyHeader: secure_key
 9    # Authentication headers secure key that is expected to match secure key value from headers
10    # Typically this is placed in the header by the authentication agent
11    # secureKeyHeaderValue: secure
12    # Authentication header for username
13    # usernameHeader: username
14    # Authentication header for first name
15    # firstNameHeader: firstname
16    # Authentication header for last name
17    # lastNameHeader: lastname
18    # Authentication header for email
19    # emailHeader: email
20    # Authentication header for groups: comma separated list of sites and groups
21    #   Example:
22    #   site_author,site_xyz_developer
23    # groupsHeader: groups
24    # (Optional) All authentication header values are in this JWT header's claims.
25    # jwtAuthTokenHeader: x-crafter-oidc-data
26    # Enable/disable logout for headers authenticated users (SSO)
27    # logoutEnabled: false
28    # If logout is enabled for headers authenticated users (SSO), set the endpoint of the SP or IdP logout, which should
29    # be called after local logout. The {baseUrl} macro is provided so that the browser is redirected back to Studio
30    # after logout (https://STUDIO_SERVER:STUDIO_PORT/studio)
31    # logoutUrl: /YOUR_DOMAIN/logout?ReturnTo={baseUrl}
The attribute enabled enables/disables headers authentication; make sure this is set to true for header-based authentication
The secure_key attribute is a secret shared between the authentication agent and Studio via this header. Note that this secure_key is
required and header-based authentication will not proceed unless the secure_key sent to Studio matches this configuration.
Upon matching the secure_key header, Studio will then look for the principal. This can come in one of two formats:
A set of loose headers indicate the principal’s attributes:
username,firstname,lastname,email, andgroups; orA JWT-wrapped principal’s attributes as specified by
x-crafter-oidc-data
Depending on your authentication agent, configure Studio to look for either the loose attributes or JWT.
Configuring Logout
The Sign out button link is disabled/hidden by default when header-based authentication is enabled.
To enable Sign out for users signed in using header-based authentication, change the following lines (as described from the above configuration) in your studio-config-override.yaml file (of course, make any appropriate configuration changes according to your system):
# Enable/disable logout for headers authenticated users (SSO)
# logoutEnabled: false
# If logout is enabled for headers authenticated users (SSO), set the endpoint of the SP or IdP logout, which should
# be called after local logout. The {baseUrl} macro is provided so that the browser is redirected back to Studio
# after logout (https://STUDIO_SERVER:STUDIO_PORT/studio)
# logoutUrl: /YOUR_DOMAIN/logout?ReturnTo={baseUrl}
Configure LDAP Authentication
To configure LDAP authentication, in your Authoring installation, go to CRAFTER_HOME/bin/apache-tomcat/shared/classes/crafter/studio/extension and uncomment the
following lines to the studio-config-override.yaml file.
Note
The values for the parameters listed below are just examples. Remember to make any appropriate configuration changes according to your directory service in use.
 1# Studio authentication chain configuration
 2studio.authentication.chain:
 3  # Authentication provider type
 4  - provider: LDAP
 5    # Authentication via LDAP enabled
 6    enabled: true
 7    # LDAP Server url
 8    ldapUrl: ldap://localhost:389
 9    # LDAP bind DN (user)
10    ldapUsername: cn=Manager,dc=my-domain,dc=com
11    # LDAP bind password
12    ldapPassword: secret
13    # LDAP base context (directory root)
14    ldapBaseContext: dc=my-domain,dc=com
15    # LDAP username attribute
16    usernameLdapAttribute: uid
17    # LDAP first name attribute
18    firstNameLdapAttribute: cn
19    # LDAP last name attribute
20    lastNameLdapAttribute: sn
21    # LDAP email attribute
22    emailLdapAttribute: mail
23    # LDAP groups attribute
24    groupNameLdapAttribute: crafterGroup
25    # LDAP groups attribute name regex
26    groupNameLdapAttributeRegex: .*
27    # LDAP groups attribute match index
28    groupNameLdapAttributeMatchIndex: 0
Some notes on the properties above:
enabledenables/disables LDAP authentication, make sure this is set to true for LDAP authenticationserverUrlis just the URL where the LDAP server is listening for requests.bindDNandbindPasswordare basically the credentials used to connect initially to the LDAP server.baseContextis the LDAP tree root where the user entries can be located.username,firstName,lastNameandemailare basic user attributes.groupNameindicates the groups the user belongs to (can have multiple values). You can specify a regex to extract the group name of a user.
Studio will then do a query against the LDAP server whenever a user attempts to log in and the user is not yet in the DB. If there’s a match in LDAP, the user is created in the database with the imported LDAP attributes, and finally added to the groups specified in LDAP.
Also, please note that Studio needs all the attributes listed in the config to be present in the LDAP user’s attributes, otherwise, Studio is not able to authenticate the user. When an attribute is missing, an error message will be displayed in the login screen: A system error has occurred. Please wait a few minutes or contact an administrator. Please look at the tomcat log to check which attribute was not found. Here’s an example log:
[WARN] 2017-10-11 12:42:57,487 [http-nio-8080-exec-2] [security.DbWithLdapExtensionSecurityProvider] | No LDAP attribute crafterGroup found for username jbloggs
Here are a few things to take note of when configuring LDAP authentication in Studio:
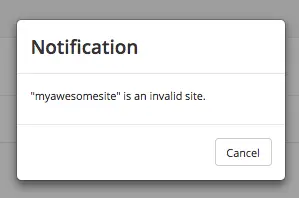
Make sure that at least one of the groupName attribute of the LDAP user exists in Studio and has Roles and Permission setup. If there is no groupName attribute setup in Studio with Roles and Permissions, please make sure that the system administrator assigns a role to at least one group in Studio so the user can access the site, otherwise, once the user gets into the Sites screen and tries to Preview the site or view the dashboard, the user will get a notification that the site is invalid.
To assign a role to a group, please follow the guide Role Mappings. To assign permissions to a role, please see Permission Mappings
For an example of setting up LDAP, see Setting up a Simple LDAP Server using Apache Directory Studio
Authorization
Role Mappings
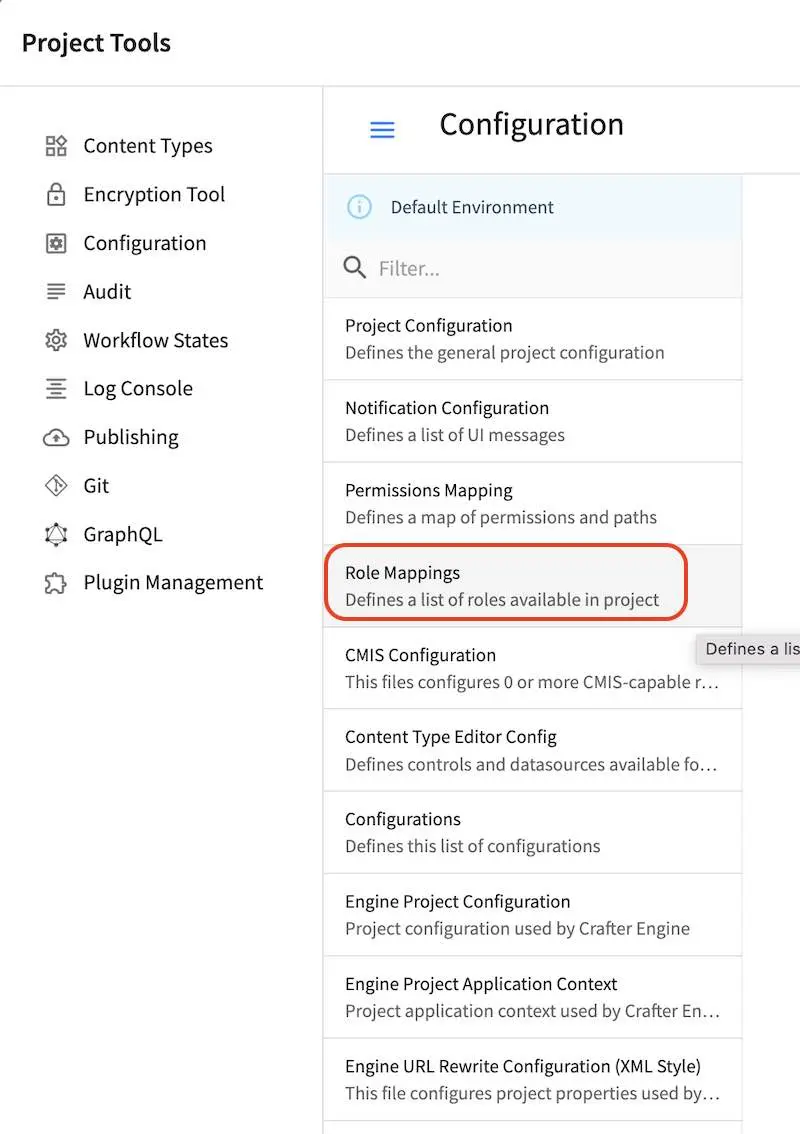
Users only see the items that they have been granted access to based on the permissions granted to the Role they have been assigned to. The role mappings configuration file defines the mapping between the group that the user belongs to and the studio authoring role. To modify the role mappings, click on ![]() from the bottom of the Sidebar, then click on Configuration and select Role Mappings from the list.
from the bottom of the Sidebar, then click on Configuration and select Role Mappings from the list.
Sample
Here’s a sample Role Mappings Configuration file (click on the triangle on the left to expand/collapse):
Sample role mappings configuration
 1<?xml version="1.0" encoding="UTF-8"?>
 2<!--
 3  ~ Copyright (C) 2007-2022 Crafter Software Corporation. All Rights Reserved.
 4  ~
 5  ~ This program is free software: you can redistribute it and/or modify
 6  ~ it under the terms of the GNU General Public License version 3 as published by
 7  ~ the Free Software Foundation.
 8  ~
 9  ~ This program is distributed in the hope that it will be useful,
10  ~ but WITHOUT ANY WARRANTY; without even the implied warranty of
11  ~ MERCHANTABILITY or FITNESS FOR A PARTICULAR PURPOSE.  See the
12  ~ GNU General Public License for more details.
13  ~
14  ~ You should have received a copy of the GNU General Public License
15  ~ along with this program.  If not, see <http://www.gnu.org/licenses/>.
16  -->
17
18<role-mappings>
19    <groups>
20        <group name="site_admin">
21            <role>admin</role>
22        </group>
23        <group name="site_developer">
24            <role>developer</role>
25        </group>
26        <group name="site_author">
27            <role>author</role>
28        </group>
29        <group name="site_publisher">
30            <role>publisher</role>
31        </group>
32        <group name="site_reviewer">
33            <role>reviewer</role>
34        </group>
35    </groups>
36</role-mappings>
Description
/role-mappings/groups/group@nameName of the user group
/role-mappings/groups/roleName of authoring role that the group will map to
Default Project Roles
CrafterCMS comes with predefined roles out of the box for projects. Here’s a list of predefined roles for projects:
admin: Users with the
adminrole have access to project configuration files, creating/editing layouts, templates, taxonomies, content types, scripts, etc. in addition to creating and editing content, as well as the ability to approve and reject workflowdeveloper: Users with the
developerrole have access to project configuration files, creating/editing layouts, templates, taxonomies, content types, scripts, etc. in addition to creating and editing content, as well as the ability to approve and reject workflowreviewer: Users with the
reviewerrole have the ability to approve and reject workflow. They also have access to a number of actions in the dashboard that are not available to content contributors (users with the roleauthor), includingPending ApprovalandScheduled Publish. They do not have access to edit content.publisher: Users with the
publisherrole have the ability to approve and reject workflow. They also have access to a number of actions in the dashboard that are not available to content contributors (users with the roleauthor), includingPending ApprovalandScheduled Publish. In addition, they also have access to create, edit, and submit content like theauthorrole.author: Users with the role
authorhave access to create, edit and submit content
See Permission Mappings for more information on all items accessible for each role in a project.
Permission Mappings
The permission mappings configuration file allows you to assign permissions to folders and objects in a project/site giving specific Roles rights to the object. The permission mappings config file contains the permissions mappings for the roles defined in the role mappings config file. When applying permissions to Roles, rights are granted by adding permissions inside the tag <allowed-permissions>. The absence of permissions means the permission is denied. Rules have a regex expression that governs the scope of the permissions assigned. A list of available permissions that can be granted to Roles is available after the sample configuration file.
- Permissions are defined per:
project/site > role > rule
For example, to grant the role component_author the ability to read/write components and read-only to everything else:
 1<role name="component_author">
 2  <rule regex="/site/website/.*">
 3    <allowed-permissions>
 4      <permission>content_read</permission>
 5    </allowed-permissions>
 6  </rule>
 7  <rule regex="/site/components/.*">
 8    <allowed-permissions>
 9      <permission>content_read</permission>
10      <permission>content_write</permission>
11      <permission>content_create</permission>
12      <permission>folder_create</permission>
13    </allowed-permissions>
14  </rule>
15  <rule regex="/static-assets/.*">
16    <allowed-permissions>
17      <permission>content_read</permission>
18    </allowed-permissions>
19  </rule>
20</role>
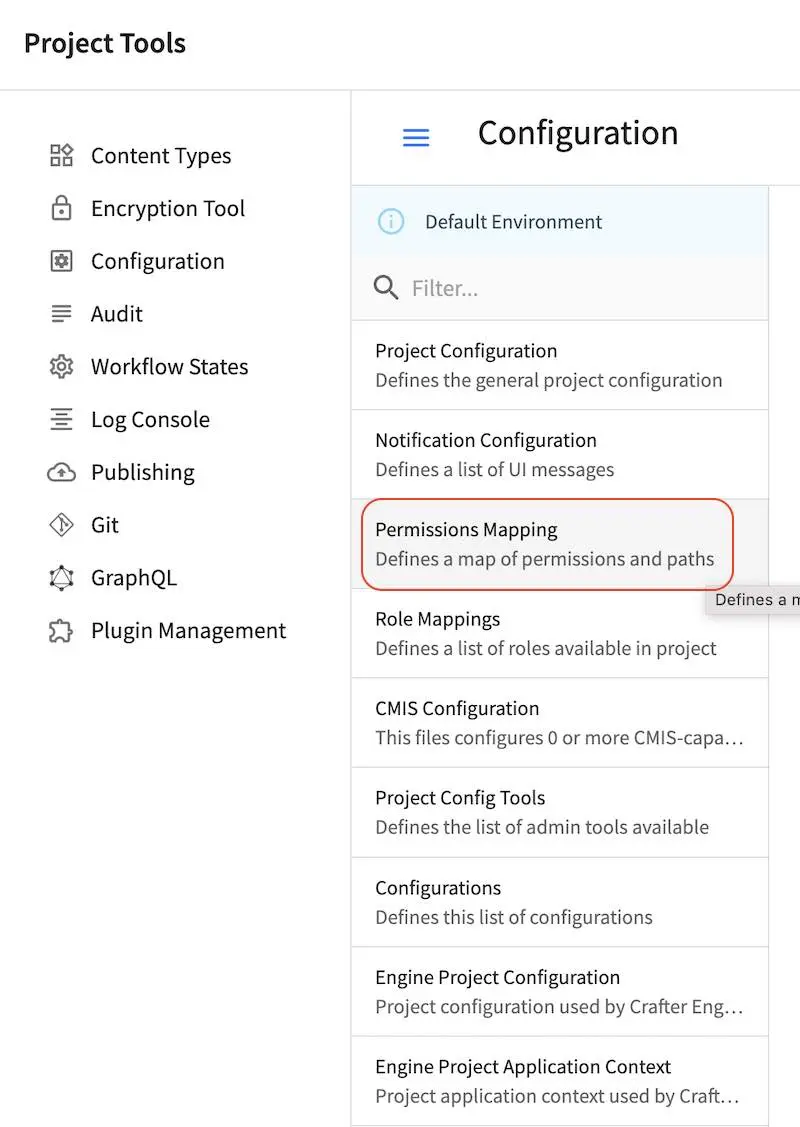
To modify/view the permission mappings for your project/site in Studio, click on ![]() at the bottom of the Sidebar, then click on Configurations and select Permissions Mapping from the list.
at the bottom of the Sidebar, then click on Configurations and select Permissions Mapping from the list.
Sample
Here’s a sample Permission Mappings Configuration file (click on the triangle on the left to expand/collapse):
Sample "permission-mappings-config.xml"
  1<?xml version="1.0" encoding="UTF-8"?>
  2<!--
  3  ~ Copyright (C) 2007-2023 Crafter Software Corporation. All Rights Reserved.
  4  ~
  5  ~ This program is free software: you can redistribute it and/or modify
  6  ~ it under the terms of the GNU General Public License version 3 as published by
  7  ~ the Free Software Foundation.
  8  ~
  9  ~ This program is distributed in the hope that it will be useful,
 10  ~ but WITHOUT ANY WARRANTY; without even the implied warranty of
 11  ~ MERCHANTABILITY or FITNESS FOR A PARTICULAR PURPOSE.  See the
 12  ~ GNU General Public License for more details.
 13  ~
 14  ~ You should have received a copy of the GNU General Public License
 15  ~ along with this program.  If not, see <http://www.gnu.org/licenses/>.
 16  -->
 17<!-- permission-mappings-config.xml
 18
 19  This files contains the permissions mappings for the roles defined in
 20  role-mappings-config.xml.
 21
 22  Permissions are defined per:
 23  site > role > rule
 24
 25  Rules have a regex expression that govern the scope of the permissions assigned.
 26
 27  Absence of permissions means the permission is denied.
 28
 29  View the sample for a good starting point.
 30-->
 31<permissions>
 32    <version>4.1.2</version>
 33    <role name="author">
 34        <rule regex="/site/website/.*">
 35            <allowed-permissions>
 36                <permission>content_read</permission>
 37                <permission>content_write</permission>
 38                <permission>content_create</permission>
 39                <permission>folder_create</permission>
 40                <permission>get_children</permission>
 41                <permission>content_copy</permission>
 42            </allowed-permissions>
 43        </rule>
 44        <rule regex="/site/components|/site/components/.*">
 45            <allowed-permissions>
 46                <permission>content_read</permission>
 47                <permission>content_write</permission>
 48                <permission>content_create</permission>
 49                <permission>folder_create</permission>
 50                <permission>get_children</permission>
 51                <permission>content_copy</permission>
 52            </allowed-permissions>
 53        </rule>
 54        <rule regex="/static-assets|/static-assets/.*">
 55            <allowed-permissions>
 56                <permission>content_read</permission>
 57                <permission>content_write</permission>
 58                <permission>content_create</permission>
 59                <permission>folder_create</permission>
 60                <permission>get_children</permission>
 61                <permission>content_copy</permission>
 62            </allowed-permissions>
 63        </rule>
 64        <rule regex=".*">
 65            <allowed-permissions>
 66                <permission>s3_read</permission>
 67                <permission>s3_write</permission>
 68                <permission>webdav_read</permission>
 69                <permission>webdav_write</permission>
 70                <permission>list_plugins</permission>
 71                <permission>get_children</permission>
 72                <permission>publish_status</permission>
 73                <permission>content_read</permission>
 74                <permission>content_search</permission>
 75                <permission>read_configuration</permission>
 76                <permission>get_publishing_queue</permission>
 77            </allowed-permissions>
 78        </rule>
 79    </role>
 80    <role name="publisher">
 81        <rule regex="/site/.*">
 82            <allowed-permissions>
 83                <permission>content_read</permission>
 84                <permission>content_write</permission>
 85                <permission>content_create</permission>
 86                <permission>folder_create</permission>
 87                <permission>publish</permission>
 88                <permission>get_publishing_queue</permission>
 89                <permission>cancel_publish</permission>
 90                <permission>get_children</permission>
 91                <permission>content_copy</permission>
 92            </allowed-permissions>
 93        </rule>
 94        <rule regex="^/site/(?!website/index\.xml)(.*)">
 95            <allowed-permissions>
 96                <permission>content_delete</permission>
 97                <permission>content_read</permission>
 98            </allowed-permissions>
 99        </rule>
100        <rule regex="/static-assets.*">
101            <allowed-permissions>
102                <permission>content_read</permission>
103                <permission>content_write</permission>
104                <permission>content_create</permission>
105                <permission>folder_create</permission>
106                <permission>publish</permission>
107                <permission>get_publishing_queue</permission>
108                <permission>cancel_publish</permission>
109                <permission>content_delete</permission>
110                <permission>get_children</permission>
111                <permission>content_copy</permission>
112            </allowed-permissions>
113        </rule>
114        <rule regex="~DASHBOARD~">
115            <allowed-permissions>
116                <permission>publish</permission>
117                <permission>get_publishing_queue</permission>
118                <permission>cancel_publish</permission>
119                <permission>publish_status</permission>
120                <permission>content_read</permission>
121            </allowed-permissions>
122        </rule>
123        <rule regex=".*">
124            <allowed-permissions>
125                <permission>s3_read</permission>
126                <permission>s3_write</permission>
127                <permission>webdav_read</permission>
128                <permission>webdav_write</permission>
129                <permission>list_plugins</permission>
130                <permission>get_children</permission>
131                <permission>publish_status</permission>
132                <permission>content_read</permission>
133                <permission>content_search</permission>
134                <permission>read_configuration</permission>
135                <permission>get_publishing_queue</permission>
136            </allowed-permissions>
137        </rule>
138    </role>
139    <role name="developer">
140        <rule regex="/.*">
141            <allowed-permissions>
142                <permission>content_read</permission>
143                <permission>content_write</permission>
144                <permission>publish</permission>
145                <permission>get_publishing_queue</permission>
146                <permission>cancel_publish</permission>
147                <permission>folder_create</permission>
148                <permission>content_create</permission>
149                <permission>change_content_type</permission>
150                <permission>write_configuration</permission>
151                <permission>add_remote</permission>
152                <permission>list_remotes</permission>
153                <permission>pull_from_remote</permission>
154                <permission>push_to_remote</permission>
155                <permission>rebuild_database</permission>
156                <permission>remove_remote</permission>
157                <permission>site_status</permission>
158                <permission>resolve_conflict</permission>
159                <permission>site_diff_conflicted_file</permission>
160                <permission>commit_resolution</permission>
161                <permission>cancel_failed_pull</permission>
162                <permission>encryption_tool</permission>
163                <permission>get_children</permission>
164                <permission>publish_status</permission>
165                <permission>content_copy</permission>
166            </allowed-permissions>
167        </rule>
168        <rule regex="^/(?!site/website/index\.xml)(.*)">
169            <allowed-permissions>
170                <permission>content_delete</permission>
171                <permission>content_read</permission>
172            </allowed-permissions>
173        </rule>
174        <rule regex="~DASHBOARD~">
175            <allowed-permissions>
176                <permission>publish</permission>
177                <permission>get_publishing_queue</permission>
178                <permission>cancel_publish</permission>
179                <permission>write_configuration</permission>
180                <permission>add_remote</permission>
181                <permission>list_remotes</permission>
182                <permission>pull_from_remote</permission>
183                <permission>push_to_remote</permission>
184                <permission>rebuild_database</permission>
185                <permission>remove_remote</permission>
186                <permission>site_status</permission>
187                <permission>resolve_conflict</permission>
188                <permission>site_diff_conflicted_file</permission>
189                <permission>commit_resolution</permission>
190                <permission>cancel_failed_pull</permission>
191                <permission>encryption_tool</permission>
192                <permission>publish_status</permission>
193                <permission>content_read</permission>
194            </allowed-permissions>
195        </rule>
196        <rule regex=".*">
197            <allowed-permissions>
198                <permission>s3_read</permission>
199                <permission>s3_write</permission>
200                <permission>webdav_read</permission>
201                <permission>webdav_write</permission>
202                <permission>list_plugins</permission>
203                <permission>install_plugins</permission>
204                <permission>get_children</permission>
205                <permission>publish_status</permission>
206                <permission>remove_plugins</permission>
207                <permission>content_read</permission>
208                <permission>content_search</permission>
209                <permission>view_logs</permission>
210                <permission>audit_log</permission>
211                <permission>read_configuration</permission>
212                <permission>write_configuration</permission>
213                <permission>set_item_states</permission>
214            </allowed-permissions>
215        </rule>
216    </role>
217    <role name="admin">
218        <rule regex="/.*">
219            <allowed-permissions>
220                <permission>content_read</permission>
221                <permission>content_write</permission>
222                <permission>publish</permission>
223                <permission>get_publishing_queue</permission>
224                <permission>cancel_publish</permission>
225                <permission>folder_create</permission>
226                <permission>content_create</permission>
227                <permission>change_content_type</permission>
228                <permission>add_remote</permission>
229                <permission>list_remotes</permission>
230                <permission>pull_from_remote</permission>
231                <permission>push_to_remote</permission>
232                <permission>rebuild_database</permission>
233                <permission>remove_remote</permission>
234                <permission>write_configuration</permission>
235                <permission>site_status</permission>
236                <permission>resolve_conflict</permission>
237                <permission>site_diff_conflicted_file</permission>
238                <permission>commit_resolution</permission>
239                <permission>cancel_failed_pull</permission>
240                <permission>encryption_tool</permission>
241                <permission>get_children</permission>
242                <permission>edit_site</permission>
243                <permission>publish_status</permission>
244                <permission>publish_clear_lock</permission>
245                <permission>unlock_repository</permission>
246                <permission>item_unlock</permission>
247                <permission>content_copy</permission>
248                <permission>repair_repository</permission>
249            </allowed-permissions>
250        </rule>
251        <rule regex="^/(?!site/website/index\.xml)(.*)">
252            <allowed-permissions>
253                <permission>content_delete</permission>
254                <permission>content_read</permission>
255            </allowed-permissions>
256        </rule>
257        <rule regex="~DASHBOARD~">
258            <allowed-permissions>
259                <permission>publish</permission>
260                <permission>get_publishing_queue</permission>
261                <permission>cancel_publish</permission>
262                <permission>add_remote</permission>
263                <permission>list_remotes</permission>
264                <permission>pull_from_remote</permission>
265                <permission>push_to_remote</permission>
266                <permission>rebuild_database</permission>
267                <permission>remove_remote</permission>
268                <permission>write_configuration</permission>
269                <permission>site_status</permission>
270                <permission>resolve_conflict</permission>
271                <permission>site_diff_conflicted_file</permission>
272                <permission>commit_resolution</permission>
273                <permission>cancel_failed_pull</permission>
274                <permission>encryption_tool</permission>
275                <permission>publish_status</permission>
276                <permission>publish_clear_lock</permission>
277                <permission>unlock_repository</permission>
278                <permission>item_unlock</permission>
279                <permission>content_read</permission>
280                <permission>repair_repository</permission>
281            </allowed-permissions>
282        </rule>
283        <rule regex=".*">
284            <allowed-permissions>
285                <permission>s3_read</permission>
286                <permission>s3_write</permission>
287                <permission>webdav_read</permission>
288                <permission>webdav_write</permission>
289                <permission>edit_site</permission>
290                <permission>list_plugins</permission>
291                <permission>install_plugins</permission>
292                <permission>get_children</permission>
293                <permission>publish_status</permission>
294                <permission>item_unlock</permission>
295                <permission>remove_plugins</permission>
296                <permission>content_read</permission>
297                <permission>content_search</permission>
298                <permission>view_logs</permission>
299                <permission>start_stop_publisher</permission>
300                <permission>read_configuration</permission>
301                <permission>write_configuration</permission>
302                <permission>set_item_states</permission>
303            </allowed-permissions>
304        </rule>
305    </role>
306    <role name="reviewer">
307        <rule regex="/.*">
308            <allowed-permissions>
309                <permission>content_read</permission>
310                <permission>publish</permission>
311                <permission>get_publishing_queue</permission>
312                <permission>cancel_publish</permission>
313                <permission>get_children</permission>
314                <permission>publish_status</permission>
315            </allowed-permissions>
316        </rule>
317        <rule regex="~DASHBOARD~">
318            <allowed-permissions>
319                <permission>publish</permission>
320                <permission>get_publishing_queue</permission>
321                <permission>cancel_publish</permission>
322                <permission>publish_status</permission>
323                <permission>content_read</permission>
324            </allowed-permissions>
325        </rule>
326        <rule regex=".*">
327            <allowed-permissions>
328                <permission>s3_read</permission>
329                <permission>webdav_read</permission>
330                <permission>list_plugins</permission>
331                <permission>get_children</permission>
332                <permission>publish_status</permission>
333                <permission>content_read</permission>
334                <permission>content_search</permission>
335                <permission>read_configuration</permission>
336            </allowed-permissions>
337        </rule>
338    </role>
339    <role name="*">
340        <rule regex="/.*">
341            <allowed-permissions>
342                <permission>content_read</permission>
343                <permission>get_children</permission>
344                <permission>publish_status</permission>
345            </allowed-permissions>
346        </rule>
347        <rule regex=".*">
348            <allowed-permissions>
349                <permission>s3_read</permission>
350                <permission>webdav_read</permission>
351                <permission>list_plugins</permission>
352                <permission>get_children</permission>
353                <permission>publish_status</permission>
354                <permission>content_read</permission>
355                <permission>content_search</permission>
356            </allowed-permissions>
357        </rule>
358    </role>
359</permissions>
Description
List of available permissions
Permission |
Description |
|---|---|
add_remote |
User is permitted to add a remote repository |
audit_log |
User is permitted to access the audit log |
cancel_failed_pull |
User is permitted to cancel a failed pull from a repository |
cancel_publish |
User is permitted to cancel a publish request |
change_content_type |
User is permitted to change content type |
commit_resolution |
User is permitted to commit resolution |
configure_log_levels |
User is permitted to configure log levels |
content_copy |
User is permitted to copy content |
content_create |
User is permitted to create new content |
content_delete |
User is permitted to delete content |
content_read |
User is permitted to read content |
content_search |
User is permitted to search for content |
content_write |
User is permitted to edit content |
duplicate_site |
User is permitted to duplicate a project |
folder_create |
User is permitted to create new folder |
create_cluster |
User is permitted to create cluster |
create_groups |
User is permitted to create new groups |
create_users |
User is permitted to create new users |
create_site |
User is permitted to create projects |
delete_site |
User is permitted to delete projects |
delete_cluster |
User is permitted to delete clusters |
delete_groups |
User is permitted to delete groups |
delete_users |
User is permitted to delete users |
edit_site |
User is permitted to edit sites |
encryption_tool |
User is permitted to access the encryption tool |
get_children |
User is permitted to call getChildren* APIs for browsing project content |
get_publishing_queue |
User is permitted to get the list of packages in the publishing queue |
install_plugins |
User is permitted to install plugins |
item_unlock |
User is permitted to unlock items |
list_plugins |
User is permitted to list installed plugins |
list_remotes |
User is permitted to list remote repositories for a project |
manage_access_token |
User is permitted to manage the access tokens |
publish |
User is permitted to approve submitted content for publishing or publish content |
publish_status |
User is permitted to get the publishing status |
publish_clear_lock |
User is permitted to clear publishing locks |
pull_from_remote |
User is permitted to pull content from remote repository to project content repository |
push_to_remote |
User is permitted to push content to remote repository from project content repository |
read_configuration |
user is permitted to read configuration content for project |
read_cluster |
User is permitted to read cluster |
read_groups |
User is permitted to read groups |
read_logs |
User is permitted to read logs |
read_users |
User is permitted to read users |
rebuild_database |
User is permitted to rebuild Crafter Studio’s database and object state with the underlying repository |
remove_plugins |
User is permitted to remove installed plugins |
remove_remote |
User is permitted to remove remote repository from project content repository |
repair_repository |
User is permitted to repair the repository |
resolve_conflict |
User is permitted to resolve a conflict for a file by accepting ours or theirs |
s3_read |
User is permitted to get a list of items from an S3 bucket |
s3_write |
User is permitted to upload a file to an S3 bucket |
search_plugins |
User is permitted to search for plugins |
set_item_states |
User is permitted to set item states |
site_diff_conflicted_file |
User is permitted to get the difference between |
site_status |
User is permitted to get status of repository for a project |
start_stop_publisher |
User is permitted to start/stop the publisher |
unlock_repository |
User is permitted to unlock the repository |
update_cluster |
User is permitted to update cluster |
update_groups |
User is permitted to update groups |
update_users |
User is permitted to update users |
view_logs |
User is permitted to view logs |
view_log_levels |
User is permitted to view log levels |
webdav_read |
User is permitted to get a list of items from a WebDAV server |
webdav_write |
User is permitted to upload a file to a WebDAV server |
write_configuration |
User is permitted to write configuration content for project |
write_global_configuration |
User is permitted to write global configuration content for Studio |
where:
/permissions/site/role@nameRole name/permissions/site/role/rule@regexRegular expression to filter paths where permission is applied. The valueregex="~DASHBOARD~"is a special regular expression applied for content displayed in dashboard widgets only/permissions/site/role/rule/allowed-permissions/permissionAllowed permission for role and rule (possible values given in the table above)
Other Security Configuration
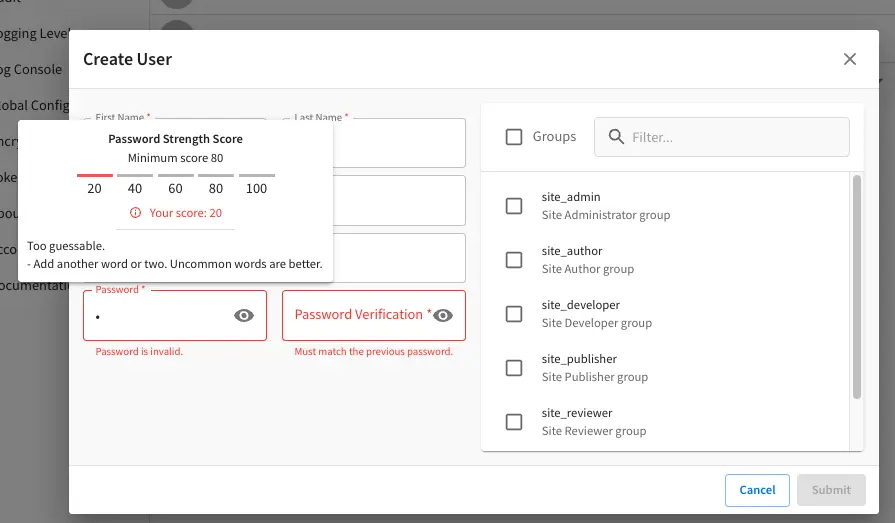
Configure Studio Password Requirements
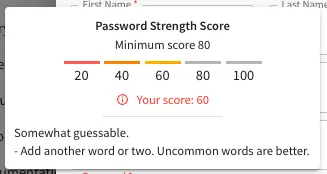
Password requirements validation allows the admin to setup rules that ensures users create passwords based on an organization’s password security policy.
Crafter Studio uses zxcvbn for password strength management.
Since 4.0.3The password strength configured here is displayed to the user when resetting a password or creating a user.
To configure the password strength, click on Main Menu then click on Global Config.
Scroll to the section Security and change the value of studio.security.passwordRequirements.minimumComplexity
to desired minimum password complexity required:
 1# Password requirements minimum complexity
 2# This is based on https://github.com/dropbox/zxcvbn
 3# The minimum complexity corresponds to the password score
 4# You can try this out here https://lowe.github.io/tryzxcvbn/
 5#  score      # Integer from 0-4 (useful for implementing a strength bar)
 6#  0 # too guessable: risky password. (guesses < 10^3)
 7#  1 # very guessable: protection from throttled online attacks. (guesses < 10^6)
 8#  2 # somewhat guessable: protection from unthrottled online attacks. (guesses < 10^8)
 9#  3 # safely unguessable: moderate protection from offline slow-hash scenario. (guesses < 10^10)
10#  4 # very unguessable: strong protection from offline slow-hash scenario. (guesses >= 10^10)
11# The default value is 3
12studio.security.passwordRequirements.minimumComplexity: 3
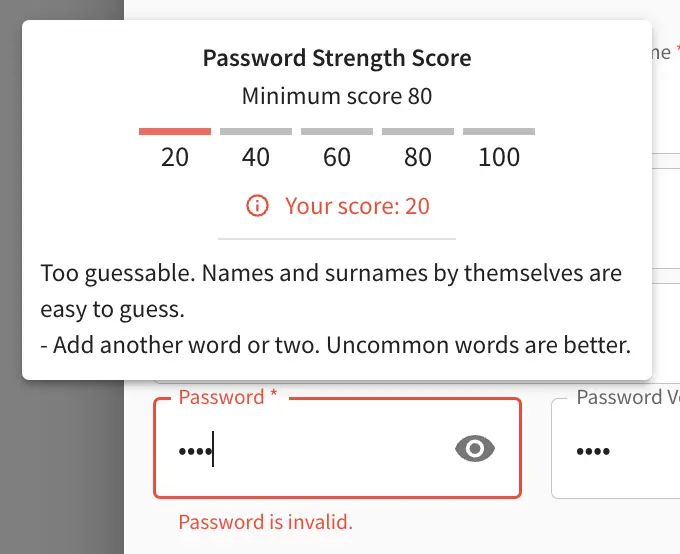
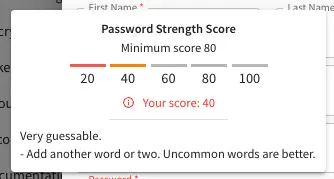
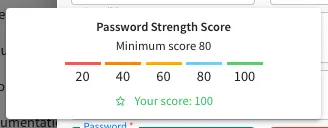
Crafter Studio’s default minimum password complexity required is set to 3 (which translate to a score
of 80 in the UI), and until the user setting/changing the password has met the minimum required,
the Submit button will not be enabled. Also, once the minimum password strength score has been
reached, the score will be displayed in green.
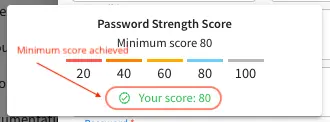
Below, are some of the messages displayed as a user is inputting a new password:
Studio Timeouts
Changing the Session Timeout
CrafterCMS has configurable timeouts for session lifetime and session inactivity.
Session lifetime timeout is the amount of time a session is valid before requiring the user to re-authenticate.
Session inactivity timeout is the amount of time of user inactivity before requiring the user to re-authenticate.
In some cases, some operations in CrafterCMS may last longer than the user session inactivity timeout settings. For this scenario, the session inactivity timeout will need to be modified to allow the operation to finish without the session timing out. Also, you may want to change the timeouts from the default settings.
Here’s a summary of the session timeouts available in CrafterCMS:
Timeout Name |
Default Value |
Description |
|---|---|---|
|
480 |
Studio session lifetime timeout |
|
30 |
Studio session inactivity timeout |
|
30 |
Tomcat session timeout |
Change Session Lifetime Timeout
To change the session lifetime timeout, in your
CRAFTER_HOME/bin/apache-tomcat/shared/classes/crafter/studio/extension/studio-config-override.yaml,
change the value for studio.security.sessionTimeout to desired amount of time the session is valid
in minutes for users.
# Time in minutes after which active users will be required to login again
# studio.security.sessionTimeout: 480
Make sure to stop and restart Studio after making your changes.
Change Session Inactivity Timeout
There are two timeouts you can configure for the session inactivity timeout as described in the above table.
session-timeoutin the Tomcatweb.xmlfile This is the default Tomcat timeout for handling idle connections (inactive)inactivityTimeoutin the Studio override configuration file This is the Studio session inactivity timeout
To change the session inactivity timeout, follow the instructions below:
In your
CRAFTER_HOME/bin/apache-tomcat/shared/classes/crafter/studio/extension/studio-config-override.yaml, change the value forstudio.security.inactivityTimeoutto set the amount of time in minutes the amount of time a user can be inactive before the user’s session times out.# Time in minutes after which inactive users will be required to login again # studio.security.inactivityTimeout: 30
In your
CRAFTER_HOME/bin/apache-tomcat/webapps/studio/WEB-INF/web.xmlfile, change the value in between thesession-timeouttags to desired amount of time the session will exist in minutes:<session-config> <session-timeout>30</session-timeout> <tracking-mode>COOKIE</tracking-mode> </session-config>
Remember to keep the Studio session inactivity timeout inactivityTimeout from the studio-config-override.yaml file less than the Tomcat session-timeout from the CRAFTER_HOME/bin/apache-tomcat/webapps/studio/WEB-INF/web.xml file.
Make sure to stop and restart Studio after making your changes.
You can also change the Studio session timeouts from the Main Menu in Studio under Global Config
Cipher Configuration
 1##################################################
 2##                   Security                   ##
 3##################################################
 4# Time in minutes after which active users will be required to login again
 5# studio.security.sessionTimeout: 480
 6# Time in minutes after which inactive users will be required to login again
 7# studio.security.inactivityTimeout: 30
 8#
 9# Salt for encrypting
10studio.security.cipher.salt: ${env:CRAFTER_SYSTEM_ENCRYPTION_SALT}
11# Key for encrypting
12studio.security.cipher.key: ${env:CRAFTER_SYSTEM_ENCRYPTION_KEY}
13
14# The key used for encryption of configuration properties
15studio.security.encryption.key: ${env:CRAFTER_ENCRYPTION_KEY}
16# The salt used for encryption of configuration properties
17studio.security.encryption.salt: ${env:CRAFTER_ENCRYPTION_SALT}
18
19# The path of the folder used for the SSH configuration
20studio.security.ssh.config: ${env:CRAFTER_SSH_CONFIG}
21
22# Defines name used for environment specific configuration. It is used for environment overrides in studio. Default value is default.
23studio.configuration.environment.active: ${env:CRAFTER_ENVIRONMENT}
Access Tokens
Since 4.0.0The following section of Studio’s configuration overrides allows you to configure settings for the Studio access tokens. Access tokens can then be used to invoke Crafter Studio’s REST APIs from the out of the box UI as well as any customized JavaScript, CURL commands, or used in Crafter CLI to perform operations on Studio.
Studio access tokens uses JWT tokens for authentication. The following environment variables are used to customize the default behavior of the JWT token that is used.
 1##################################################
 2##               Access Tokens                  ##
 3##################################################
 4
 5# Issuer for the generated access tokens
 6studio.security.token.issuer: ${env:STUDIO_TOKEN_ISSUER}
 7# List of accepted issuers for validation of access tokens (separated by commas)
 8studio.security.token.validIssuers: ${env:STUDIO_TOKEN_VALID_ISSUERS}
 9# The audience for generation and validation of access tokens (if empty the instance id will be used)
10studio.security.token.audience: ${env:STUDIO_TOKEN_AUDIENCE}
11# Time in minutes for the expiration of the access tokens
12studio.security.token.timeout: ${env:STUDIO_TOKEN_TIMEOUT}
13# Password for signing the access tokens (needs to be equal or greater than 512 bits in length)
14studio.security.token.password.sign: ${env:STUDIO_TOKEN_SIGN_PASSWORD}
15# Password for encrypting the access tokens
16studio.security.token.password.encrypt: ${env:STUDIO_TOKEN_ENCRYPT_PASSWORD}
17# Name of the cookie to store the refresh token
18studio.security.token.cookie.name: ${env:STUDIO_REFRESH_TOKEN_NAME}
19# Time in seconds for the expiration of the refresh token cookie
20studio.security.token.cookie.maxAge: ${env:STUDIO_REFRESH_TOKEN_MAX_AGE}
21# Indicates if the refresh token cookie should be secure (should be true for production environments behind HTTPS)
22studio.security.token.cookie.secure: ${env:STUDIO_REFRESH_TOKEN_SECURE}
where:
STUDIO_TOKEN_ISSUER,STUDIO_TOKEN_VALID_ISSUERS,STUDIO_TOKEN_AUDIENCE
These variables are used in the JWT claims set. See https://datatracker.ietf.org/doc/html/rfc7519#section-4.1 for more information on JWT claims set.STUDIO_TOKEN_TIMEOUT
This variable sets the expiration of the JWT token in minutes (default is 5 minutes). The expiration value is also injected into the JWT claims when a token is published. This cannot be changed after the token is published. After the expiration time, the token is invalid and a new token must be published to use for API calls. (This can be done automatically with therefresh_tokenin the UI)STUDIO_TOKEN_SIGN_PASSWORD
This variable is used for the Signature part of the JWT token. The signature is used to verify the message wasn’t changed along the way, and, in the case of tokens signed with a private key, it can also verify that the sender of the JWT is who it says it is. For Studio, we use HMAC_SHA512 algorithm for the signature.STUDIO_TOKEN_ENCRYPT_PASSWORD
This variable is used for encrypting the JWT token itself so that it won’t be decrypted without a password.STUDIO_REFRESH_TOKEN_NAME,STUDIO_REFRESH_TOKEN_MAX_AGE,STUDIO_REFRESH_TOKEN_SECURE
These variables are used for customizing the refresh token cookie. JWT token is short lived in general and we use a refresh token to exchange for a new JWT token when the old one is expired. By default the cookie name isrefresh_token. When creating a new access token, the backend will validate if the refresh token cookie is valid. You should find this from the cookies in the browser while logging in with Studio.
For more information on JWT tokens in general, see https://jwt.io/introduction. For information on creating access tokens in Studio, see here.