
Studio Administration
Much of the administration of Crafter Studio can be done via the UI. This section describes how to perform these basic tasks.
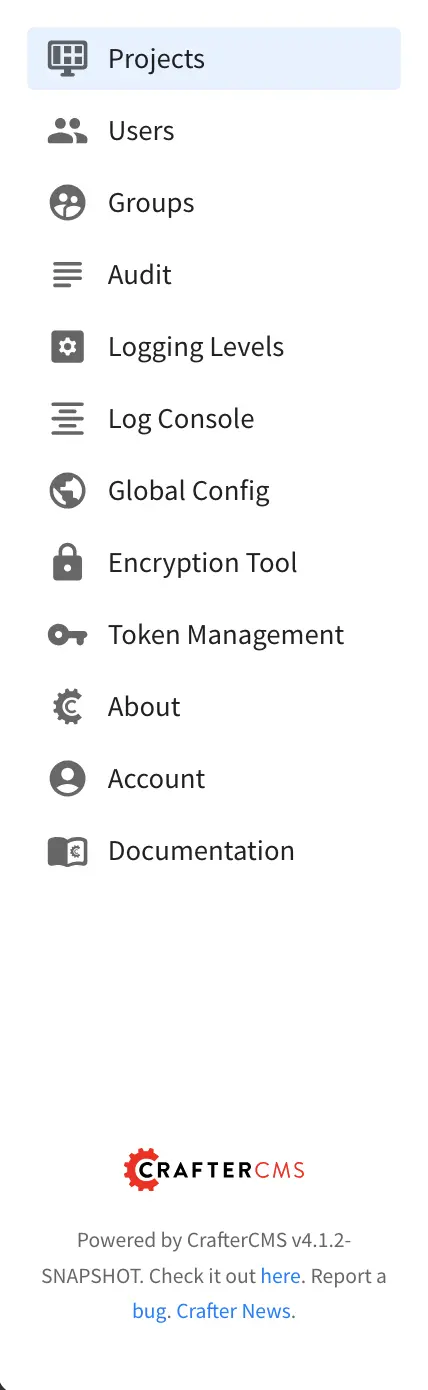
Navigating the Navigation Menu
In this section, we discuss the Navigation Menu tools available in Studio. To access, click the Navigation Menu icon from the top right of the browser

Here are the list of tools available when using an out of the box blueprint. The Navigation Menu tools described below are available to users belonging to the system_admin group.
The configuration files for the Navigation Menu is located in CRAFTER_HOME/data/repos/global/configuration/ where:
global-menu-config.xml lets you setup the list of tools available from the Navigation Menu sidebar
global-permission-mappings-config.xml lets you configure the permissions to a role globally for the entire application
global-role-mappings-config.xml lets you configure the mapping between the group and the role
The tools available in the Navigation Menu is configured similar to how the Project Tools Sidebar is configured here using the global menu config configuration file mentioned above.
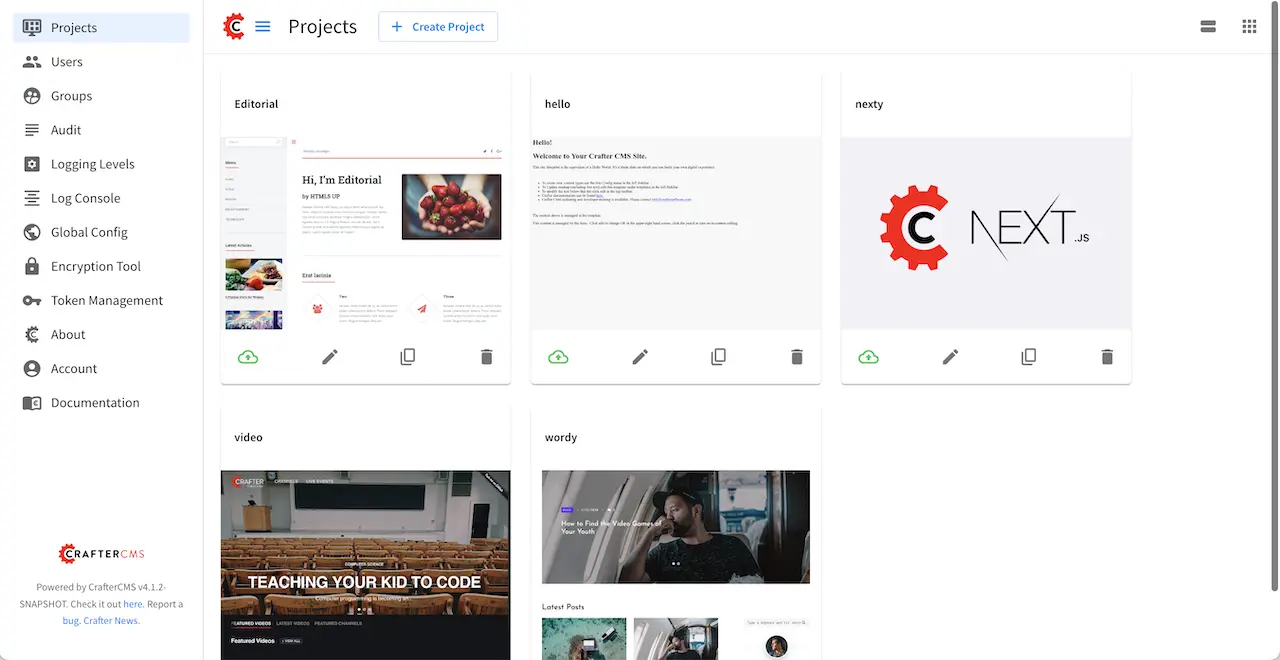
Projects
Projects contains a list of all the projects the logged in user has access to. The section Author Screens in Content Authors contains descriptions on some of the actions that can be performed from the Projects screen. This also allows users with the system admin role to create new projects either from a blueprint, a remote repository or an existing project.
Users
A user is anybody who uses CrafterCMS. Users lets the administrator manage who has access to Crafter Studio. See Users Management for more information on Users
User/Group Management contains more information on managing users and groups.
Groups
A group consists of a collection of users. Groups lets the administrator manage groups, members belonging to a group, etc. For more information on groups, see Groups Management
User/Group Management contains more information on managing users and groups.
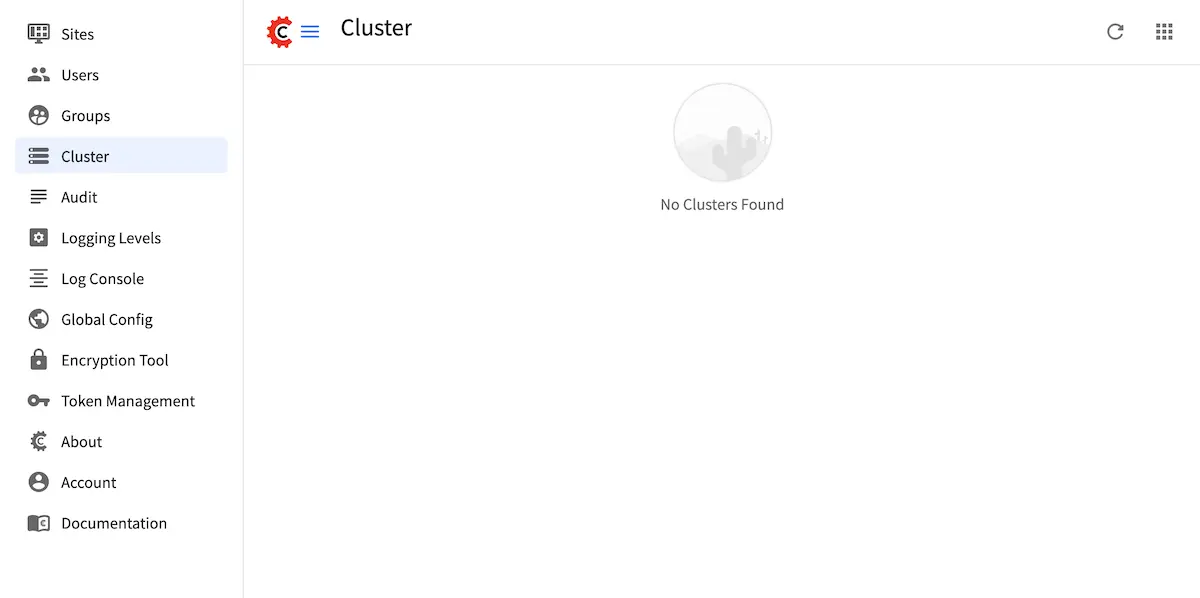
Cluster 
Cluster lets the administrator manage Studio clusters. See Studio Clustering for more information on how to setup clustering and available actions from Cluster from the Main Menu
Audit
Audit logs displays the date, time, user and action performed to content in all the projects available as well as actions performed in Studio such as logins/logouts, user removal, group addition, etc.
See Navigation Menu Audit for more details on the audit logs
Logging Levels
There are 6 log levels defined in CrafterCMS. These levels determine what messages will be logged and displayed in the Logging Console.
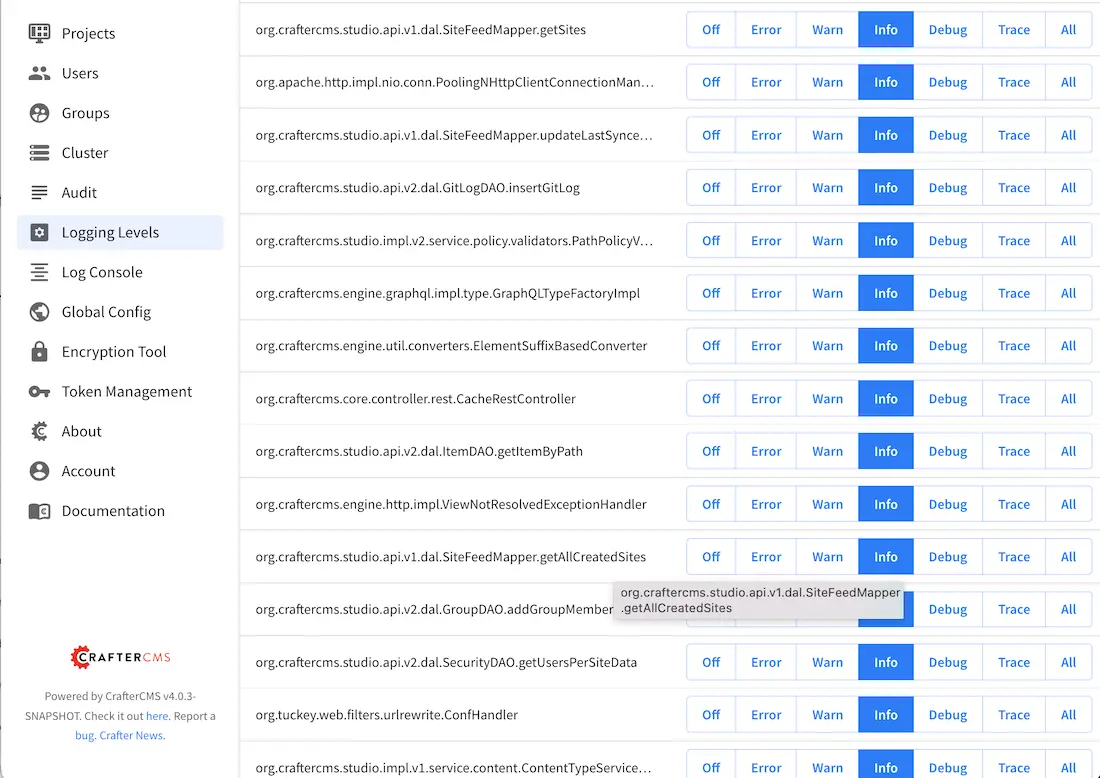
For more information on logging levels, see Overriding Logging Levels
Log Console
The Log Console allows the user to view messages depending on what log levels and what Java packages have been set for tracking.
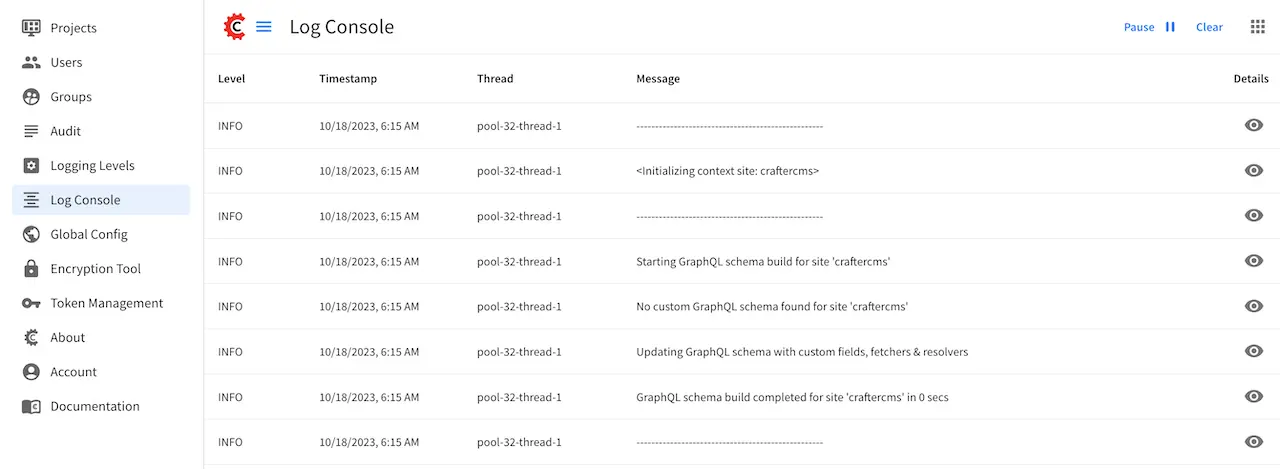
Overriding Logging Levels contains more information on how to track Java packages with the corresponding log levels desired.
The Log Console here in the Main Menu is similar to a project Log Console described here. The difference is the Log Console from the Main Menu can display logs for all the projects inside Studio, not just one project.
Global Config
The Global Config allows the user to edit the system settings for Studio without access to the physical server.
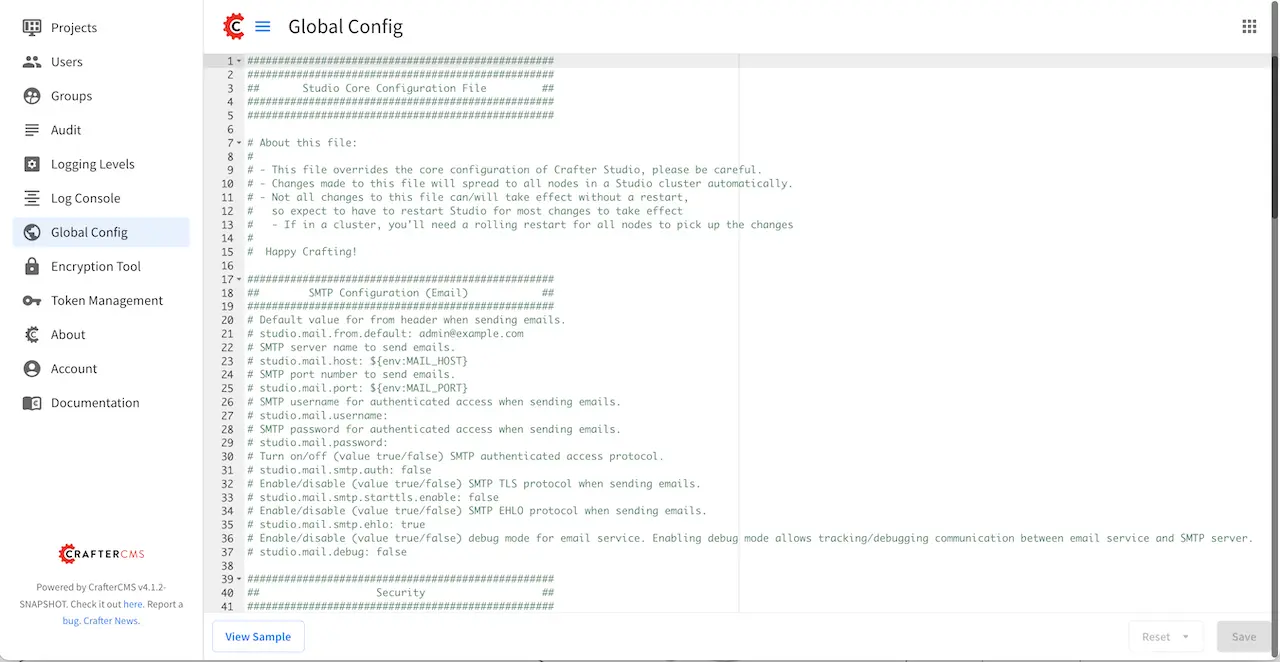
When making changes here, not all changes can/will take effect without a restart, so expect to have to restart Studio for most changes to take effect
For more information on what you can configure from the Global Config, see Navigation Menu Global Config
Encryption Tool
The Encryption Tool allows the user to encrypt sensitive data such as access keys and passwords, that shouldn’t be publicly available to anyone but developers and administrators
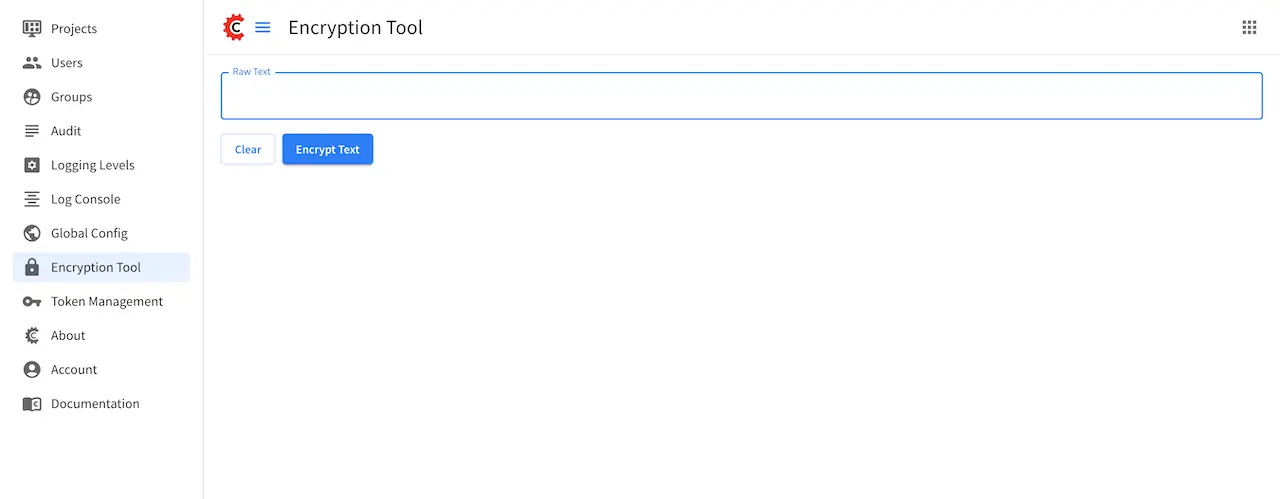
For more information on how to use the encryption tool, see Studio UI Encryption Tool.
Token Management
The Token Management Tool allows the user to manage access tokens used to make API requests on behalf of the user
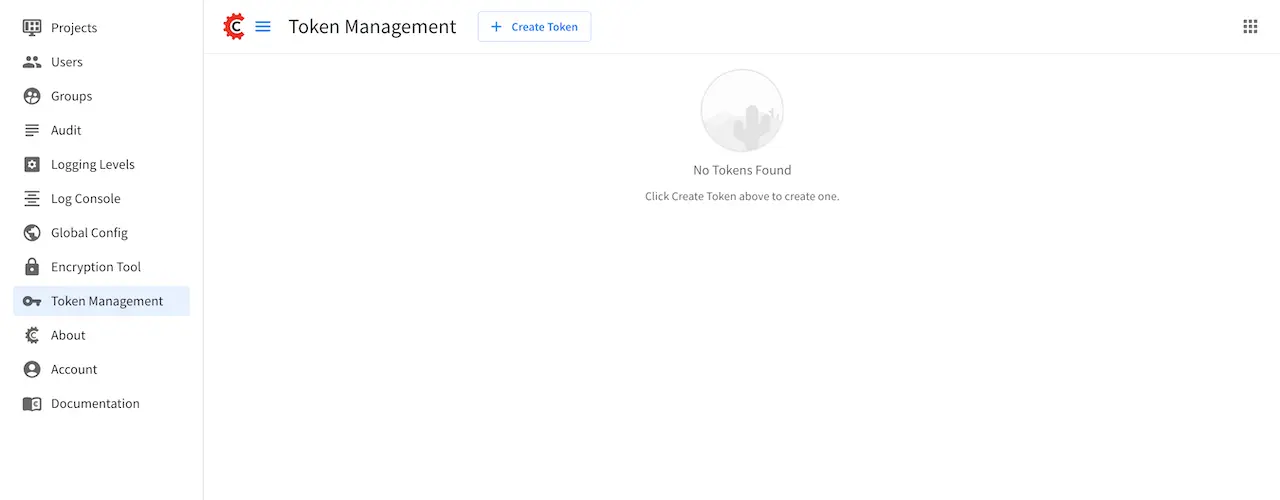
For an example of how to use the generated token, see Crafter CLI.
Account
The Account Tool allows the user to change the user’s personal Crafter Studio settings like language or to change the user’s password or to clear your Studio UI preferences from the browser cache.
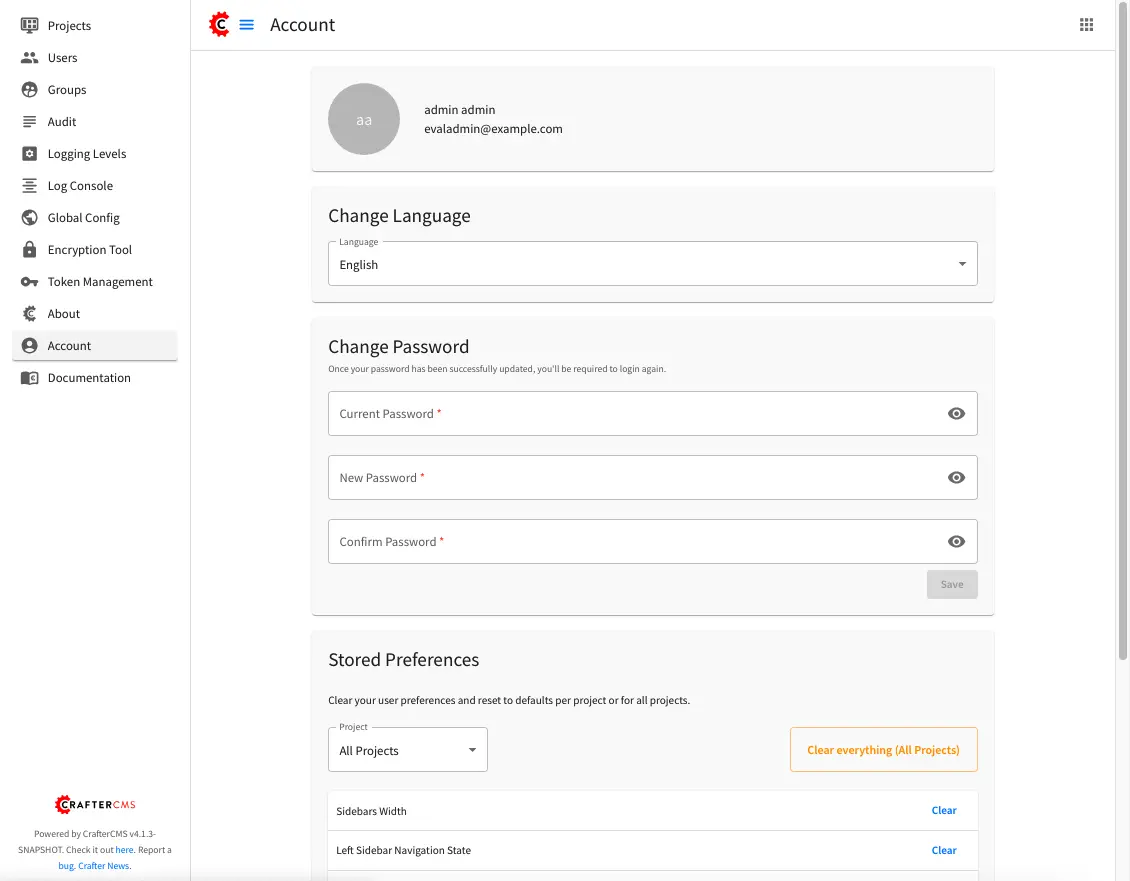
For more information on how to use the Account tool, see Account Management.
Navigation Menu Global Config
CrafterCMS allows the user to edit the system settings for Studio without access to the physical server through Global Config under the Navigation Menu in Studio.
This global configuration file overrides the core configuration of Crafter Studio, studio-config.yaml, found in your Authoring installation, under CRAFTER_HOME/bin/apache-tomcat/webapps/studio/WEB-INF/classes/crafter/studio, and the Studio configuration override file studio-config-override.yaml under CRAFTER_HOME/bin/apache-tomcat/shared/classes/crafter/studio/extension in your Authoring installation (for more information on this file, see Studio Configuration.
Changes made to this file will spread to all nodes in a Studio cluster automatically. Please note that not all changes to this file can/will take effect without a restart, so expect to have to restart Studio for most changes to take effect. If in a cluster, you’ll need a rolling restart for all nodes to pick up the changes.
To access the Global Config, click on the Navigation Menu icon at the top right corner, then click on Global Config in the Global panel
To find out more on what you can configure from the Global Config, see Studio Configuration.
Navigation Menu Audit
CrafterCMS tracks the date, time, user and action performed to content and the system through an audit log.
To view the audit logs, from the top right of your browser, click on the Navigation Menu icon, then click on Audit.
You can filter the logs displayed based on the following:
Audit Logs Project Filter
Project filters the log by project . Clicking on Project gives you a list of all the projects in Studio and the option to see system logs or logs for all the projects.

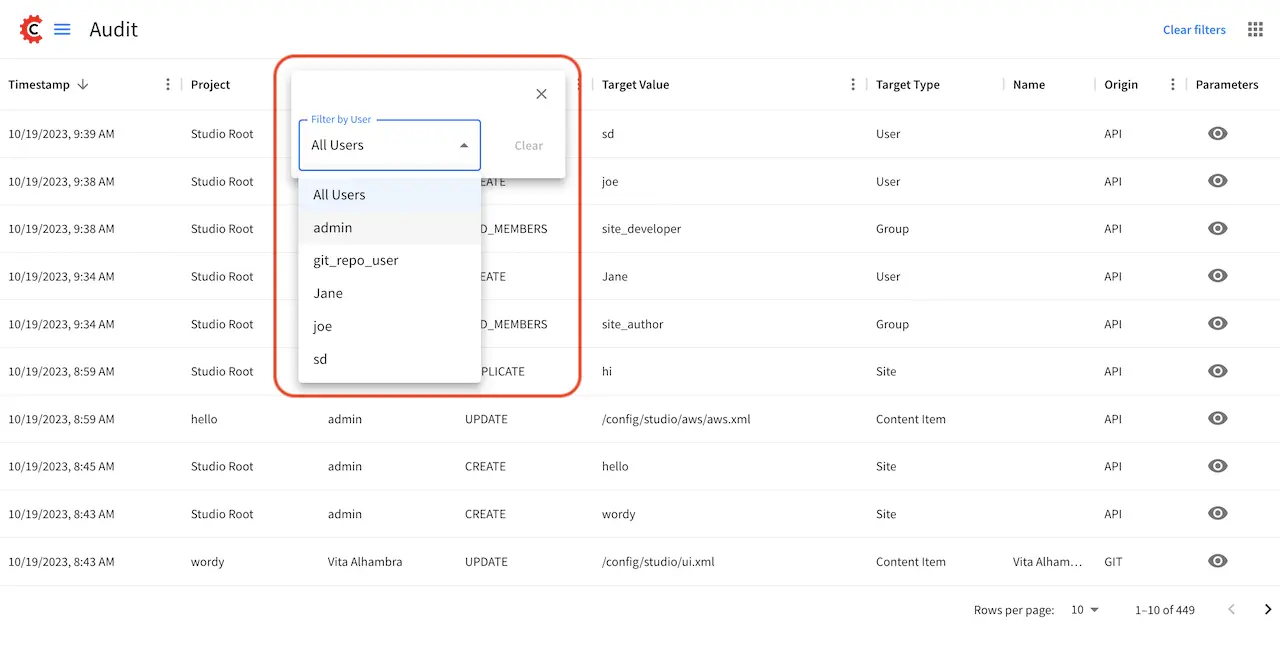
Audit Logs User Filter
Username filters the log by username. Clicking on Username gives you a list of all the users in Studio and the option to see logs for all users.
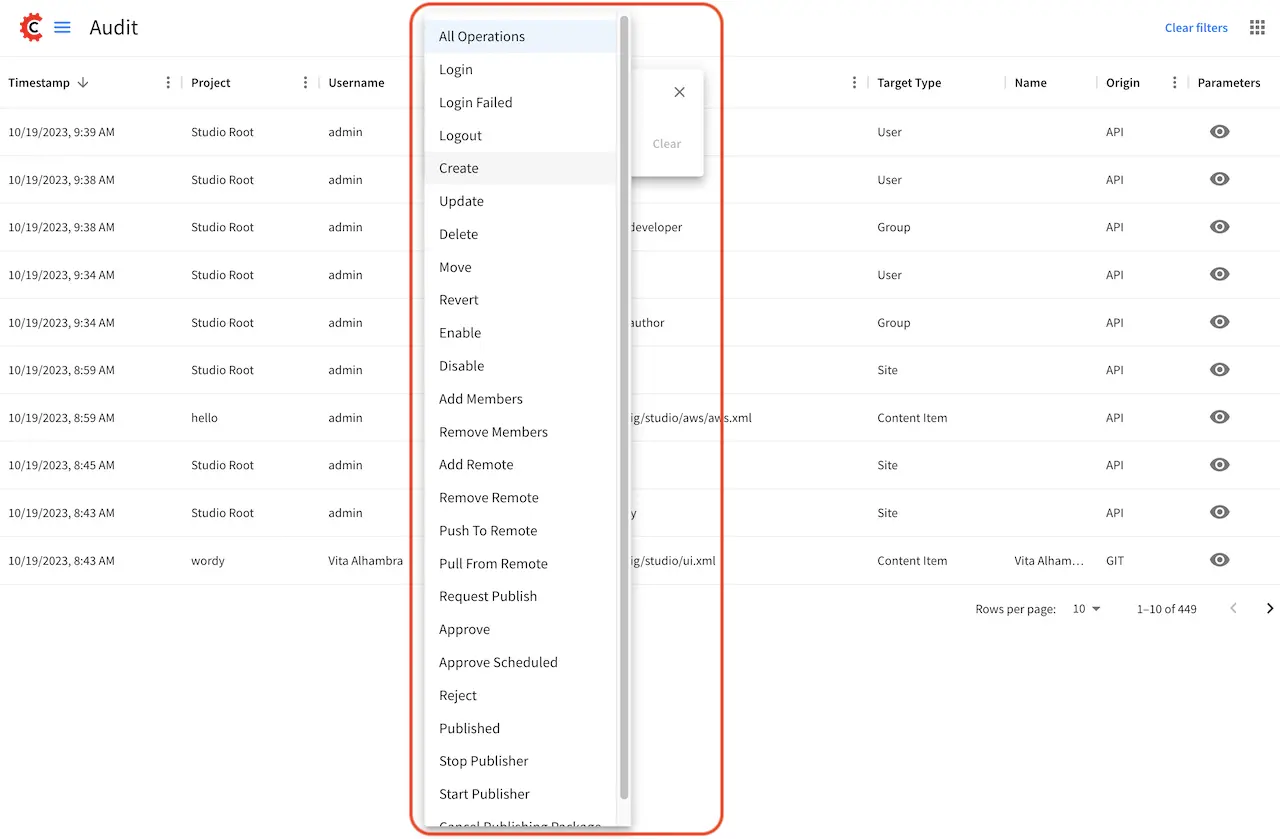
Audit Logs Operations Filter
Operation filters the log by operations. Clicking on Operation gives you a list of all operations logged.
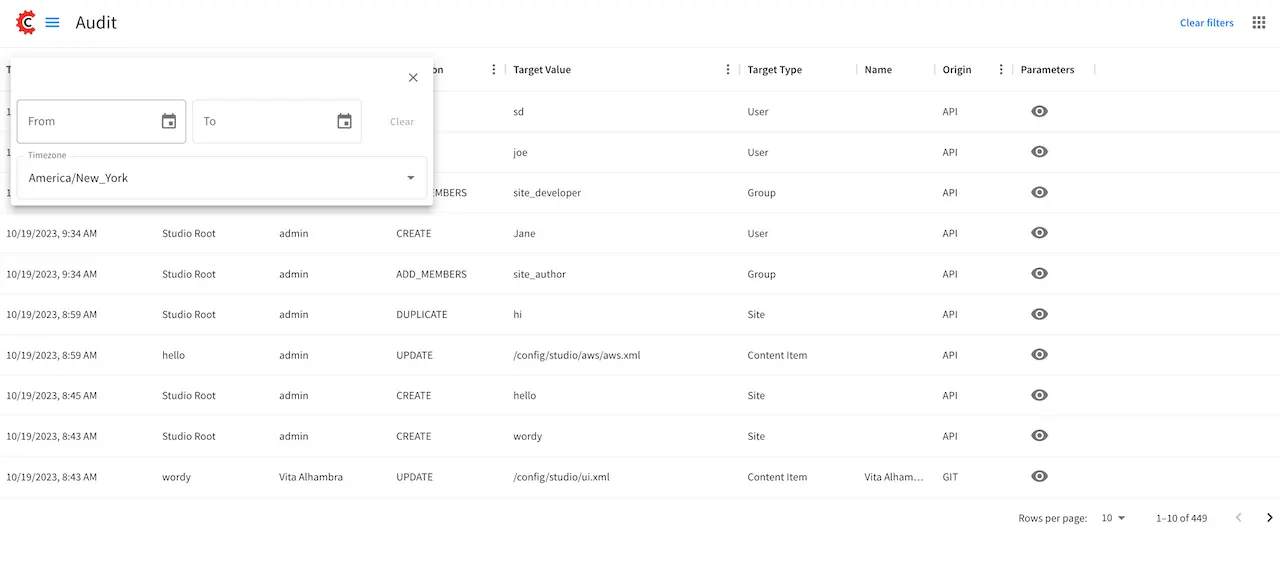
Audit Logs Timestamp Filter
Timestamp filters the log based on date range
User/Group Management
This section describes managing user accounts and groups.
A user is anybody who uses CrafterCMS. A user account holds a user name and password. A group consists of a collection of users. Users can be assigned to a group for a project/site. Through the groups, roles are assigned to users to certain areas of the site (access rights/ permissions). Each role represents a set of activities allowed. Groups are used to simplify management as changes made to the rights of the group applies to all the users belonging to that group.
When you work in Crafter Studio, you need to login as a user. Your CrafterCMS administrator sets up user accounts, group memberships, roles and permissions. The sections below goes into more detail on how users, groups, permissions and roles are administered/setup.
Users Management
Description
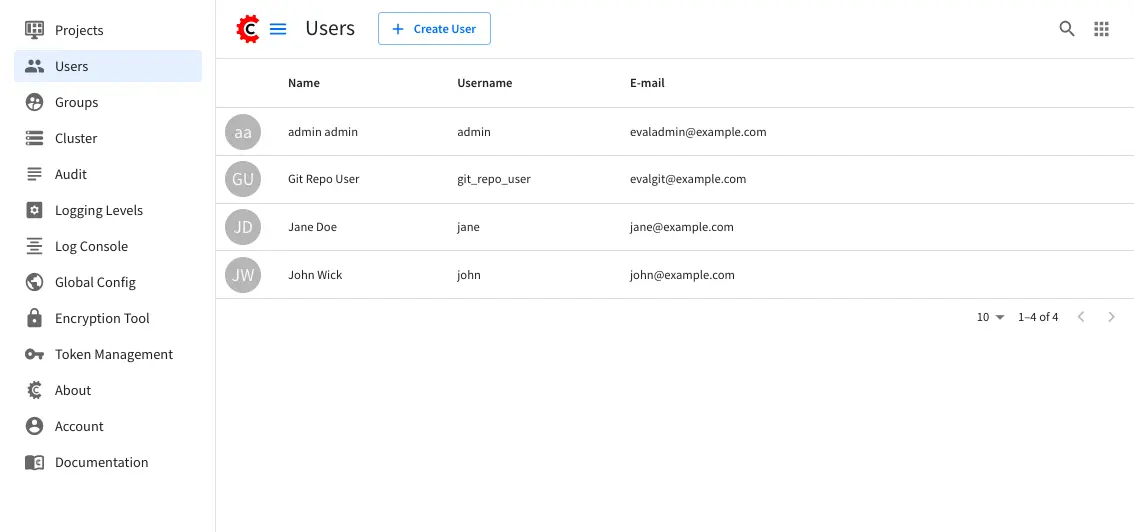
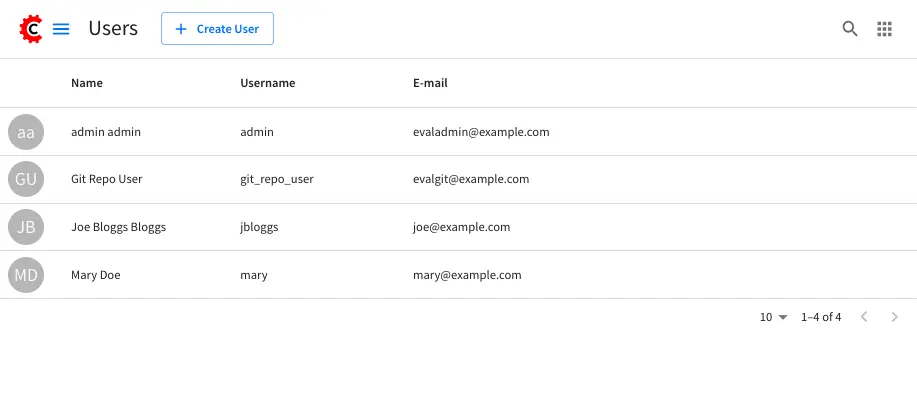
User Management allows you to control and set up who can access and manage the sites. All users are listed on the User Management page.
To find the Users Management console follow the next instructions:
Click on the Navigation Menu
 option located at the top right of the browser, then click on
Users in the sidebar located on the left side of the browser:
option located at the top right of the browser, then click on
Users in the sidebar located on the left side of the browser: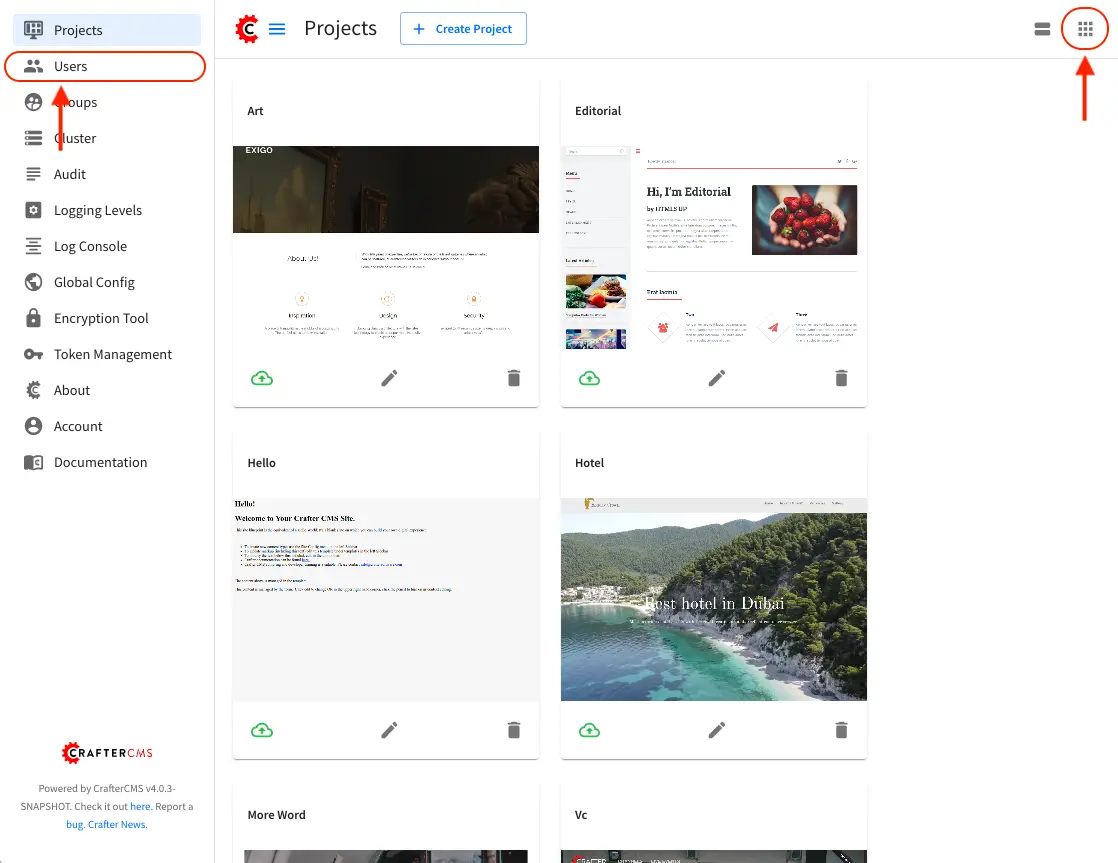
Here’s the screen that will appear after clicking on Users
Actions
You can list, search, add or delete users, as well as view specific information.
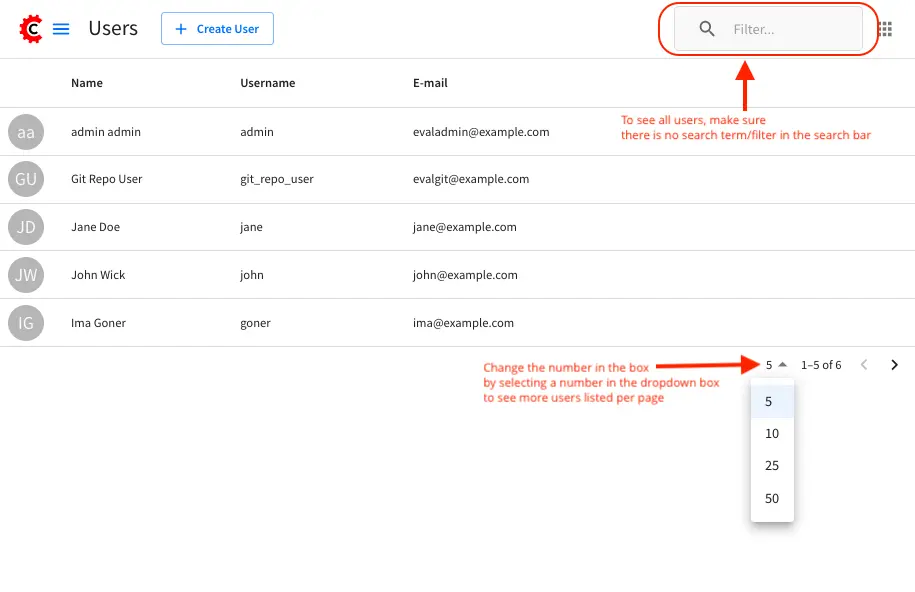
Listing Users
To see a list of all existing users, make sure that there are no search terms entered in the search bar. You can also change the number of users listed per page by selecting a different number in the dropdown box at the bottom right of the screen
Searching Users
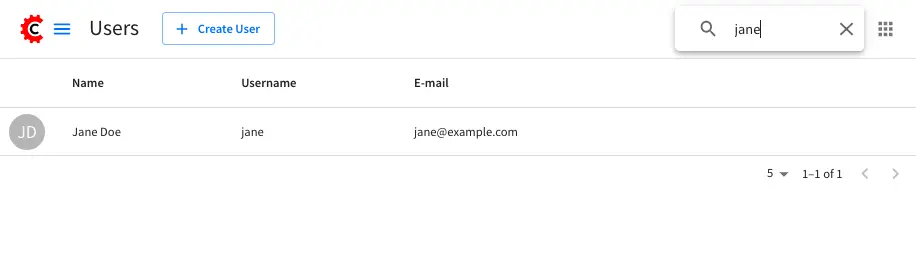
You can search for a specific user. To search users, click on the magnifying glass icon on the top right then go to the search field and type user name, last name, user name or mail. In the following example we typed “jane”, we obtained only one related user: “Jane”.
Creating a New User
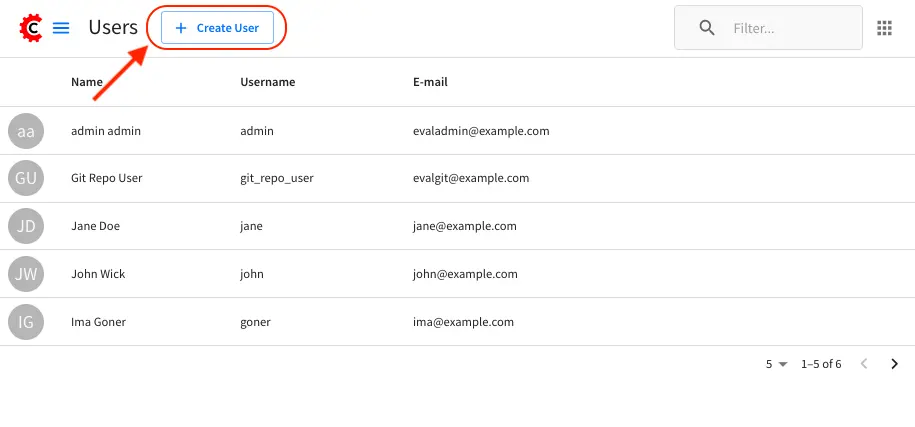
To create a new user, please click on the “Create User” button at the top of the page.
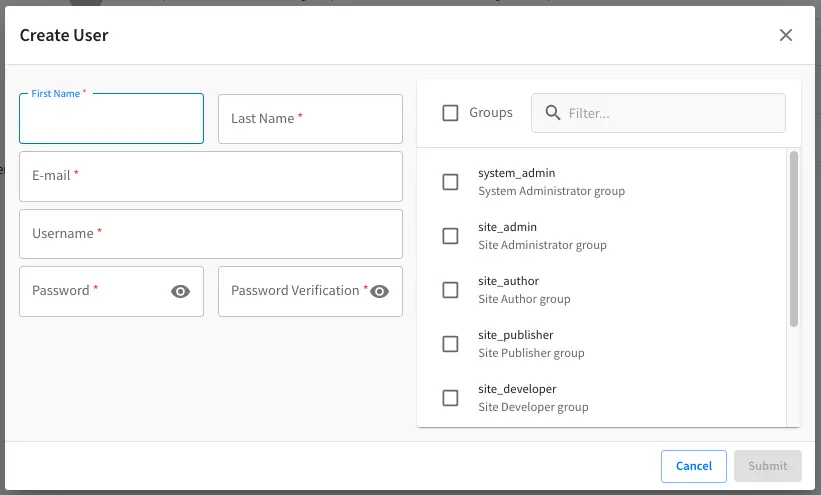
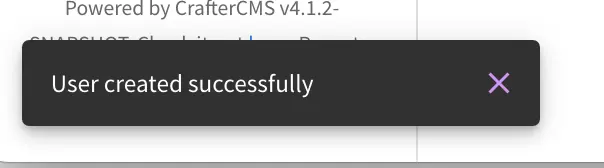
A modal dialog will be displayed, please fill out all the fields and finally click on the “Submit” button. If you do not want to create a new user, please click on the “Cancel” button.
A notification will appear on the screen for a few seconds on successful creation of a new user
Viewing and Editing an Existing User
To view/edit a specific user, please click on the row of the name you want to edit:
A modal dialog will be displayed with the user information. To finish viewing, click on the “X” (close icon) button.
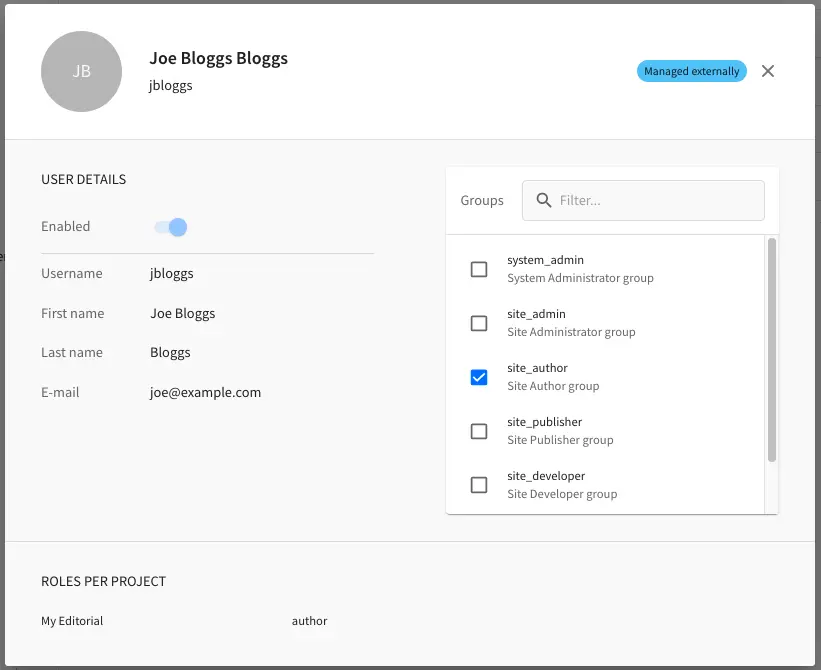
Once the dialog is displayed, to edit a specific user, simply click on the field that you want to change. In the above dialog the Externally Managed label is displayed which indicates that the user is externally managed such as the case in LDAP. Notice that since the user is externally managed, the only change that can be made for the user is the group membership.
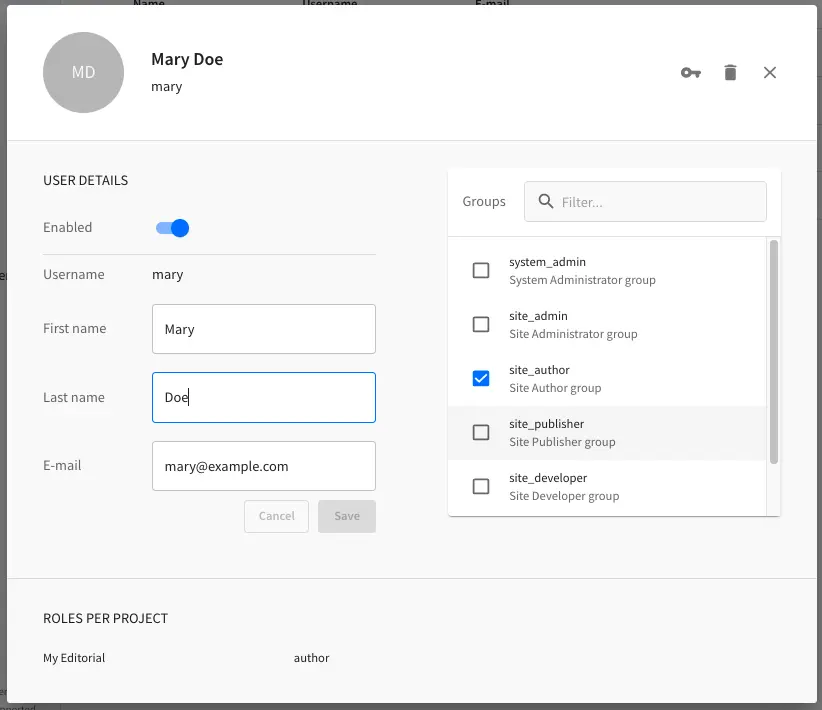
For the user dialog displayed below, since the user is not externally managed, all the fields can be changed for the user. In this dialog, you can modify the user information such as email, first name, last name and user name, group membership, reset the user’s password and delete the user. You can also activate/de-activate the user currently being viewed by clicking on the slider labeled Enabled. Edit the fields you want to change and then click on the “Save” button. If you do not want to edit the user, please click on the “Cancel” button.
Resetting an Existing User’s Password
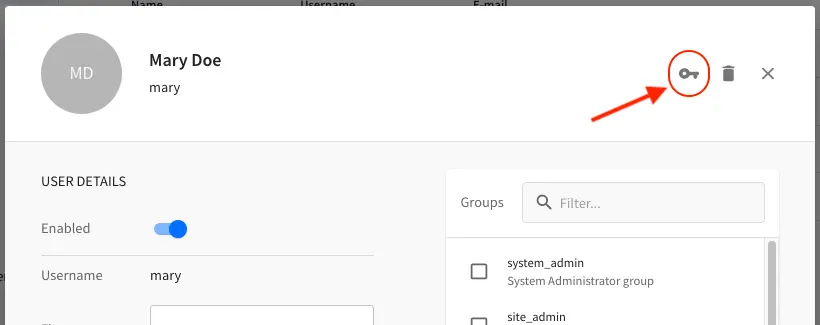
To reset the password of a specific user, please click on the key icon in the user modal dialog as shown in the following example.
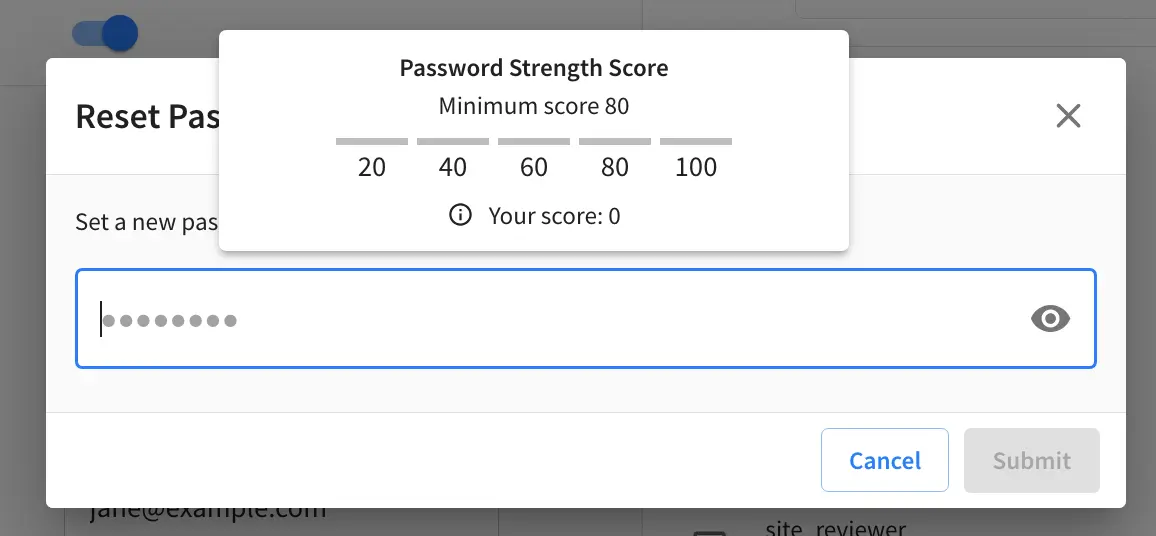
A modal dialog will be displayed, where the admin can reset the users password. Click on Save to reset the password.
Removing an Existing User
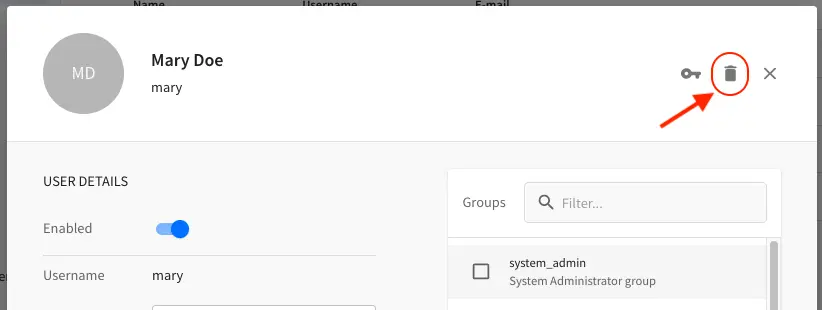
To remove a specific user, please click on the trash can icon located in the user modal dialog as shown in the following example.
A confirmation pop up will be displayed, please click on “Yes” to remove the user and click on “No” if you do not want to remove it.

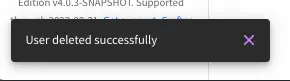
A notification will appear on the screen for a few seconds on successful deletion of a user
Important
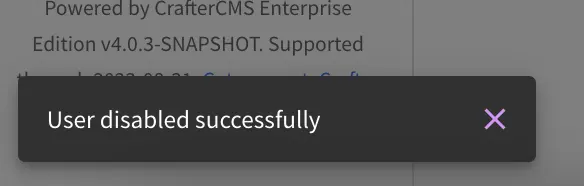
When a user is deleted, the deleted user cannot be re-created. Instead of deleting a user, we recommend disabling the user, which prevents them from connecting to the system.
To disable a user, simply click the Enabled slider to turn it off and a notification snack
bar at the bottom will appear informing you that the user has been disabled successfully.
Groups Management
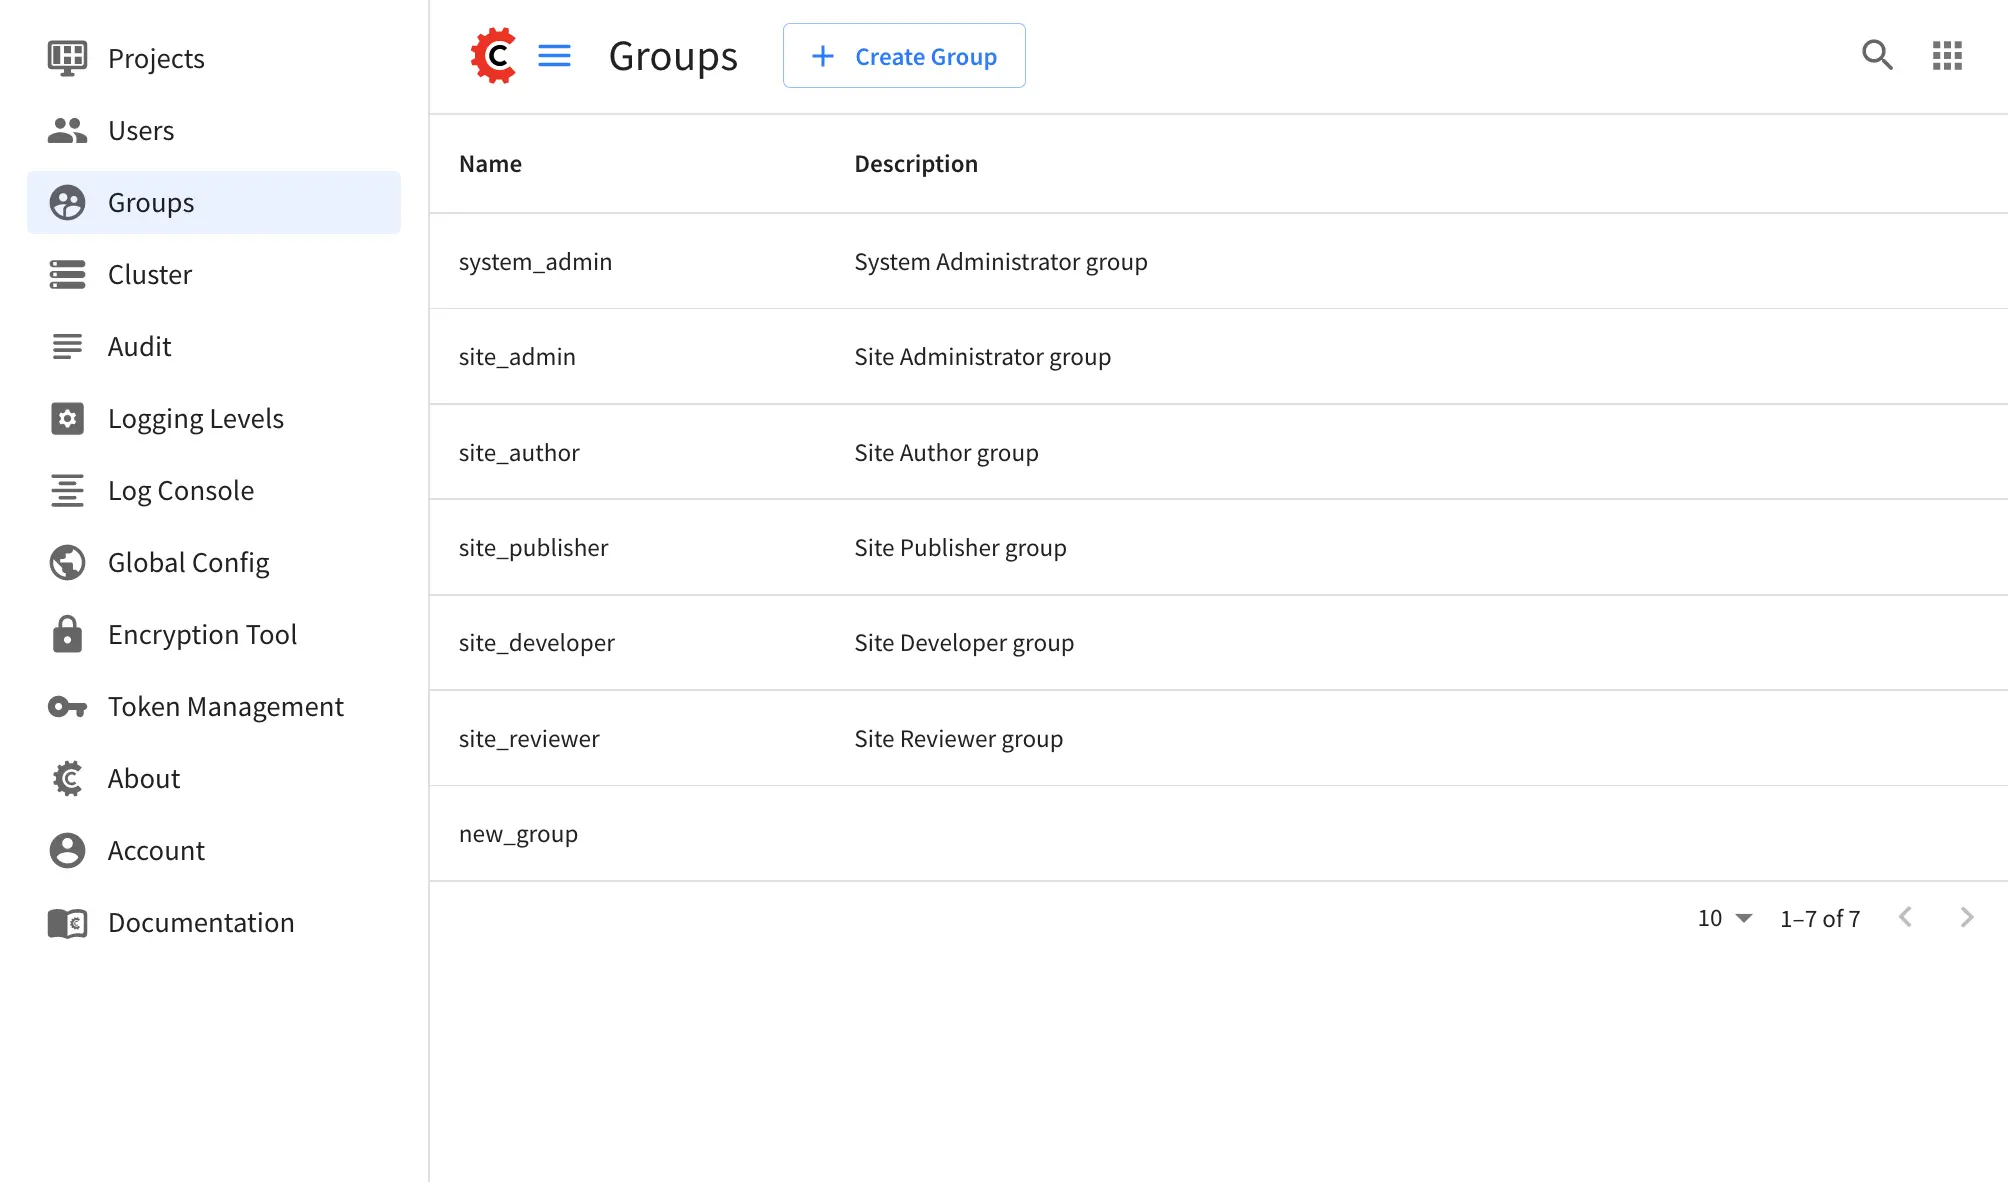
Groups Management allows you to administrate the groups created on CrafterCMS. You can add, remove, edit, and manage the users that will belong to the groups and you can also add and remove groups.
Here’s a list of predefined groups and roles in CrafterCMS:
Group
|
Description
|
Role
|
|---|---|---|
system_admin
|
System administrator
|
system_admin
|
site_admin
|
Site administrator
|
admin
|
site_author
|
Site author
|
author
|
site_developer
|
Site developer
|
developer
|
site_reviewer
|
Site reviewer
|
reviewer
|
site_publisher
|
Site publisher
|
publisher
|
You can add more groups defined whenever needed. The list above is just a starting point for when you first create your project. The following sections will give you more details on users and groups. The next sections, Permission Mappings and Role Mappings describes how to setup/assign permissions and roles.
To find this section through studio follow the next instructions:
Click on
Navigation Menu at the top right of your browser.Click on Groups from the main menu on the left side of your browser.
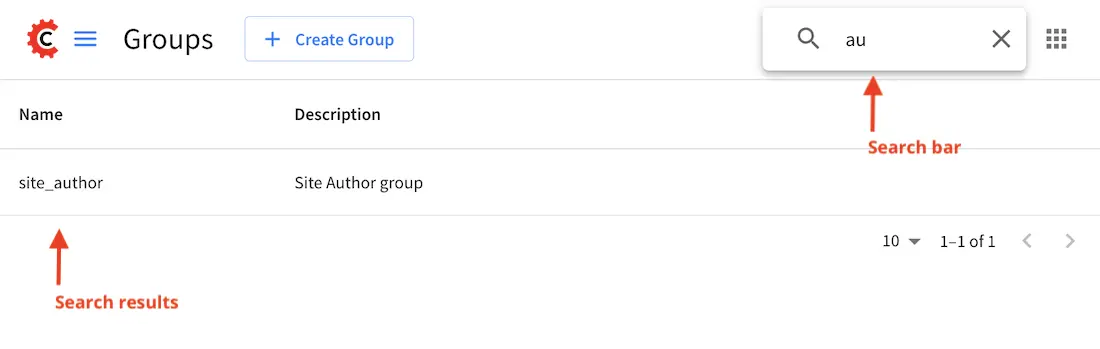
Searching Groups
You can search for groups by their properties (Display Name, Description), simply enter your search term into the search bar by clicking on the magnifying glass icon on the top right and it will show results that match your search term.
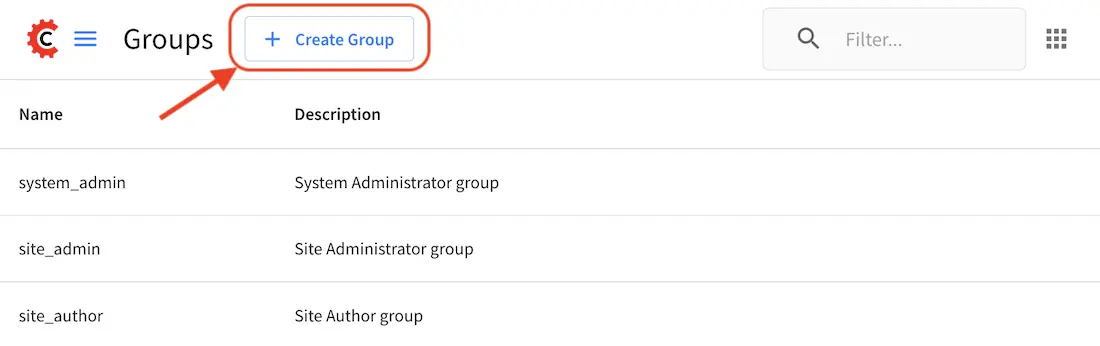
Adding a New Group
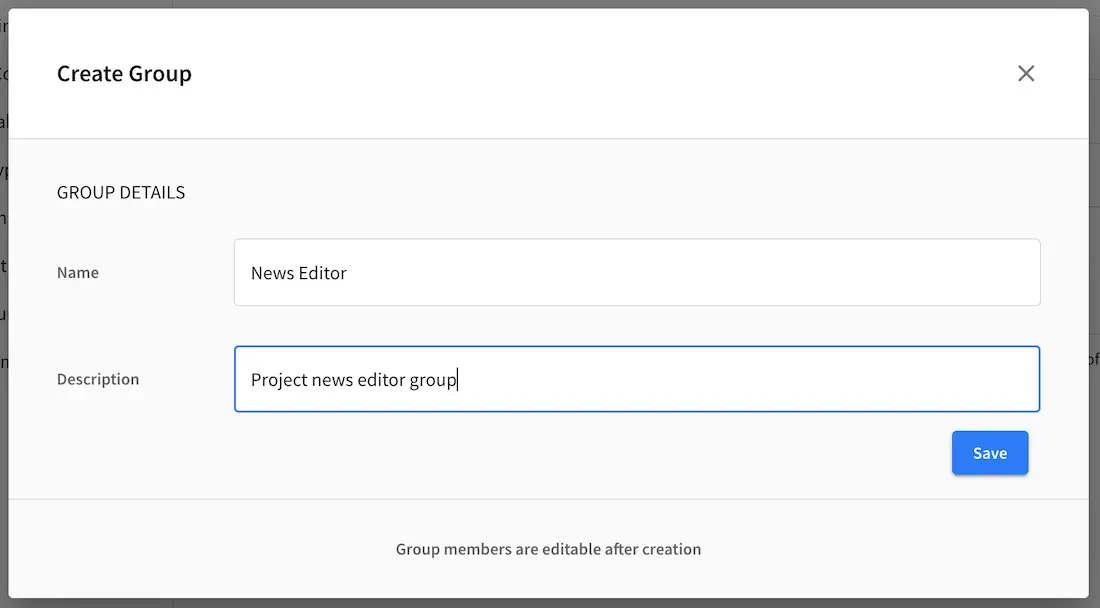
To create a new group, you just need to click on the “Create Group” button,
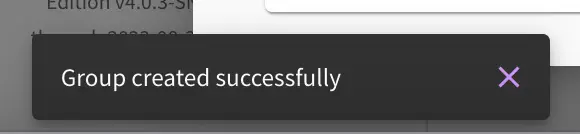
then, a modal dialog will show up with the required fields for the group creation. Enter a display name and a short description for the new group. After filling the form, click on Save, and the new group will show in the groups table.
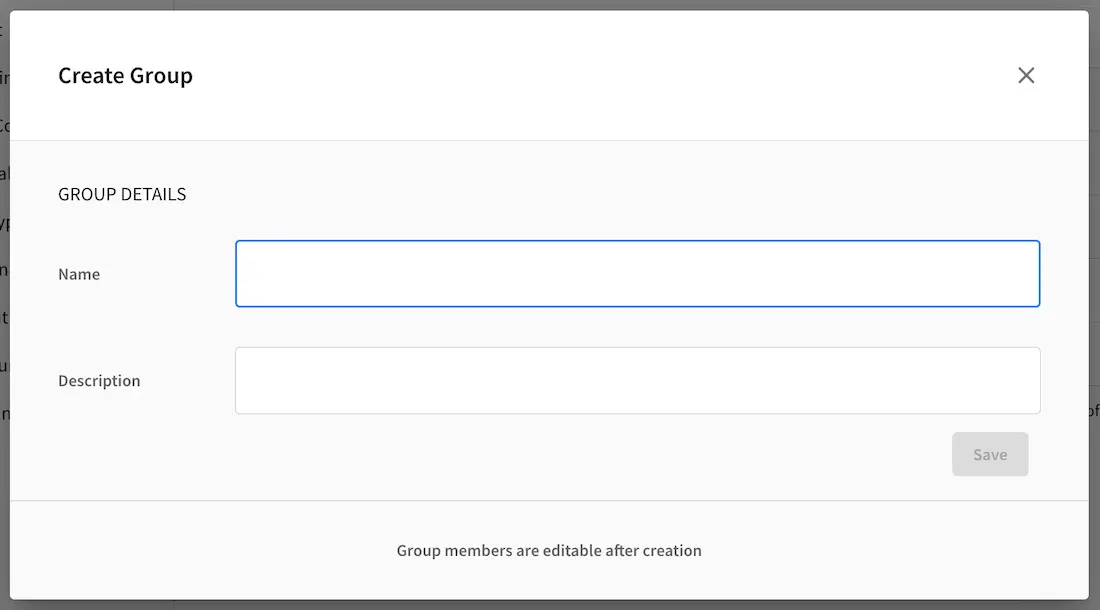
A notification of successful group creation will pop up for a few seconds after clicking on the Create button.
Removing a Group
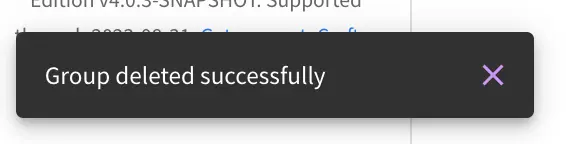
To remove a group, select a group from the list which will open a dialog for the selected group. Click on the trash can icon on the top right of the group dialog.
A confirmation popup will appear asking you if you want to delete the group, as seen above. Click on Yes to remove the group.
On successful removal of the group, a notification will appear for a few seconds that the group has been deleted.
Editing an Existing Group
To edit a group, select a group from the list which will open a dialog for the selected group. In this dialog, you can modify the group description, just click on the Save button after making your changes. You can also add/remove users from the group. Finally, you’ll see a list of all users that belong to the group. To return to the list of all groups in your project, click on the X at the top right of the dialog.
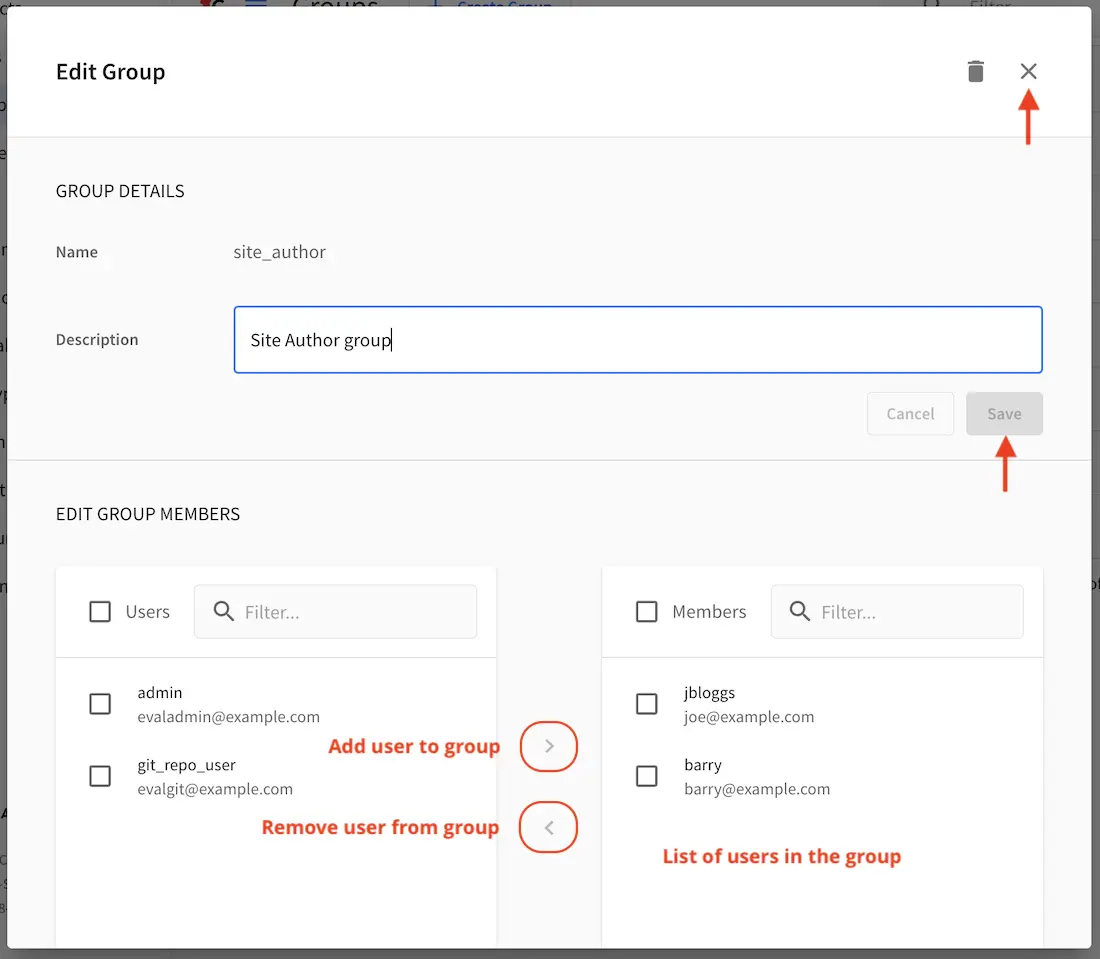
Adding Users to a Group
To add a user to a group, click on the group you want to add users. In the Users column found on the left
in the Edit Group Members section, you can click on the search box then type in the name, username or
email of the user you want to add to the group.
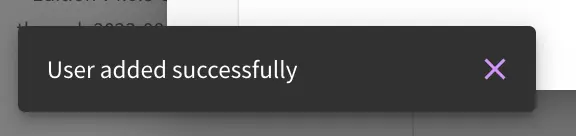
Notice that it will give you a list of matching users, select the user you want to add by clicking on the checkbox next to it, and if you want to add some more users to the group, just type in the names, and put a checkmark next to them, then click on the > (greater than icon) button.

It will then give you a notification that the user(s) has been successfully added to the group.
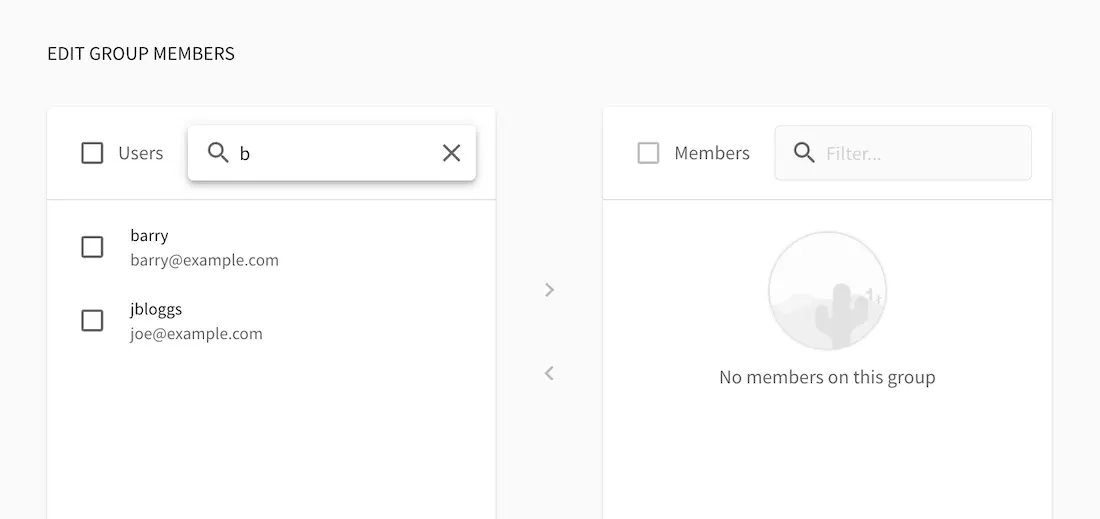
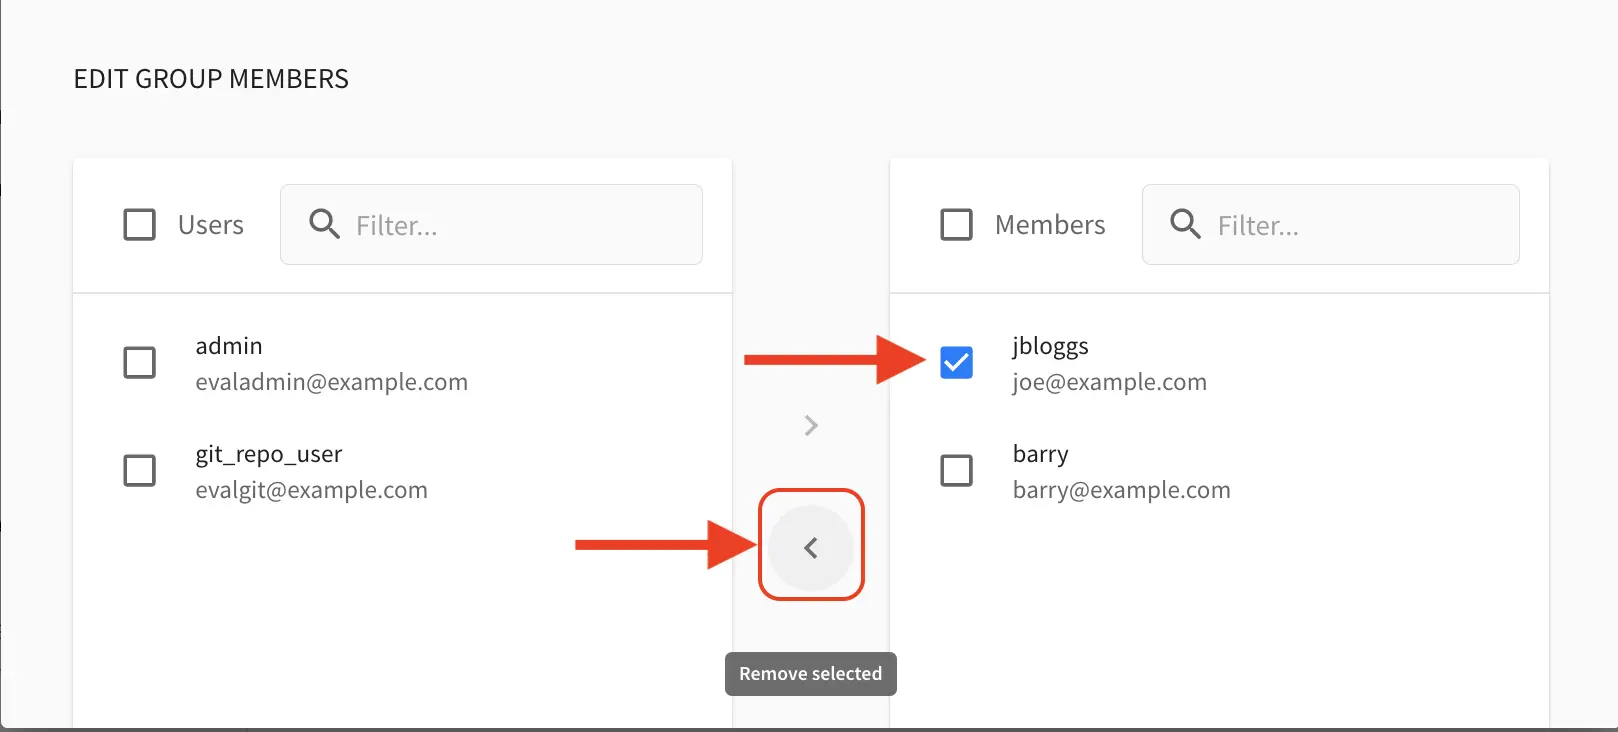
Removing Users from a Group
To remove a user from a group, click on the group you want to remove users. In the Members column
found on the right in the Edit Group Members section, you can click on the search box then type in
the name, username or email of the user you want to remove from the group. Select the user you want to
remove from the group by clicking on the checkbox next to it, and if you want to remove some more users
from the group, just type in the names and put a checkmark next to them, then click on
the < (less than icon) button.
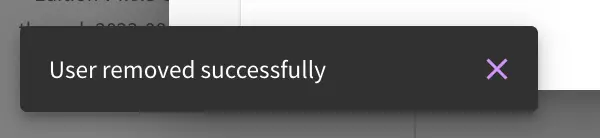
It will then give you a notification that the user(s) has been successfully deleted from the group.
Roles and Permissions
To access CrafterCMS, a user must be allowed access rights to certain areas of the project (access rights/ permissions). For example, if a user wants to create, edit or submit content, the user needs to have those specific permissions. Here, we see that the user requires multiple permissions. For simplicity, permissions are grouped together into roles. A role is a set of allowed actions/activities. An author role, for example, has access to create, edit and submit content.
To define permissions for users, they need to be a member of a group. A group is a collection of users with a role assigned. Groups are used to simplify management as changes made to the rights of the group applies to all the users belonging to that group. For our example above of a user that wants to create, edit or submit content, the user should be assigned to a group with the author role.
Out of the box, CrafterCMS supports the following roles/groups:
Role |
Group |
Description |
|---|---|---|
system_admin |
system_admin |
Has access to everything in the CMS, such as all the projects, users, groups, etc. in addition to the admin role |
admin |
site_admin |
Has access to everything in the project such as project configurations, creating/editing layouts, templates, taxonomies, content types, scripts, etc. in addition to the publisher role |
author |
site_author |
Has access to create, edit or submit content in a project |
developer |
site_developer |
Has access to access to creating/editing layouts, templates, taxonomies, content types, scripts, etc., project configurations in addition to the publisher role in a project |
reviewer |
site_reviewer |
Has the ability to approve and reject workflow, but don’t have access to the author role in a project |
publisher |
site_publisher |
Has the ability to approve and reject workflow, in addition to the author role in a project |
Permissions and roles can be setup for each project, and for the entire application itself. Note that the system_admin role applies to the entire application and the rest of the default roles applies to a project.
See Groups Management for more information on administrating groups.
Projects
To edit permissions for a project role, in Studio, from the Sidebar, click on ![]() -> Configuration -> Permission Mapping. See Permission Mappings for more information on permissions and the default permissions assigned to roles.
-> Configuration -> Permission Mapping. See Permission Mappings for more information on permissions and the default permissions assigned to roles.
To add/edit a role for a project, in Studio, from the Sidebar, click on ![]() -> Configuration -> Role Mapping. See Role Mappings for more information.
-> Configuration -> Role Mapping. See Role Mappings for more information.
The items for interaction/tools available from the Sidebar depending on the user role can be configured in Studio, from the Sidebar, click on ![]() -> Configuration -> User Interface Configuration. See User Interface Configuration for more information.
-> Configuration -> User Interface Configuration. See User Interface Configuration for more information.
Global
To add/edit a global role/group, see Global Role Mappings Config for more information.
To add/edit global permissions for a role, see Global Permission Mappings Config for more information.
The items for interaction/tools available from the Main Menu depending on the user role can be configured by opening the global-menu-config.xml file under CRAFTER_HOME/data/repos/global/configuration using your favorite editor.
Putting it all together - Users, Groups, Roles and Permissions
In this section, we’ll see how users, groups, roles and permissions work together in giving users access to certain folders in a project.
We’ll create a new role, group and user, add permissions for the new role and finally assign the newly created user to the new group setup.
In preparation for our example, we will be using the Website editorial blueprint. We’ll add a news folder under Home, by navigating to Pages -> Home, then right click on Home and select New Folder. Enter news in the Folder Name field. We will be using the news folder for our example in setting up permissions to folders based on roles. Users assigned to the newseditor role will then have access to publish and add/edit content in the news folder.
Create a new group
Let’s begin by creating a new group.
To create a new group, click on
Navigation Menu from the top right, then click on Groups.Click on the Create Group button.
Enter a name for the new group being created in the Display Name field.
Enter a description of the new group being created in the Description field.
Click on the Save button. A notification will appear that your new group has been created.
Below are the information used to create a new group:
For more information on adding a new group to a project, please see Adding a New Group
Create a new role
We’ll now create a new role for the new group we just created.
To create a new role, click on
 from the Sidebar, then click on Configuration.
From the list, select Role Mappings
Add your new group and role in the editor
 1<role-mappings>
 2  <groups>
 3    <group name="Admin">
 4        <role>admin</role>
 5    </group>
 6    <group name="Developer">
 7        <role>developer</role>
 8    </group>
 9    <group name="Author">
10        <role>author</role>
11    </group>
12    <group name="Publisher">
13        <role>publisher</role>
14    </group>
15    <group name="Reviewer">
16        <role>reviewer</role>
17    </group>
18    <group name="NewsEditor">
19        <role>newseditor</role>
20    </group>
21  </groups>
22</role-mappings>
Click on the Save button.
For more information about role mappings, please see: Role Mappings
Adding permissions
To add permissions to the new role we just created, click on
from the Sidebar, then click on Configuration.From the dropdown box, select Permissions Mappings
Add in the permissions that you would like to give to the new role that we just created. For our example below, we are giving the role newseditor permission to publish from the dashboard and the following permissions for the news folder and assets folder:
read
write
create content
create folder
publish
 1<role name="newseditor">
 2   <rule regex="/site/website/news/.*">
 3     <allowed-permissions>
 4       <permission>Read</permission>
 5       <permission>Write</permission>
 6       <permission>Create Content</permission>
 7       <permission>Create Folder</permission>
 8       <permission>Publish</permission>
 9     </allowed-permissions>
10   </rule>
11   <rule regex="/static-assets/.*">
12     <allowed-permissions>
13       <permission>Read</permission>
14       <permission>Write</permission>
15       <permission>Delete</permission>
16       <permission>Create Content</permission>
17       <permission>Create Folder</permission>
18       <permission>Publish</permission>
19     </allowed-permissions>
20   </rule>
21   <rule regex="~DASHBOARD~">
22     <allowed-permissions>
23       <permission>Publish</permission>
24     </allowed-permissions>
25   </rule>
26 </role>
Click on the Save button to save your changes.
For more information about permission mappings, please see: Permission Mappings
Adding users to the role
We can now add users to the role by adding the users to the group mapped to the role. In the role mappings configuration file, we mapped the role newseditor to the group NewsEditor. To add users to the group NewsEditor,
Click on
from the top right of Studio, then select Groups on the left hand sideClick on the pencil (edit icon) next to the group name you want to edit. In our example, the group NewsEditor
Click on the box for the field Add new members, enter the users you’d like to add, then click on the Add members button.
For more information about adding users to a group, please see: Adding Users to a Group
Your new role with users and permissions assigned are now ready!
User passwords
Changing Your Password
Every user logged in to CrafterCMS can change their own password.
To change your own password, click on the Navigation Menu
option at the top right of Studio,
then select Account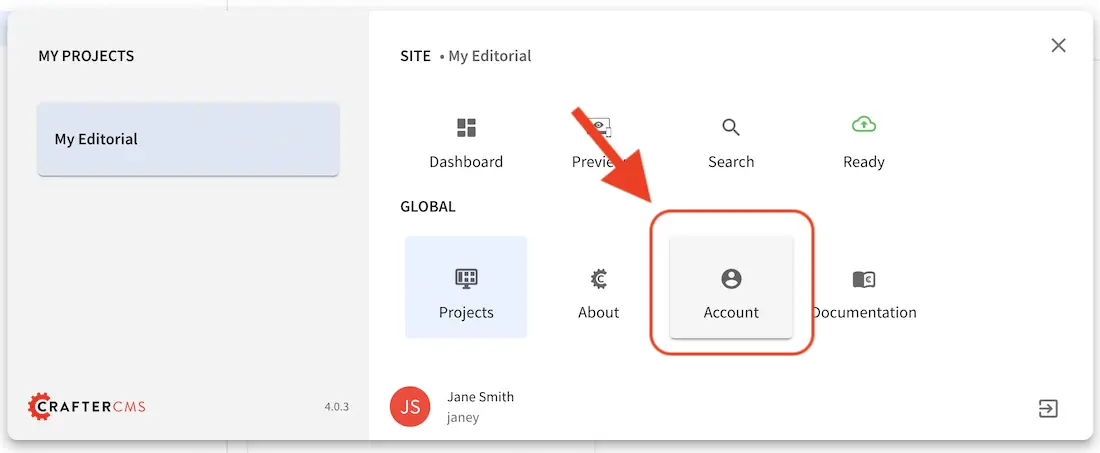
In the Change Password section of the dialog, enter your current password in the Current Password field.
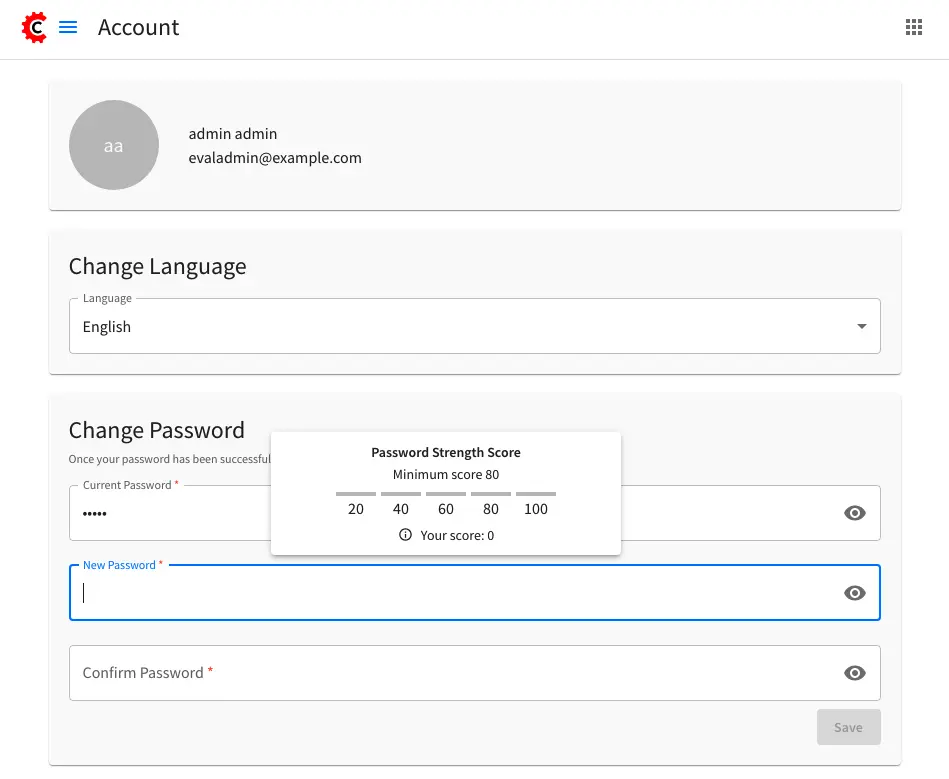
Next, enter the new password into the New Password field.
Re-enter the new password into the Confirm Password field.
Click on the Save button. A notification will appear that the profile has been updated.
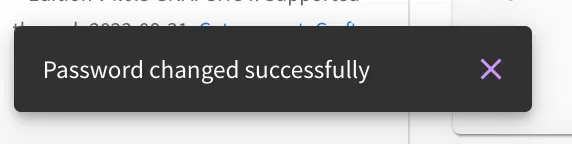
After changing your password, you will be logged out of the system and will have to log back in using the new password you set before continuing your work in Studio.
Changing a User Password
The Crafter admin can change passwords for other users.
To change a user’s password, login as crafter admin in Studio.
Click on Users at the top right of Studio
Click on the pencil (edit icon) next to the user you would like to change/reset the password.
Enter a new password in the Reset Password field.
Click on the Save button. A notification will appear that the user has been edited.
For more information on editing a user, see Viewing and Editing an Existing User
Setting a User’s Initial Password
The Crafter admin must set an initial password when creating a new user. To create a new user, please see Creating a New User
Project Creation with Remote Repositories
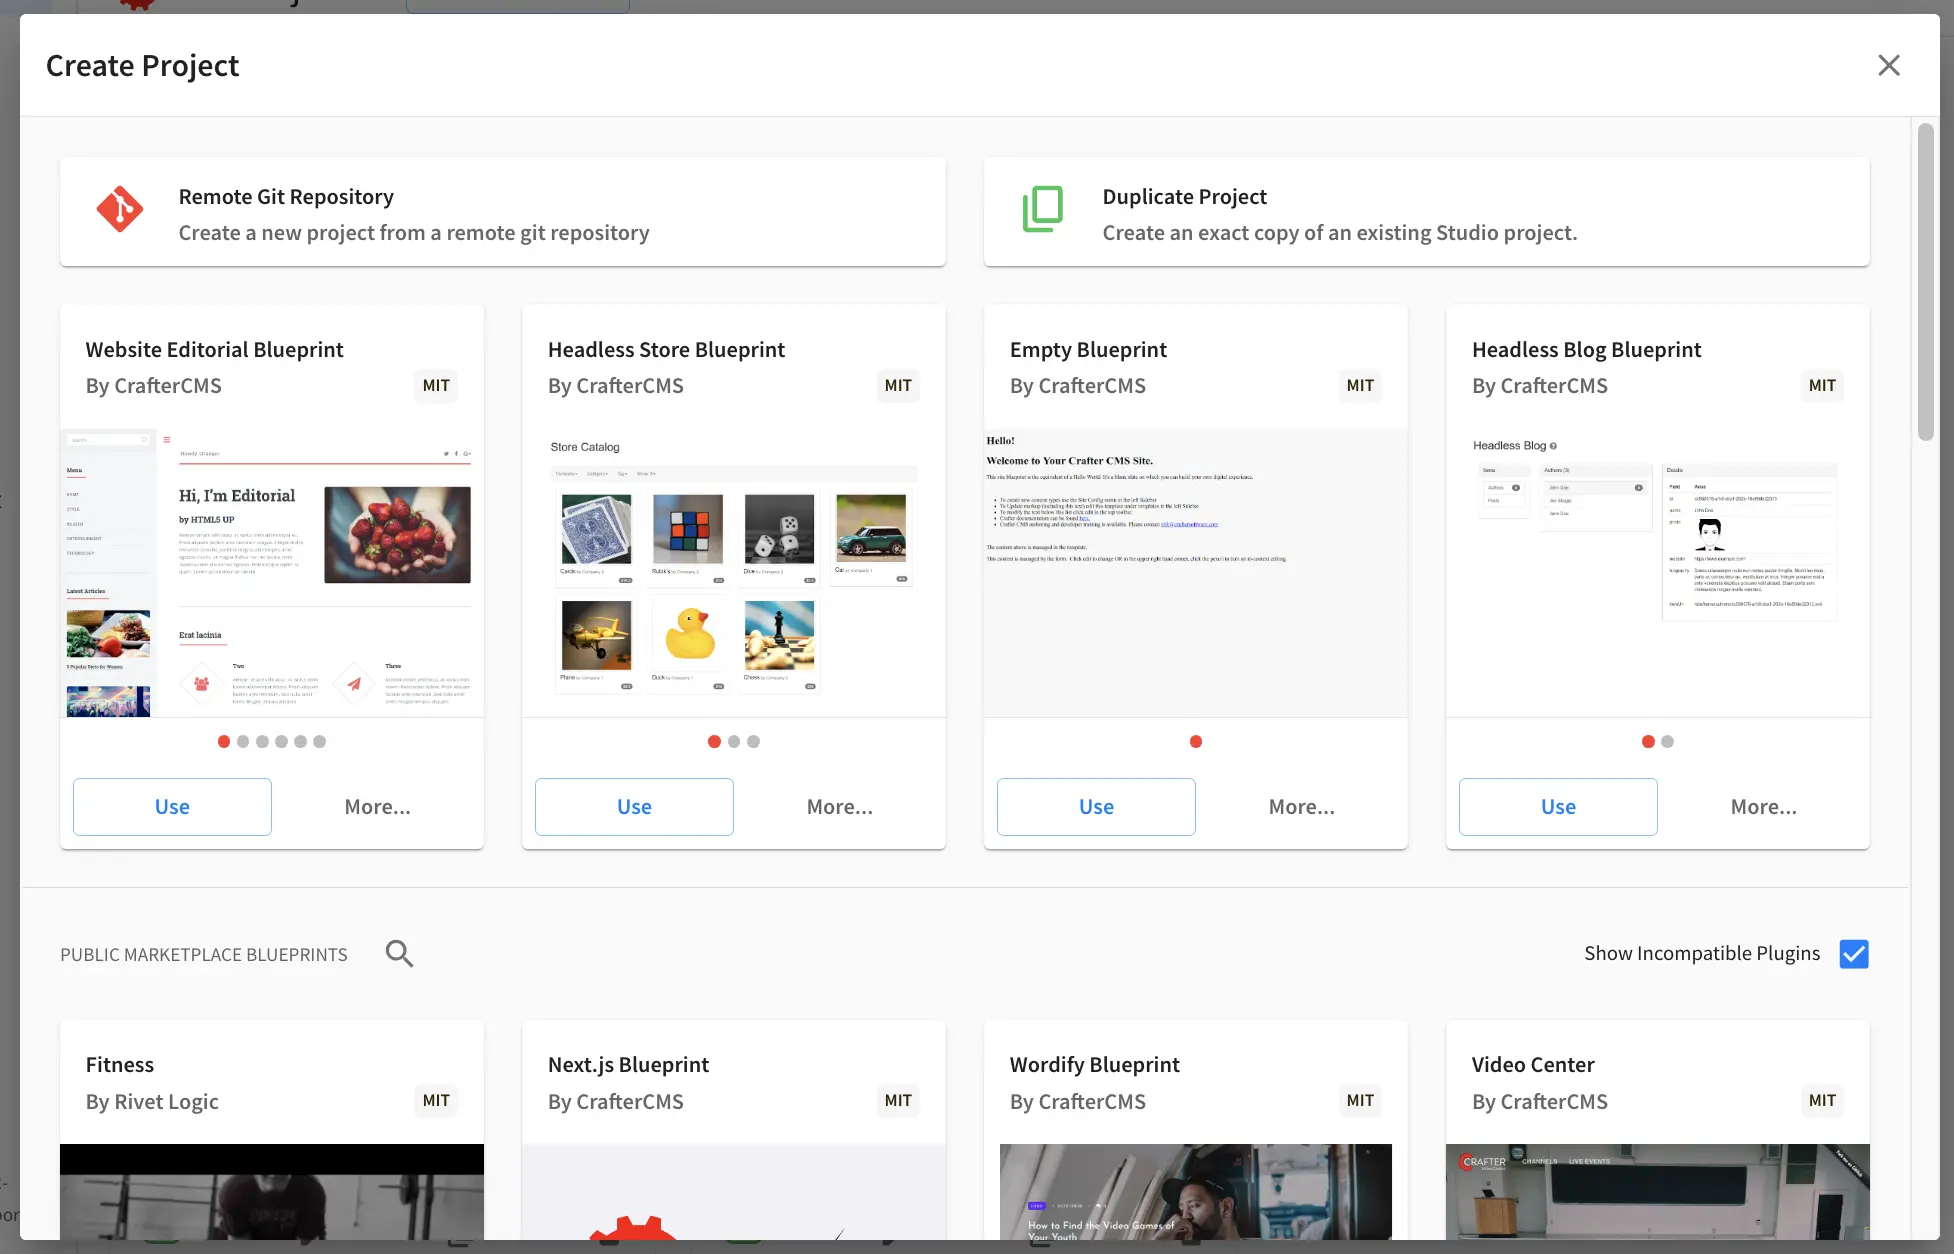
Crafter Studio supports project creation with remote repositories and provides two options:
Create project based on remote Git repository
Create project based on a blueprint then add a remote Git repository
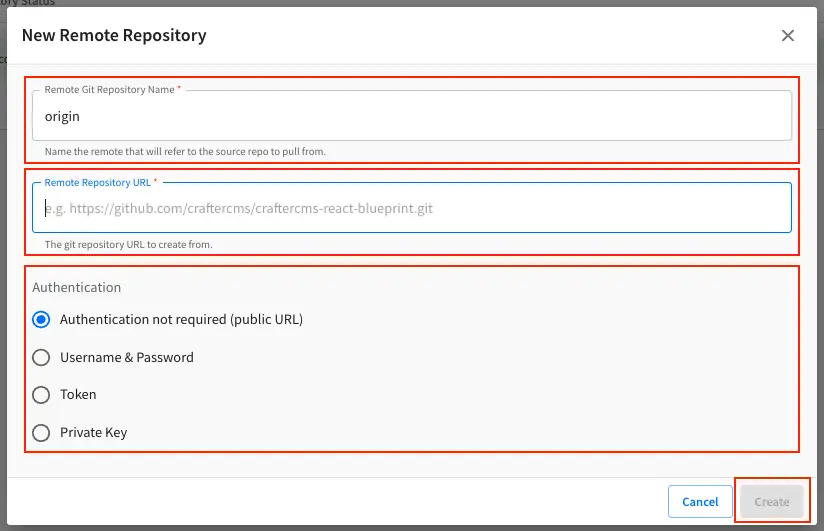
To start creating a project with a remote repository, from the Projects screen, click on the Create Project button. A Create Project dialog will be launched. For both options, there will be a screen where the Remote Git Repository Name and Remote Git Repository URL needs to be filled out and the rest is optional and only needs to be filled out if required by the remote git repository being used.
Let’s take a look at the fields where the remote repository details needs to be filled in:
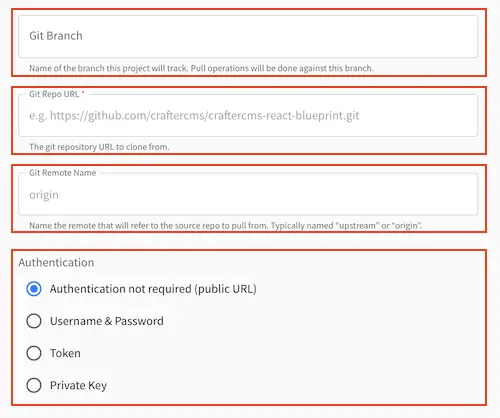
In the Git Repo URL field you must provide the link to the Git repository you would like to use
In the Authentication field you must select the authentication method to be used to access the Git repository in the previous field.
CrafterCMS supports the following authentication types to use to access remote repository:
Authentication not required (Public URL) - no credentials needed to access remote repository
Username & Password - for this method, you will be asked for a Remote Git Repository Username and a Remote Git Repository Password. Supply your username and password
Token - for this method, you will be asked for a Remote Git Repository Username (if required) and a Remote Git Repository Token. This method is usually used when two-factor authentication is configured on the remote repository to be accessed. Supply your username if required and token.
Private Key - for this method, you will be asked for a Remote Git Repository Private Key. This method is a key-based authentication. Supply your private key.
In the Git Branch field, you can supply a branch name, but can be left blank, which in turn would default to the
masterbranch.In the Git Remote Name field you want to provide a repository name that makes sense. It’s common to use “origin” or “upstream.”
Create project based on a blueprint then add a remote bare Git repository
To create a project based on a blueprint then add a remote bare git repository, click on Create Site from Sites, then select the blueprint you would like to use
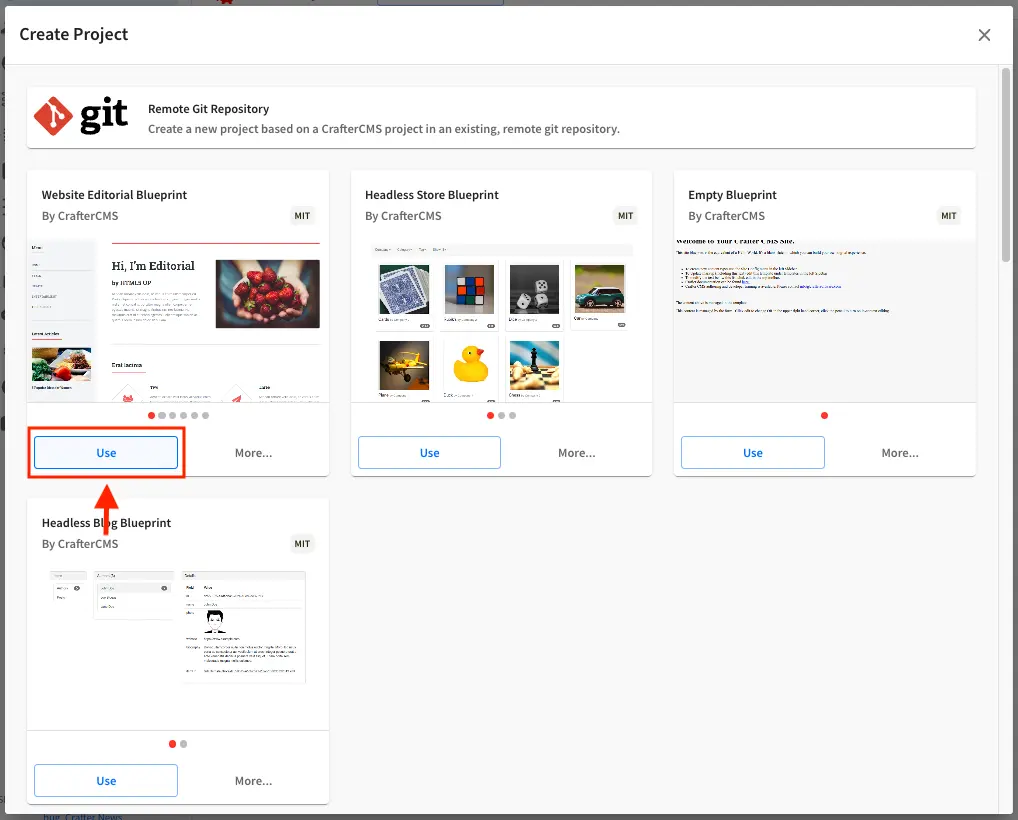
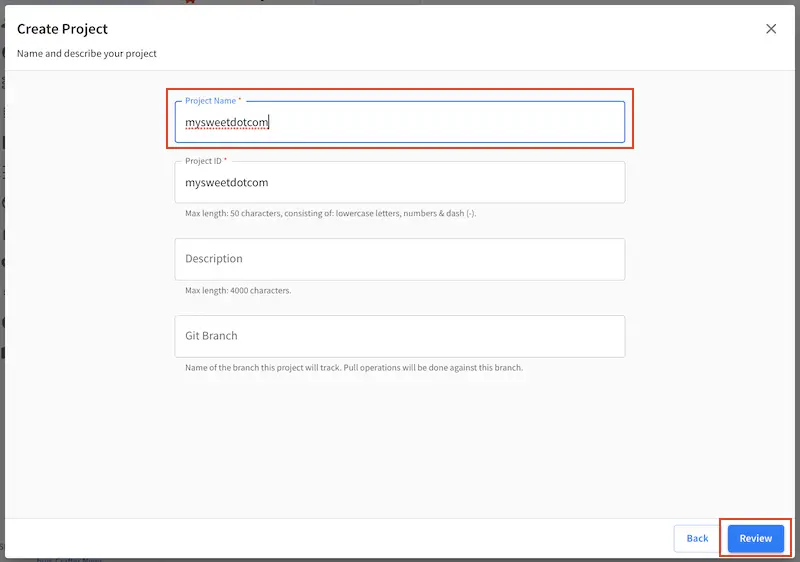
The next step is to fill in the Project ID and Project Name, then click on the Review button, then finally click on the Create Project button to create your project. Your project should be created in a short while.
Once your project is created, the next step is to add a remote repository to your newly created project. Open the Sidebar then click on Site Config -> Remote Repositories, then click on the New Repository on the top right. This will open up a dialog where we can fill in all the information for our remote repository as described above. Click on the Create button after filling in the required information.
Your project should now have a remote repository listed in the Remotes screen

Remember that the remote repository needs to be a bare git repository, since we are pushing our newly created project to the remote repository. To push our newly create project to the remote repository, click on the Push button (button with the up arrow) next to the remote repository
Create project based on a remote Git repository
Creating a project based on a remote Git repository is basically exporting a project from one Studio and importing it into another one.
To create a project based on remote Git repository, after clicking on Create Project, Click on Remote Git Repository in the create project screen
Click on the Site ID field where you’ll need to give your project an ID. Scroll down to see where you can fill in all the information for the remote repository we are importing. The Git Repo URL is the import project’s sandbox repository git url (the project you want to bring over to your Studio). Below are sample urls for the project being imported:
Here is a sample Git url from GitHub: https://github.com/username/hello-test.git Here is a sample Git url using ssh: ssh://[user@]host.xz[:port]/path/to/repo/ or alternatively for ssh: [user@]host.xz:path/to/repo/
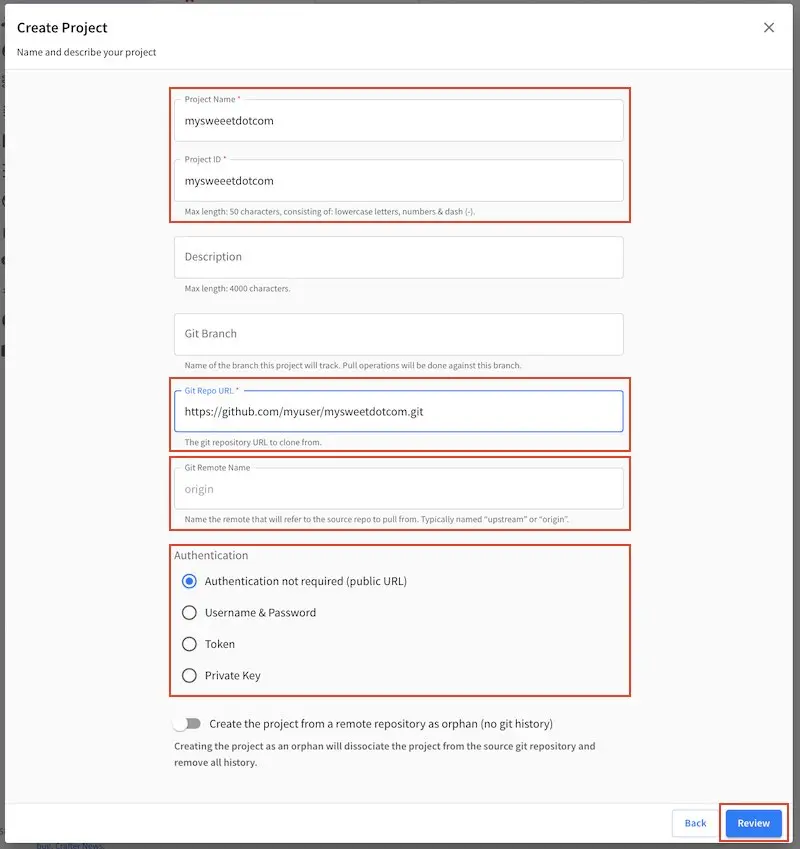
Click on the Review button, then finally, the Create Site button.
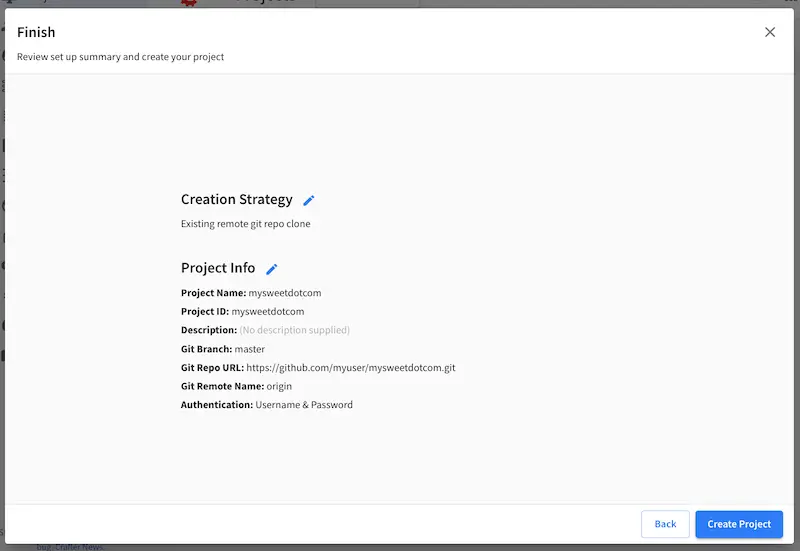
After a short while, your project will be imported.
In case you want to publish the entire project, follow these optional steps:
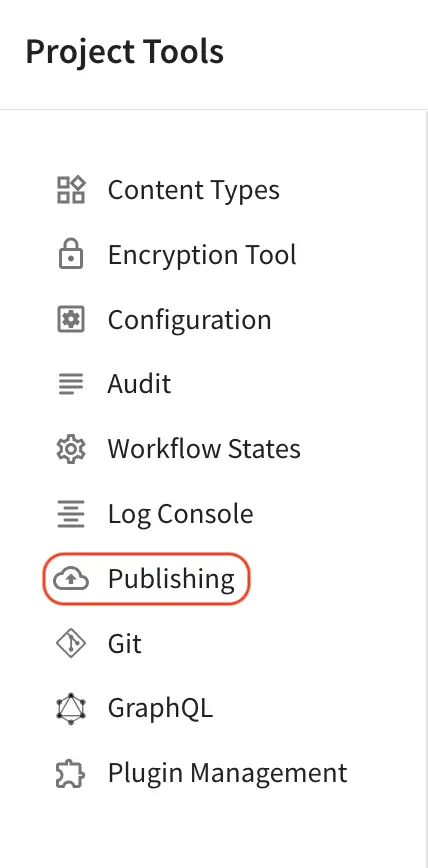
In the project you just imported, click on Project Tools, then click on Publishing
In the Publishing screen, scroll down to
Publish on Demandthen click on the Publish Entire Project button to publish the whole project.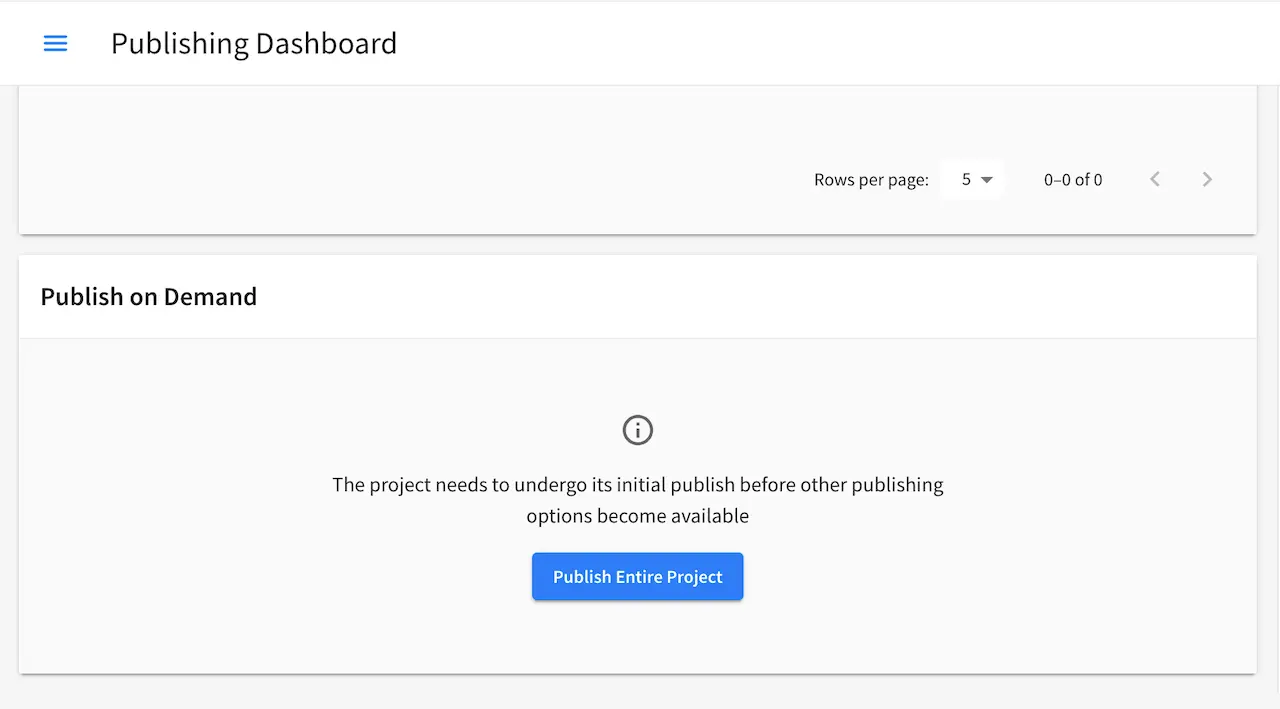
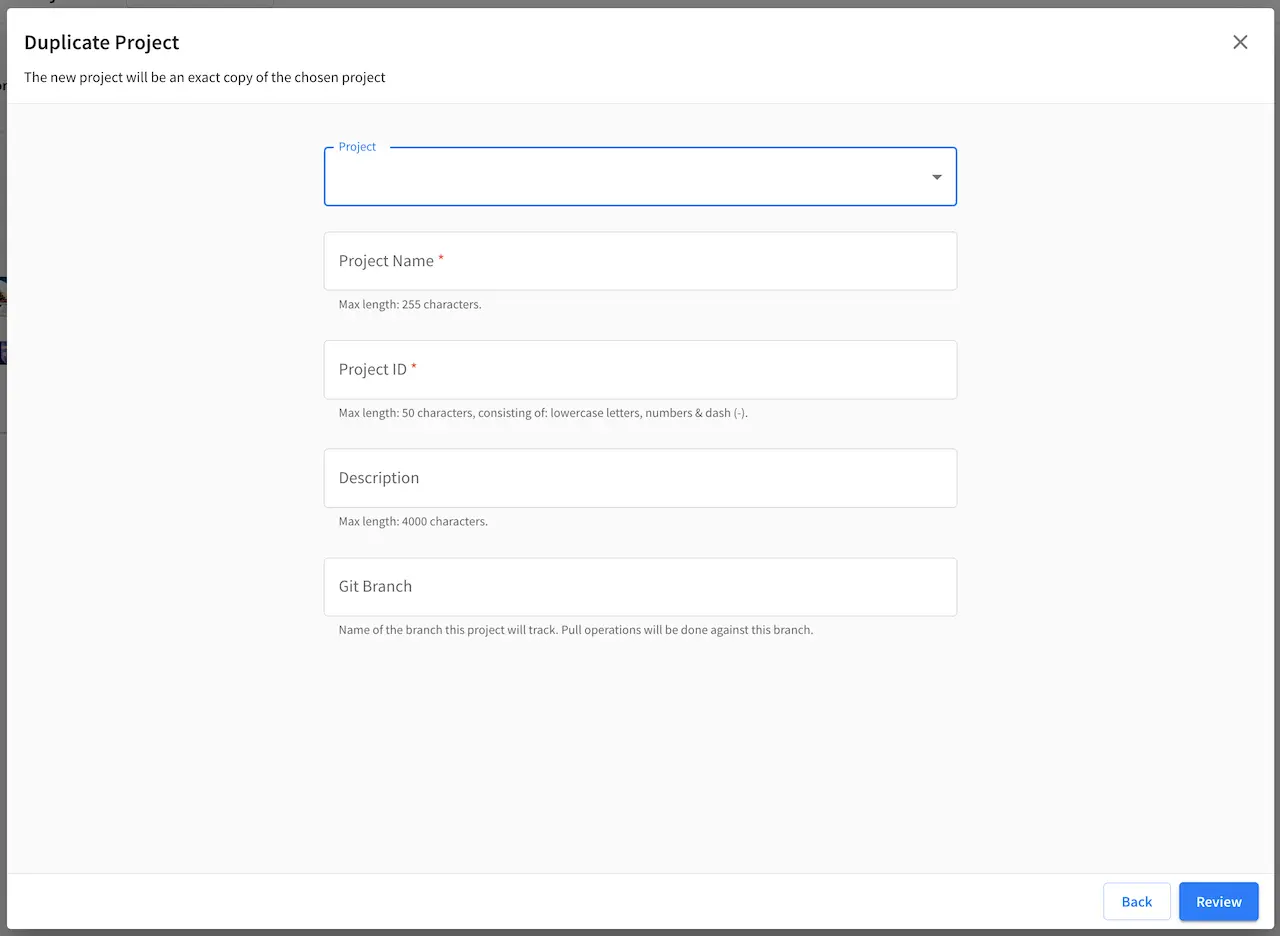
Duplicating a Project
Crafter Studio supports creating a new project by duplicating an existing project.
To duplicate a project, from Projects, click on the Create Project button.
Next, click on Duplicate Project. It will then prompt you to select the project to be duplicated by clicking
on the dropdown arrow in the Project field. Give it a good Project Name and Project ID, then click on the
Review button
When duplicating a project that uses S3 buckets (blob stores), the S3 buckets may be copied over to the new project and the configuration updated if separate S3 buckets from the source project are required.