Engine Headers Based Authentication 
Crafter Engine is able to integrate with any authentication system that sends custom HTTP headers containing information that will be used to authenticate the user in Engine. This section details how to setup Engine for headers based authentication.
To enable Engine headers based authentication:
Set
security.headers.standalonetotrueSet the URLs requiring authentication
Additionally, optional role mappings are available that allows mapping names from the external authentication to simple role names to use in the page or URL restrictions. Optional attribute mappings are also available which allow exposing attributes from the external authentication authority.
Configure Engine for Headers Based Authentication
To enable Engine headers based authentication, open the Engine project configuration file site-config.xml.
Set security.headers.standalone to true
Engine Project Configuration - Enable headers authentication<security> ... <headers> <standalone>true</standalone> </headers> </security>
Next, configure the URLs you require authentication by setting url to desired value and expression to
isAuthenticated() like below:
Engine Project Configuration - setup url restrictions<security> <urlRestrictions> <restriction> <url>/**</url> <expression>isAuthenticated()</expression> </restriction> </urlRestrictions> ... </security>
See Restrict URLs for more information on expressions that can be used.
From the above configuration, here are the headers that Engine expects to be provided:
CRAFTER_secure_key (required)
CRAFTER_username (required)
CRAFTER_email (required)
CRAFTER_groups
CRAFTER_*
It is also possible to change the prefix and names for the headers:
 1<security>
 2  <headers>
 3    ...
 4    <names>
 5     <!-- Prefix that will be used for all headers, defaults to 'CRAFTER_' -->
 6     <prefix>MY_APP_</prefix>
 7
 8     <!-- Name for the header containing the username, defaults to 'username' -->
 9     <username>user</username>
10
11     <!-- Name for the header containing the email, defaults to 'email' -->
12     <email>address</email>
13
14     <!-- Name for the header containing the groups, defaults to 'groups' -->
15     <groups>roles</groups>
16
17     <!-- Name for the header containing the token, defaults to 'secure_key' -->
18     <token>verification</token>
19
20    </names>
21    ...
22  </headers>
23</security>
Note
For CrafterCMS versions prior to 3.1.14, the prefix for the headers is
MELLON_and can’t be changed via project configuration
The default value of the token is my_secure_token. Remember to replace the default value by setting
security.headers.token to secure your installation. In the example below, the token is now set to
CHANGE_MY_TOKEN_VALUE
Engine Project Configuration - Change the default value of the token<security> ... <headers> <token>CHANGE_MY_TOKEN_VALUE</token> </headers> </security>
Optional Role Mappings
To add optional role mappings, add the following inside the <headers> tag:
Engine Project Configuration - setup optional role mappings in header<security> <headers> ... <groups> <group> <name>APP_GROUP_NAME</name> <!-- The name of the group in the header --> <role>ROLE_name_of_role</role> <!-- The name of the role in the authentication object --> </group> </groups> ... </headers> </security>
where:
name: The name of the group in the header. The
APP_prefix shown above is just an example and could be anything.role: The name of the role in the authentication object. Remember to add ROLE_ to the name of the role in the authentication object. So, if mapping the role
user, it will be<role>ROLE_user</role>
Optional Attributes
To add optional attributes, add the following inside the <headers> tag:
Engine Project Configuration - setup optional attributes in header1<security> 2 <headers> 3 ... 4 <!-- Optional attribute mappings, allows to expose attributes from the external auth --> 5 <attributes> 6 <attribute> 7 <name>APP_ATTRIBUTE_NAME</name> <!-- The name of the attribute in the header, excluding the prefix --> 8 <field>name</field> <!-- The name of the attribute in the authentication object --> 9 </attribute> 10 </attributes> 11 ... 12 </headers> 13</security>
where:
name: The name of the attribute in the header, with the prefix removed. (if your prefix is
CRAFTER_then the header value would beCRAFTER_APP_ATTRIBUTE_NAME, and you should enterAPP_ATTRIBUTE_NAMEin this tag.)field: The name of the attribute that will be created in the authentication object.
- To get the value of the attribute passed in the header, use the following
authToken.principal.attributes.name, where
nameis the name of the attribute in the authentication object.
Example
Let’s take a look at an example of setting up Engine headers authentication using a project created using the Website
Editorial blueprint named My Editorial. We will also change the default value for the token header. We’ll then take a
look at an example of setting up Engine headers authentication with optional role mappings and attribute.
Simple Example Setting Up Engine Headers Authentication
Open the Engine site-config.xml file in Studio, by navigating from the Sidebar to
Project Tools > Configuration, and finally picking up the Engine Project Configuration option from the list.
You can also access the site-config.xml using your favorite editor under
CRAFTER_HOME/data/repos/sites/SITENAME/sandbox/config/engine/site-config.xml
Add the following, where we are enabling Engine headers authentication and requiring authentication for all URLs in the
project in addition to changing the default value for the token to my_updated_token. :
Engine Project Configuration - Example enabling headers authentication<?xml version="1.0" encoding="UTF-8"?> <site> <version>2</version> <security> <urlRestrictions> <restriction> <url>/**</url> <expression>isAuthenticated()</expression> </restriction> </urlRestrictions> <headers> <standalone>true</standalone> <token>my_updated_token</token> </headers> </security> </site>
Save your changes and remember to publish the file /config/engine/site-config.xml to see the Engine headers
authentication in action in delivery.
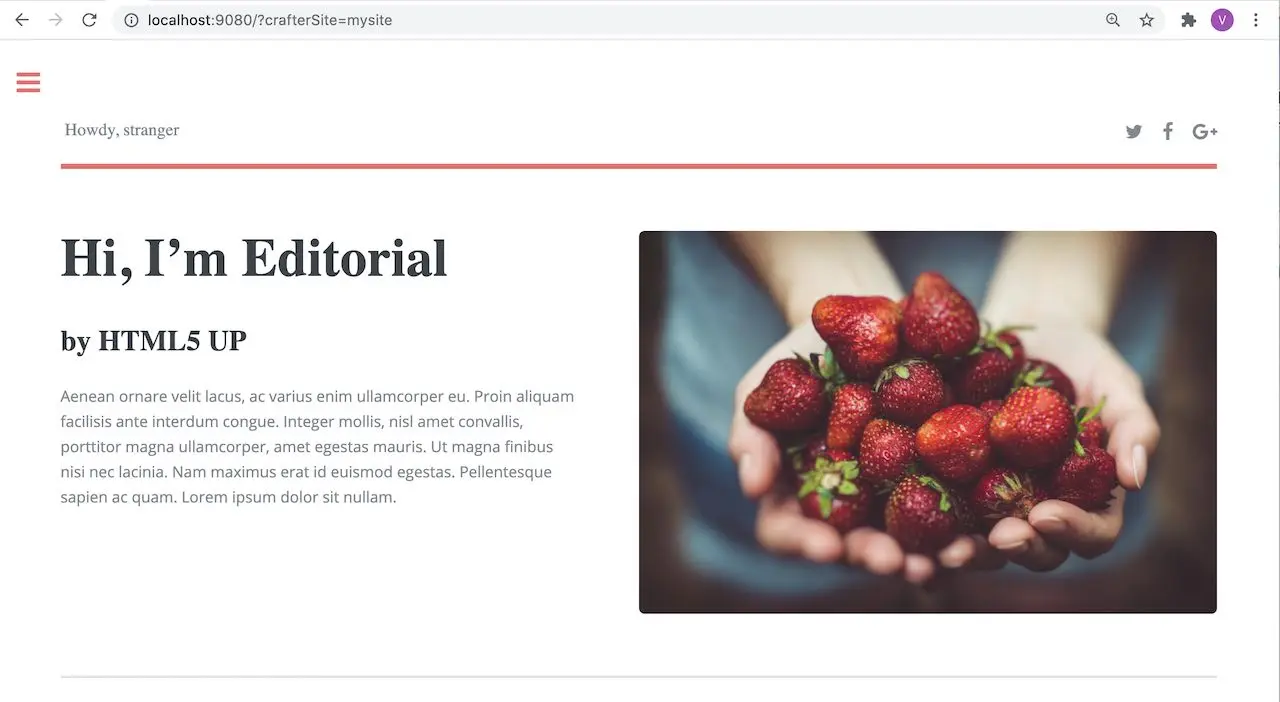
Now, try viewing the Home page without the header attributes required, by entering in your browser
localhost:9080?crafterSite=my-editorial. The Home page will not be displayed without the required header attributes.

This time, try viewing the Home page with the following header attributes and values:
CRAFTER_secure_key : my_updated_token
CRAFTER_username : jsmith
CRAFTER_email : jsmith@example.com
You should now see the Home page displayed
See Engine Project Configuration for more information on how to access the site-config.xml file.
Example Setting Up Engine Headers Authentication with Optional Role Mappings and Attributes
We’ll now take a look at another example where we setup optional role mappings and attributes.
We’ll setup the admin and the user roles and add the attribute APP_FULL_NAME. We’ll try to restrict
access to /articles/** for users with the user or admin role, then we’ll try to display the
APP_FULL_NAME value passed from the headers in our project. Remember that the ROLE_ prefix is required
Open the Engine site-config.xml file in Studio, by navigating from the Sidebar to
Project Tools > Configuration, and finally picking up the Engine Project Configuration option from the dropdown.
Add the following to setup the admin and user role, and the attribute APP_FULL_NAME:
Engine Project Configuration - Example Engine headers authentication with optional role mappings and attribute1<security> 2 <urlRestrictions> 3 <restriction> 4 <url>/articles/**</url> 5 <expression>hasAnyRole('user'\,'admin')</expression> 6 </restriction> 7 </urlRestrictions> 8 <headers> 9 <standalone>true</standalone> 10 <token>my_updated_token</token> 11 <!-- Optional role mappings, allows to map names from the external auth to simple role names to use in the page or url restrictions --> 12 <!-- The APP_ prefix is just an example, the values can be anything --> 13 <!-- The ROLE_ prefix is is required for the name of the role --> 14 <groups> 15 <group> 16 <name>APP_ADMIN</name> <!-- The name of the group in the header --> 17 <role>ROLE_admin</role> <!-- The name of the role in the authentication object --> 18 </group> 19 <group> 20 <name>APP_USER</name> <!-- The name of the group in the header --> 21 <role>ROLE_user</role> <!-- The name of the role in the authentication object --> 22 </group> 23 </groups> 24 <!-- Optional attribute mappings, allows to expose attributes from the external auth --> 25 <attributes> 26 <attribute> 27 <name>APP_FULL_NAME</name> <!-- The name of the attribute in the header --> 28 <field>name</field> <!-- The name of the attribute in the authentication object --> 29 </attribute> 30 </attributes> 31 </headers> 32</security>
For the expression in the URL restriction, remember to escape the comma as shown above
<expression>hasAnyRole('user'\,'admin')</expression>
When we send the following headers:
CRAFTER_secure_key : my_updated_token
CRAFTER_username : jsmith
CRAFTER_email : jsmith@example.com
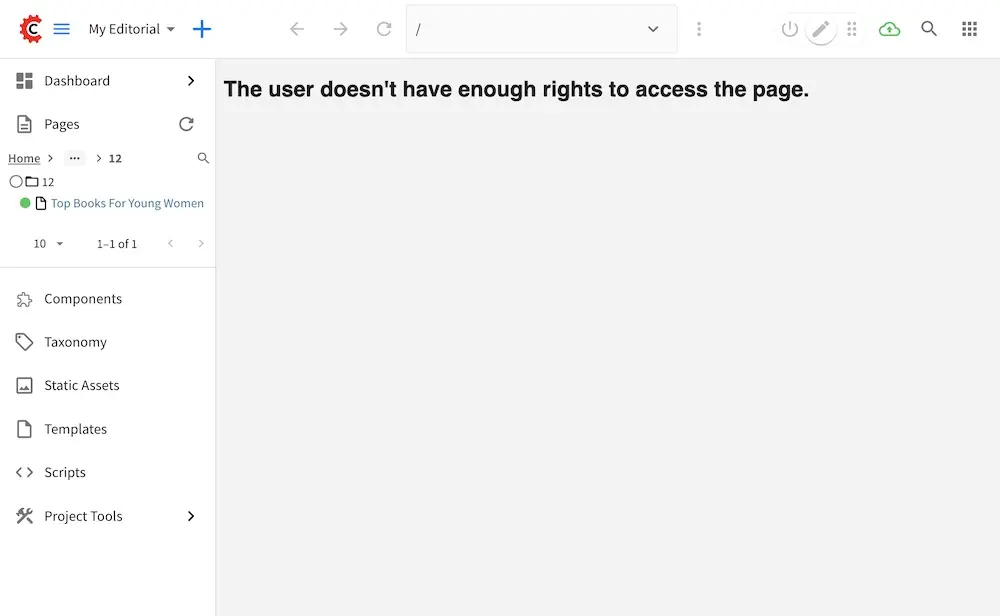
Notice that when we try to view an article, since the user does not have either admin or user role, the page
is not available and will display the following message: The user doesn't have enough rights to access the page.
In our example below, we tried previewing the article Top Books For Young Women with the headers listed above and
is shown the message below:
Let’s now try sending the headers again, but this time with the role APP_USER for our user
CRAFTER_secure_key : my_updated_token
CRAFTER_username : jsmith
CRAFTER_email : jsmith@example.com
CRAFTER_groups: APP_USER
Notice that this time, we are able to preview the article correctly

The website editorial blueprint displays the value of the attribute with field name out of the box in the page
header. You can take a look at the header.ftl file on how the attribute is displayed. Open the Sidebar in
Studio, then navigate to /templates/web/components/ then right click on header.ftl and select Edit.
The authToken.principal.attributes.name contains the value passed for APP_FULL_NAME in the header
/templates/web/components/header.ftl1<#import "/templates/system/common/cstudio-support.ftl" as studio /> 2<header id="header" <@studio.componentAttr component=contentModel ice=true iceGroup="header"/>> 3 <a href="/" class="logo"><img border="0" alt="${contentModel.logo_text_t!""}" src="${contentModel.logo_s!""}"> 4 <#if (authToken.principal)??> 5 <#assign name = authToken.principal.attributes.name!"stranger" /> 6 <#else> 7 <#assign name = "stranger" /> 8 </#if> 9 10 Howdy, ${name} 11 12 </a> 13 ... 14</header>
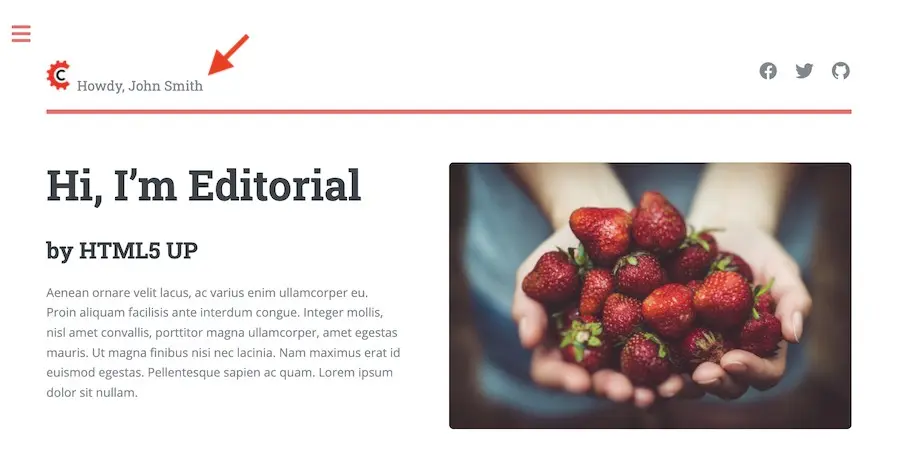
Let’s now try sending the headers again, but this time with the attribute APP_FULL_NAME
CRAFTER_secure_key : my_updated_token
CRAFTER_username : jsmith
CRAFTER_email : jsmith@example.com
CRAFTER_groups: APP_USER
CRAFTER_APP_FULL_NAME: John Smith
Note that when sending the attribute APP_FULL_NAME in the header, the header prefix must be added as shown above.
When we preview a page, the value in the custom header is displayed: