
Engine Crafter Profile Configuration
Note
This guide includes Crafter Profile specific configuration only, for a general guide see Engine Project Security Guide
Crafter Engine needs access tokens to use Crafter Profile’s API. Each project must have it’s own access token. Follow the next steps to create one:
Login to Crafter Profile Admin Console as a
PROFILE_SUPERADMIN(by default the admin user has this role). See here for more information on the Crafter Profile Admin Console UI.Click on New Access Token in the navigation. Enter your project’s name on Application, leave the Master checkbox unselected, pick a proper Expiration Date (10 years from the current date is ok) and on Tenant Permissions add your tenant’s name to the input (Remember that your tenant’s name has to have the same name as your project. See the note below) and click on Add. By default the admin console auto-selects the 3 actions mentioned before. If you’re using the same access token as another environment (e.g. you want to use the same access token in dev and prod), copy the same access token ID from the other environment, and enter the same field values for Application, Master and Expiration Date. Finally, click on Accept.
Note
Authentication by default is done against a tenant with the same name as your project. See Tenants Management for more information on creating a tenant.

Now that you have created the access token, you need to “tell” Engine to use it in your project. In Admin Console, click on List Access Tokens in the navigation menu and copy the ID of the token you just created. Then, depending on the mode Engine is running, add one of the following configurations (preview is ignored because normally predefined Personas are used, so there’s no need to access the Crafter Profile app).
Multi-tenant: You need to add the access token ID to the Config > Engine Project Configuration in Studio, and deploy the file to Engine:
1<profile>
2    <api>
3        <accessTokenId>6604d59a-fe1b-4cb3-a76f-bdb1eb61e8c2</accessTokenId>
4    </api>
5</profile>
Single tenant: In the Tomcat where Engine is installed, go to shared/classes/crafter/engine/extension and add the access token ID as the following property:
1crafter.profile.rest.client.accessToken.id=6604d59a-fe1b-4cb3-a76f-bdb1eb61e8c2
Add Authentication
Add Registration
Normally, to add registration or sign up you just need to:
Create a page with an HTML form that captures the user information for registration:
1<form action="/registration" method="post">
2    Email: <input type="text" name="email"></input><br/>
3    First Name: <input type="text" name="firstname"></input><br/>
4    Last Name: <input type="text" name="lastname"></input><br/>
5    Password: <input type="password" name="password"></input><br/>
6    <button type="submit">Submit</button>
7</form>
Create a controller script that receives the information and creates the respective profile. Assuming the controller should be under /registration, you need to create a script under Scripts > controllers > registration.post.groovy, with code similar to the following:
 1import utils.MailHelper
 2
 3import org.craftercms.engine.exception.HttpStatusCodeException
 4import org.craftercms.profile.api.Profile
 5import org.craftercms.security.utils.SecurityUtils
 6
 7def sendVerificationEmail(mailHelper, profile) {
 8    def token = profileService.createVerificationToken(profile.id.toString())
 9    def verificationUrl = urlTransformationService.transform("toFullUrl", "/verifyacct?token=${token.id}")
10    def model = [:]
11        model.profile = profile
12        model.verificationUrl = verificationUrl
13
14    mailHelper.sendEmail("noreply@example.com", profile.email, "Verify Account", "/templates/mail/verify-account.ftl", model)
15}
16
17def email = params.email
18def firstName = params.firstname
19def lastName = params.lastname
20def password = params.password
21
22if (!email) {
23    throw new HttpStatusCodeException(400, "Bad request: missing email")
24} else if (!firstName) {
25    throw new HttpStatusCodeException(400, "Bad request: missing first name")
26} else if (!lastName) {
27    throw new HttpStatusCodeException(400, "Bad request: missing last name")
28} else if (!password) {
29    throw new HttpStatusCodeException(400, "Bad request: missing password")
30}
31
32def profile = profileService.getProfileByUsername(siteContext.siteName, email)
33if (profile == null) {
34    def attributes = [:]
35        attributes.firstName = firstName
36        attributes.lastName = lastName
37
38    profile = profileService.createProfile(siteContext.siteName, email, password, email, false, null, attributes, null)
39
40    sendVerificationEmail(new MailHelper(siteContext.freeMarkerConfig.configuration), profile)
41
42    return "redirect:/"
43} else {
44    throw new HttpStatusCodeException(400, "User '${email}' already exists")
45}
Create also a MailHelper.groovy file under Classes > groovy > utils, with the following code:
 1package utils
 2
 3import java.util.Properties
 4
 5import org.craftercms.commons.mail.impl.EmailFactoryImpl
 6import org.craftercms.engine.exception.HttpStatusCodeException
 7import org.springframework.mail.javamail.JavaMailSenderImpl
 8
 9class MailHelper {
10
11    def emailFactory
12
13    def MailHelper(freeMarkerConfig) {
14        def javaMailProperties = new Properties()
15            javaMailProperties["mail.smtp.auth"] = "false"
16                  javaMailProperties["mail.smtp.starttls.enable"] = "false"
17
18        def mailSender = new JavaMailSenderImpl()
19            mailSender.host = "localhost"
20            mailSender.port = 25
21            mailSender.protocol = "smtp"
22            mailSender.defaultEncoding = "UTF-8"
23            mailSender.javaMailProperties = javaMailProperties
24
25        emailFactory = new EmailFactoryImpl()
26        emailFactory.mailSender = mailSender
27        emailFactory.freeMarkerConfig = freeMarkerConfig
28    }
29
30    def sendEmail(from, to, subject, templateName, templateModel) {
31        emailFactory.getEmail(from, (String[])[ to ], null, null, subject, templateName, templateModel, true).send()
32    }
33
34}
Create the Freemarker template that will be used to send the verification emails to the users, under Templates > mail > verify-account.ftl:
 1<p>Hi ${profile.attributes.firstName}!</p>
 2
 3<p>
 4    Thanks for joining MySite.com. To verify your new account, click or copy the link below in your browser:<br/>
 5    <a href="${verificationUrl}">${verificationUrl}</a>
 6</p>
 7
 8<p>
 9    Thanks,<br/>
10    The MySite.com Team
11</p>
Finally, add the controller that will perform the profile verification when the user clicks on the link included in the email and is redirected. If we used the code above, the script should be put in Scripts > controllers > verifyacct.get.groovy:
 1import org.craftercms.engine.exception.HttpStatusCodeException
 2
 3def token = params.token
 4if (token) {
 5    profileService.verifyProfile(token)
 6
 7    return "/templates/web/account-verified.ftl"
 8} else {
 9    throw new HttpStatusCodeException(400, "Bad request: token param is missing")
10}
Add Single Sign-On
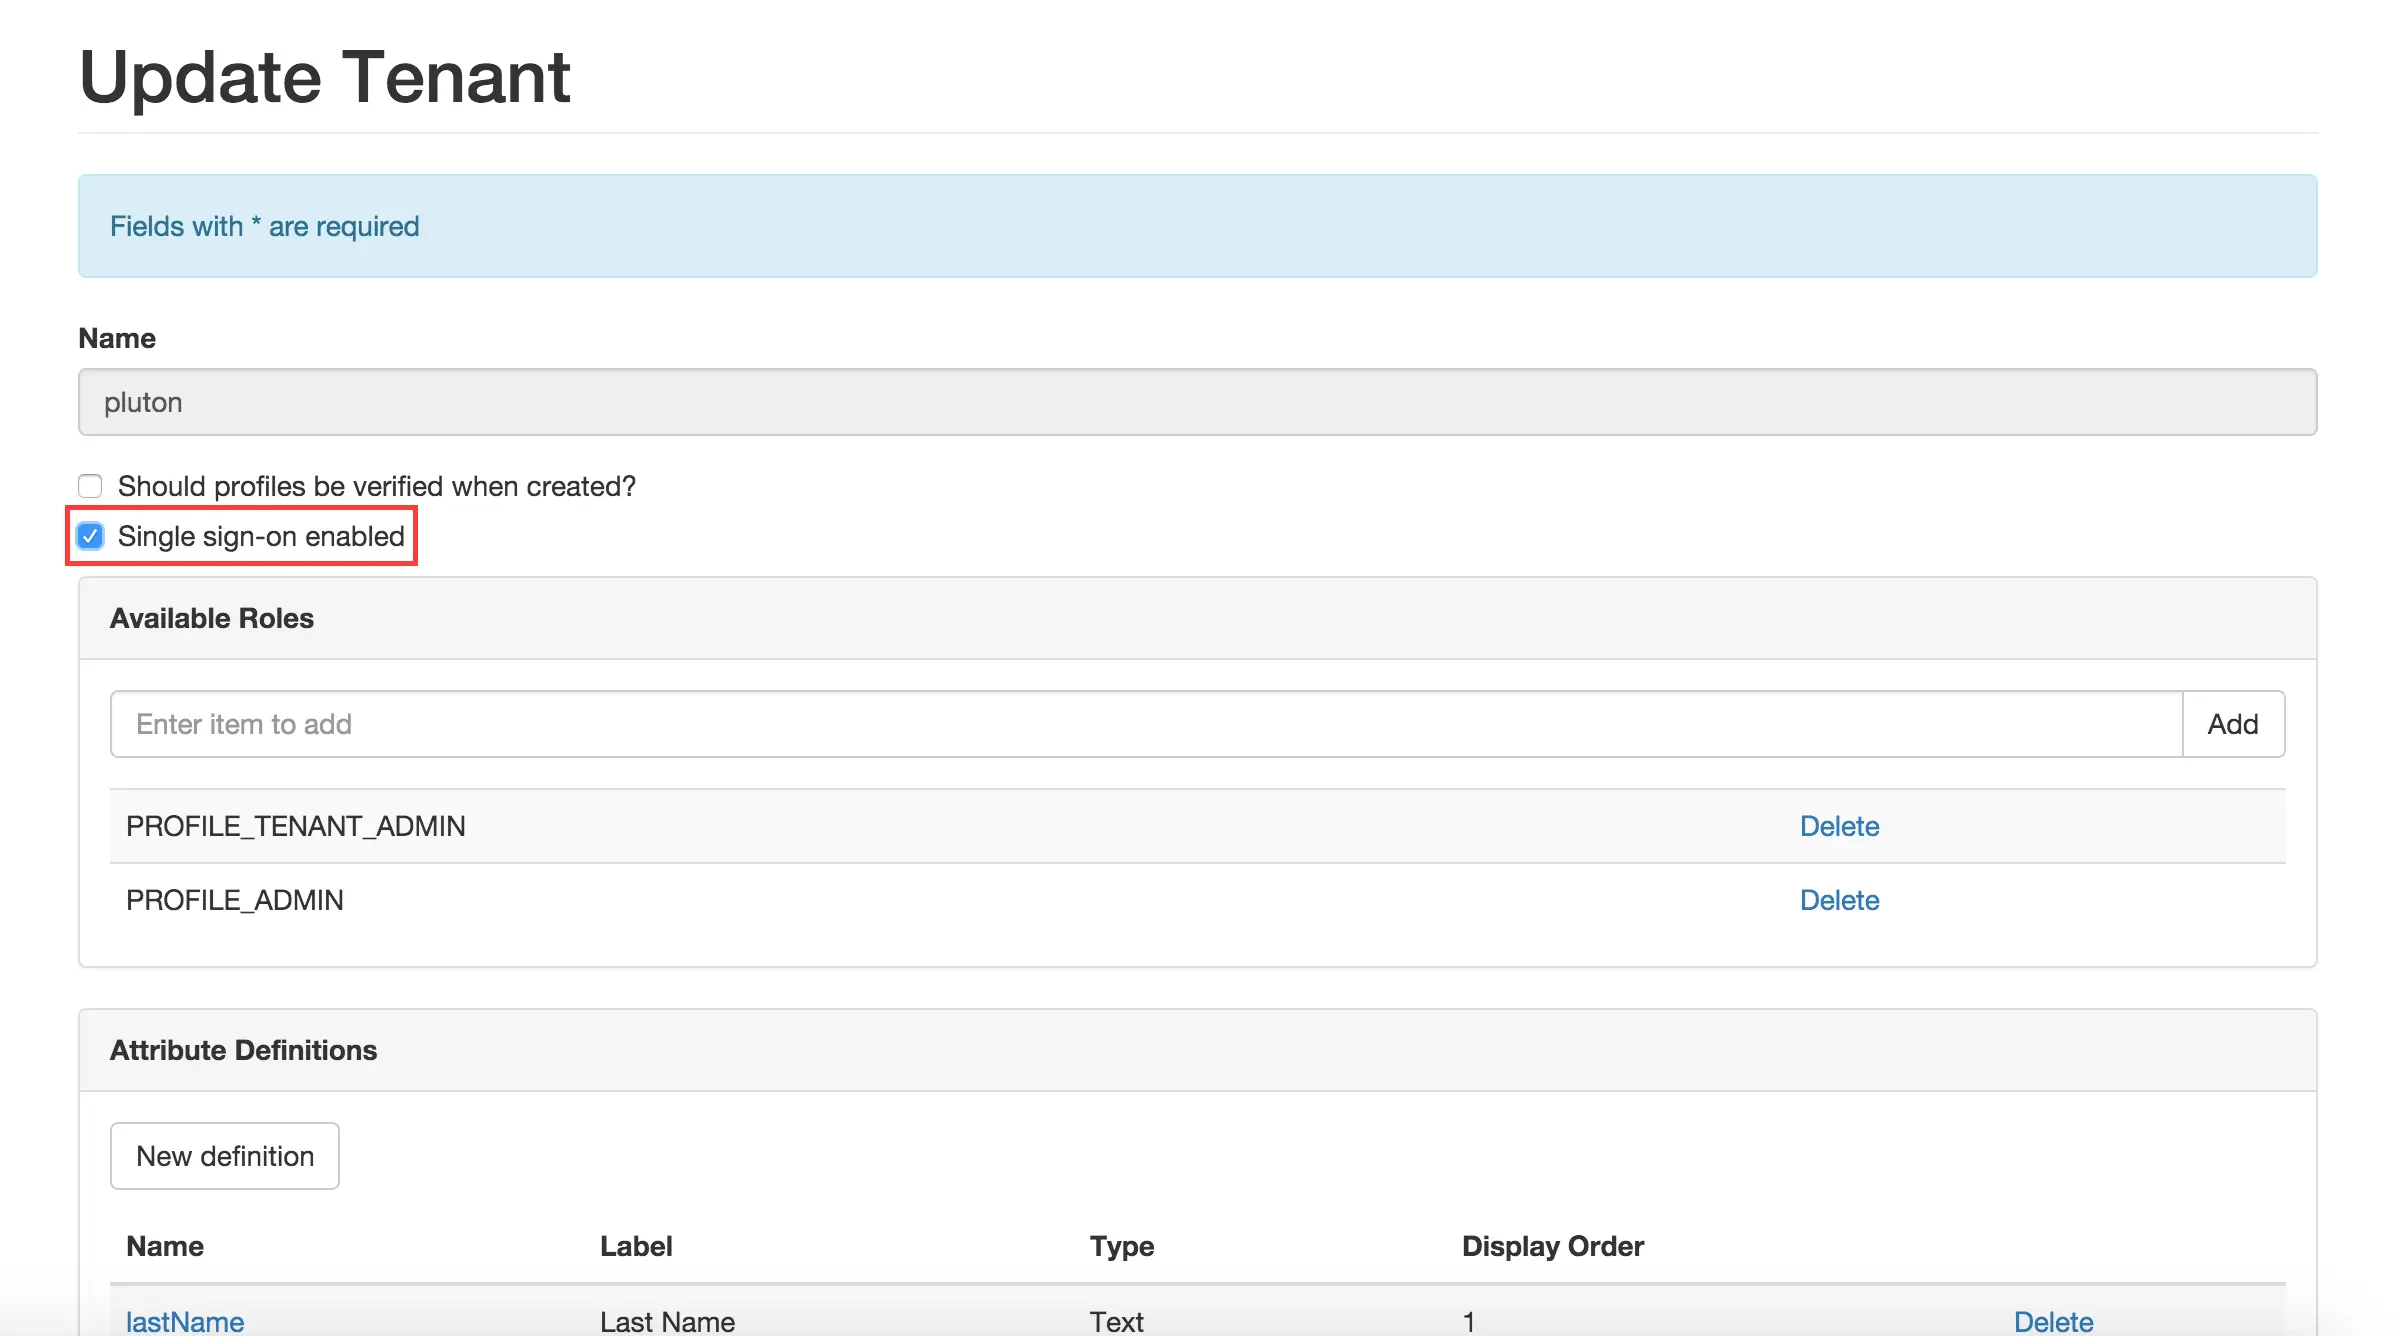
Configure SSO headers with at least a CRAFTER_secure_key, CRAFTER_username, CRAFTER_email and CRAFTER_groups (which must be a comma separated list of string) in the header, then check in Crafter Profile Admin Console to make sure that the Single sign-on enabled checkbox is selected in the tenant page.
All headers with the CRAFTER_ prefix will be mapped, without the prefix, to the attributes you defined in the
Crafter Profile tenant, when a new user needs to be created. So the configuration above will cause the Security
Provider to create a user with firstName, lastName and displayName attributes.
Note
For CrafterCMS versions prior to 3.1.14, the prefix for the headers is
MELLON_instead ofCRAFTER_and can’t be changed via project configuration.
Add Facebook Login
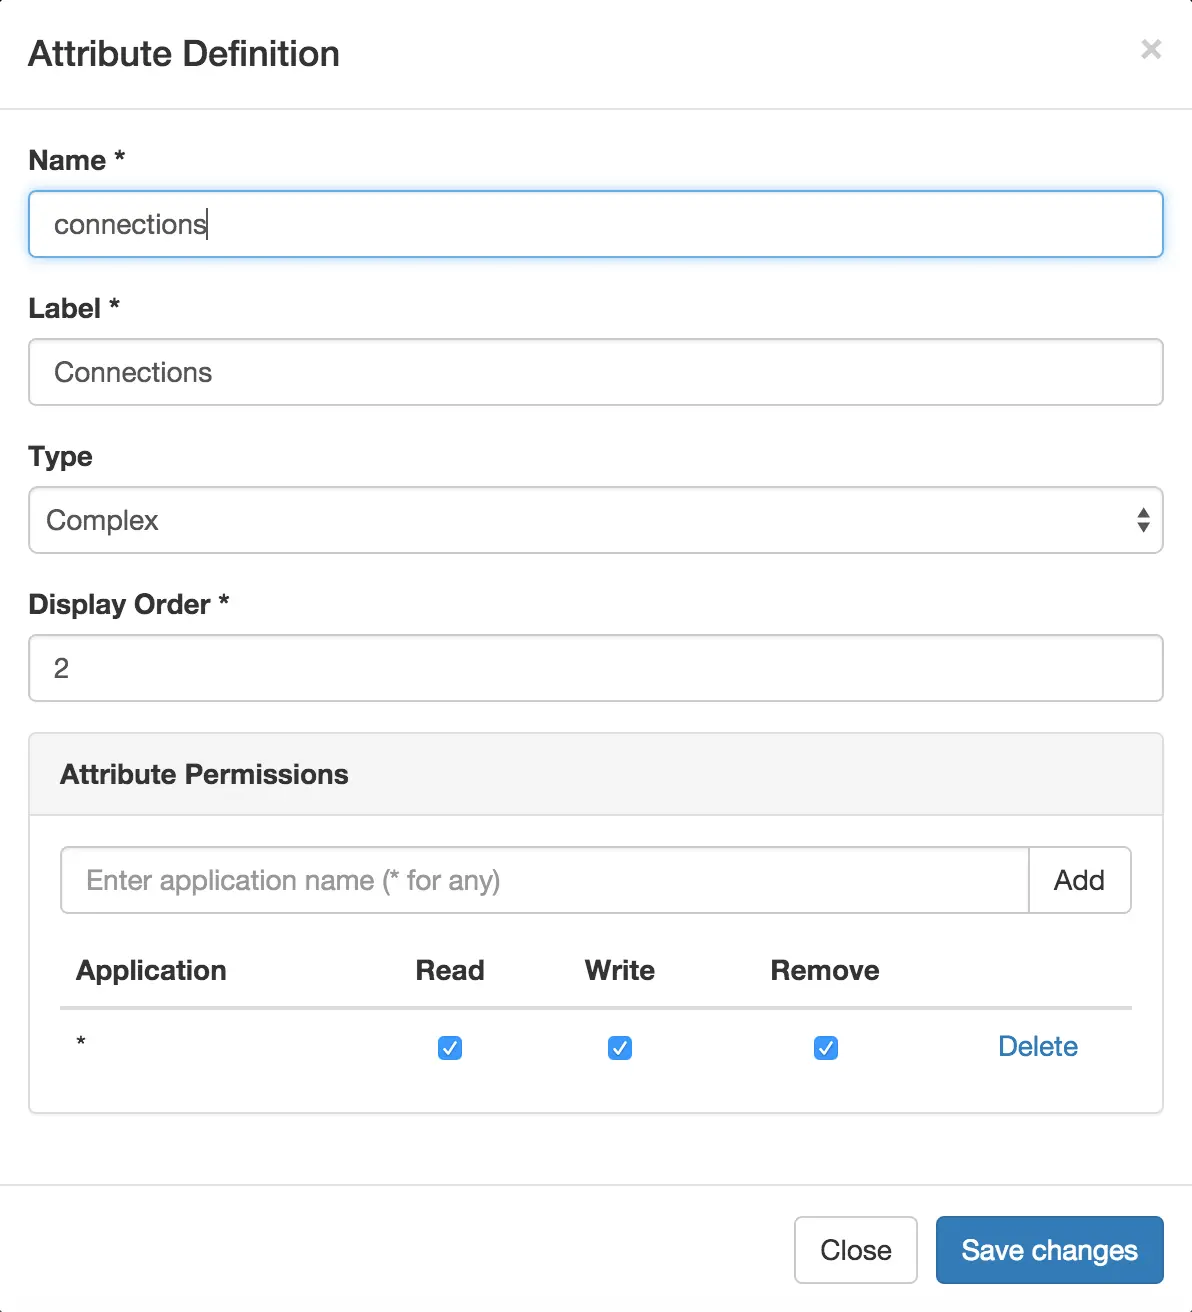
Be sure there’s a connections attribute of Complex type defined for the project’s Crafter Profile Tenant. This attribute is needed to store the Facebook connection info. To add this attribute to the Tenant, go to Crafter Profile Admin Console, select the Tenant and then add the attribute.
Add the Facebook appSecret and appKey to your project’s config (in Studio, Config > Engine Project Configuration), like this:
1<socialConnections>
2    <facebookConnectionFactory>
3        <appId>YOUR_APP_ID</appId>
4        <appSecret>YOUR_APP_SECRET</appSecret>
5    </facebookConnectionFactory>
6</socialConnections>
Add a JS method that is triggered when the user clicks on the “Login with Facebook” button, that displays the FB login popup when the user clicks on “Connect with Facebook”:
 1$("#connect").click(function() {
 2    try {
 3        var top = (screen.height / 2) - (300/ 2);
 4        var left = (screen.width / 2) - (500 / 2);
 5        var fbDialog = window.open('/connect/facebook_dialog', 'fbDialog', 'width=500, height=300, top=' + top + ', left=' + left);
 6        var interval = setInterval(function() {
 7            if (fbDialog == null || fbDialog.closed) {
 8                clearInterval(interval);
 9
10                location.reload();
11            }
12        }, 1000);
13    } catch(e) {}
14}
Add a controller script under Scripts > controllers > connect > facebook_dialog.get.groovy, that will redirect to the actual Facebook login when the popup appears. The whole FB login process can be done with the help of the
providerLoginSupport, provided automatically to all scripts. Thestart(tenant, providerId, request, additionalParams, connectSupport)method is used to create the proper Facebook redirect URL. Also, by creating a customConnectSupportwith a callbackUrl you can tell Facebook the URL to redirect to after the user has logged in.1import org.springframework.social.connect.web.ConnectSupport 2import org.springframework.util.LinkedMultiValueMap 3 4def connectSupport = new ConnectSupport() 5 connectSupport.callbackUrl = urlTransformationService.transform("toFullUrl", "/connect/facebook") 6 7def additionalParams = new LinkedMultiValueMap<String, String>() 8 additionalParams.add("scope", "email,public_profile") 9 additionalParams.add("display", "popup") 10 11return "redirect:" + providerLoginSupport.start(siteContext.siteName, "facebook", request, additionalParams, connectSupport)
Under Scripts > controllers > connect > facebook.get.groovy, add the script to complete the Facebook connection. By calling
providerLoginSupport.complete(tenant, providerId, request), the login process will automatically be completed for you, and a new user will be created if there wasn’t a previous one with the Facebook provided username or email.1providerLoginSupport.complete(siteContext.siteName, "facebook", request) 2 3return "/templates/web/fb-login-done.ftl"