
Introduction to the Developer Workflow with CrafterCMS
Development and content authoring are both a major part of producing digital experiences. In this section, we’ll take a look at the basic mechanics that support content authoring, publishing and developer workflow.
Here’s a typical developer process and set of environments which must be followed in order to get new functionality to production.
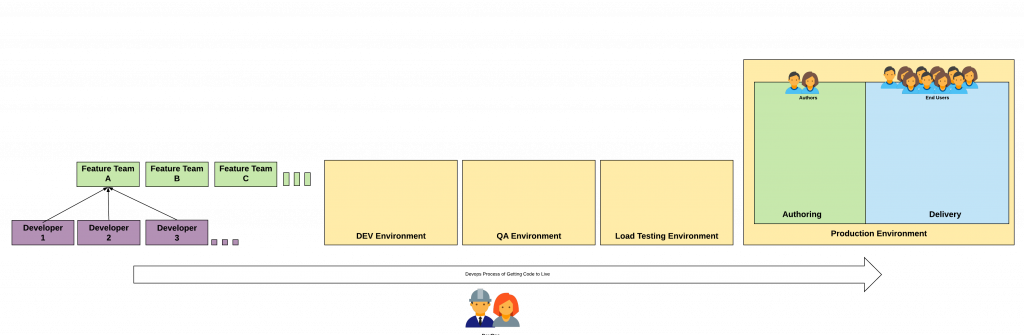
We’ll first tackle CrafterCMS content management and deployment mechanics, then the DevOps workflow and finally how to setup the workflow.
Content Management and Deployment Mechanics
CrafterCMS is implemented with a decoupled architecture, composed of several microservices where content authoring and content delivery services are separated into their own distinct, subsystems.
Authoring is supported via Crafter Studio (a web-based authoring tool) that sits on top of a headless Git-based repository and publishing system. While content authors are performing their work, Crafter is managing all of the Git mechanics, managing locking, creating a time-machine like, Git-based version history and audit trail, all accessible via the Studio UI.
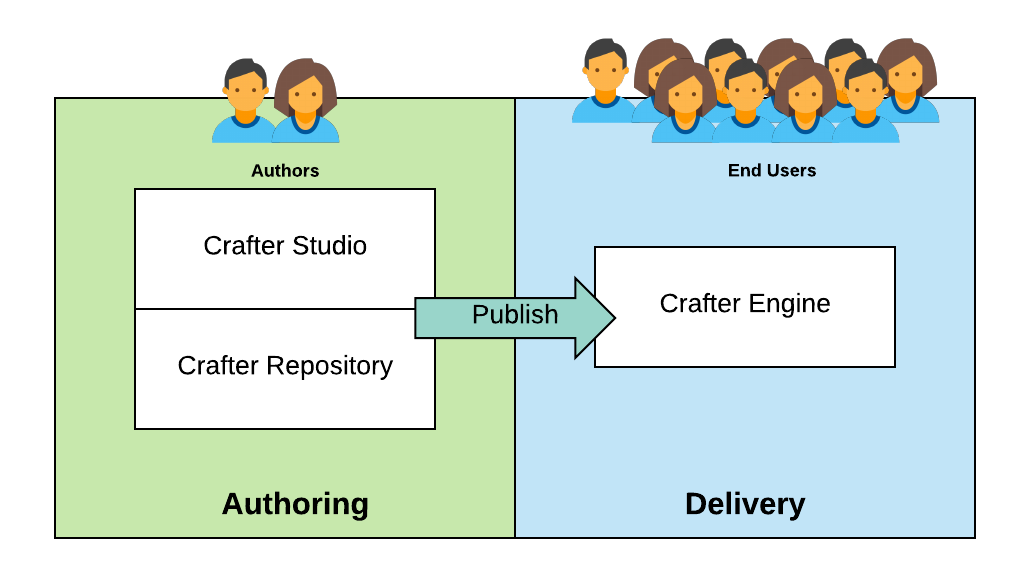
Crafter’s publish mechanism deploys content from the Authoring system to the Delivery system. Content logically flows from the authoring environment to the delivery environment. The mechanism for this, given the underlying Git repo, is a “pull” type interaction.
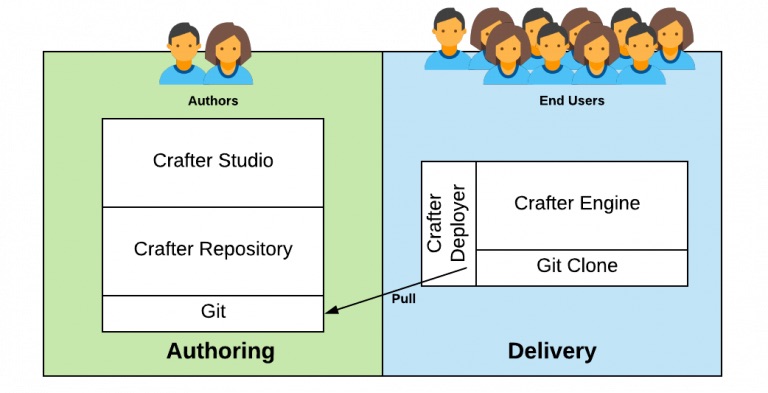
Each delivery node has a Deployer agent that coordinates deployment activities on the node for each site that is being delivered on that node.
Delivery nodes can initiate deployment pulls either on a scheduled interval (a “duty cycle”), on-demand via an API call, or both.
The Deployer performs a number of activities beyond receiving and updating content on the delivery node. A list of post-commit processors is run. These can be used to execute updates on search indexes, clear caches and perform other such operations.
The Delivery node maintains a clone of the Authoring Git-based repository.
The Crafter Deployer takes care of managing the synchronization of the delivery node’s clone authoring repository from the authoring environment.
Git-mechanics ensure content is in sync
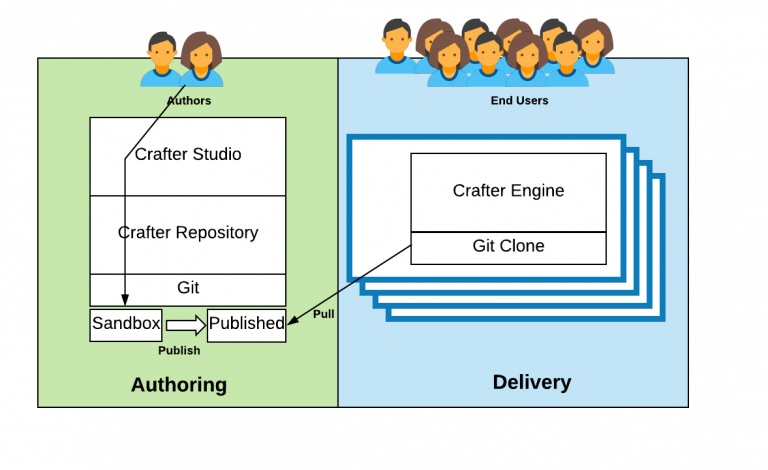
Only approved content is published to the delivery environment. Crafter manages this by using 2 repositories for each project. One called a Sandbox which contains work-in-progress and the other called Published which represents approved, published work and complete content history.
Authors use the Crafter Studio UI to review and approve content via workflow.
Crafter Studio takes care of moving approved work between Sandbox and Published repositories.
Delivery nodes monitor the published repository for updates.
The underlying Git repositories and related workflow for Authoring require no setup at all. When you create a project in Crafter Studio it automatically creates the local Sandbox and Published repositories. When you add a new Delivery node a simple command line script is run on that node that configures the node’s deployer to replicate and process content from the Published repository from authoring.
DevOps Workflow
Content Authors can edit and preview content via Crafter Studio. Edits are saved in the Git-based repository Sandbox. On approval, edits are moved to the repository Published. Crafter Studio handles all of the mechanics for authors. Authors simply click edit and make changes, perform reviews and publish work via the UI. In the background, Crafter Studio will lock content, perform commits and take any other actions necessary to perform the low-level repository tasks necessary.
The authoring environment is akin to a work and test area for the authors. Relative to the live site or app the content authors are deploying content to, the Crafter Studio (and the Sandbox repository) where they edit, preview and approve content is what we would call a lower environment. Work is promoted from the lower environment (authoring) to the live environment (delivery.)
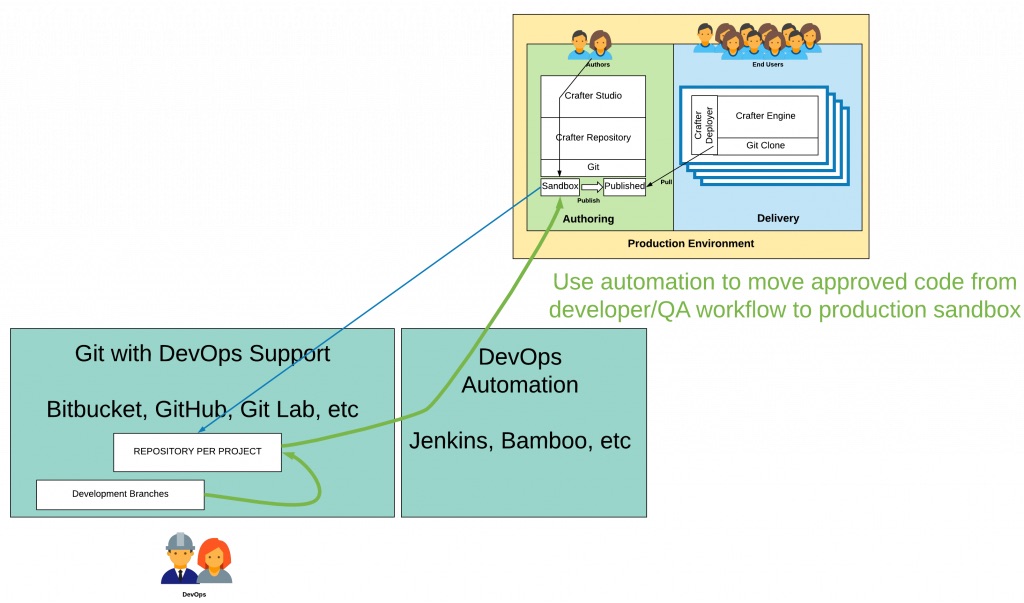
Let’s take a look at a typical developer workflow that’s integrated with the production authoring environment. In this diagram, you will find a mechanism for both a “code forward” activity in which code can be moved through a development process through to production as well as a “content back” activity in which production content, including in-process content, can be brought back to lower development environments, including local development machines.
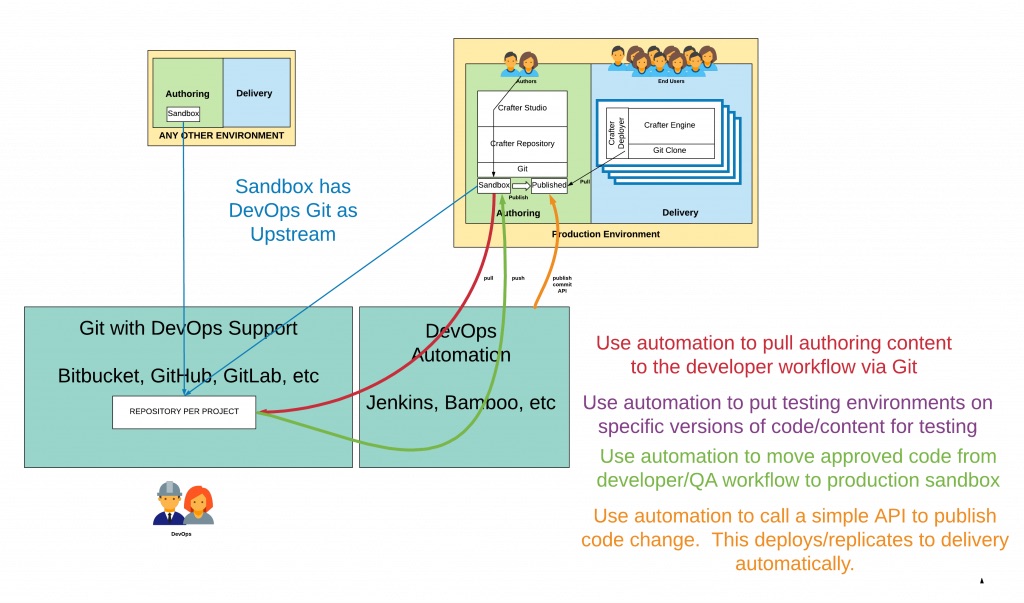
DevOps workflow that describes in general how content flows back to the development process and code flows forward through the certification process to production
Let’s take a closer look at the diagram above.
Step 1: Create an Upstream Repository
In order to facilitate a developer workflow, you want to establish an upstream repository for your Sandbox in your production authoring environment. Any Git repository will work. It’s typical to use a Git repository that has a UI/Workflow atop of it such as GitHub, Bitbucket, GitLab and other similar systems. The upstream repository is the root of the developer workflow.
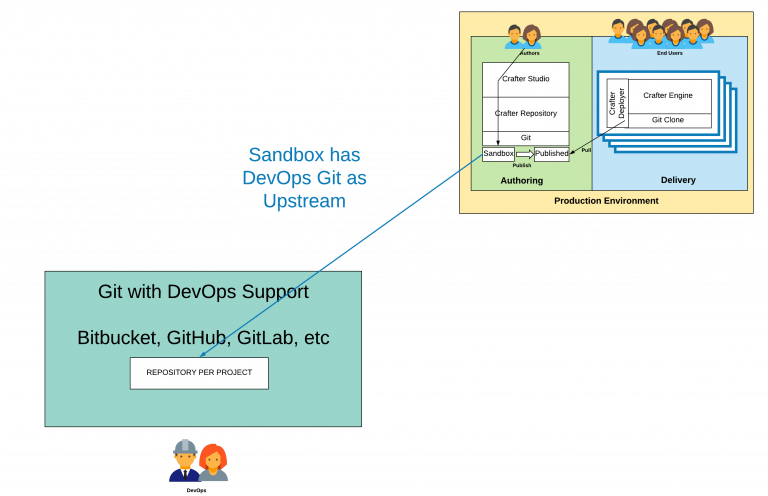
A Git repository with support for “developer/team workflow” such as GitHub, GitLab or Bitbucket is configured as a remote upstream repository of the Production Authoring Sandbox repository. This is the primary point of contact between the authoring process and the development and code release process come together.
Step 2: Use Automation to Sync Sandbox with the Upstream
Note that the repository is what the Git community refers to as an “upstream” remote repository. That means in a sense the Production Sandbox becomes subordinate to it from a Git log perspective. This upstream repository is where content and development work will be merged before making its way to the production Sandbox and ultimately to the Published repository and the delivery nodes themselves. Also, note that nothing changes about the publishing and deployment configuration and topology of the Production environment.
You will want to keep the upstream repository up to date with authoring. The best way to accomplish this is to use a DevOps automation platform such as Jenkins or Bamboo to orchestrate a push to the upstream on a schedule. Keeping the upstream repository up to date with the authoring Sandbox repository provides downstream development and testing repositories with the latest content and helps to avoid conflicts when it’s time to promote from the upstream repository to the authoring Sandbox repository.
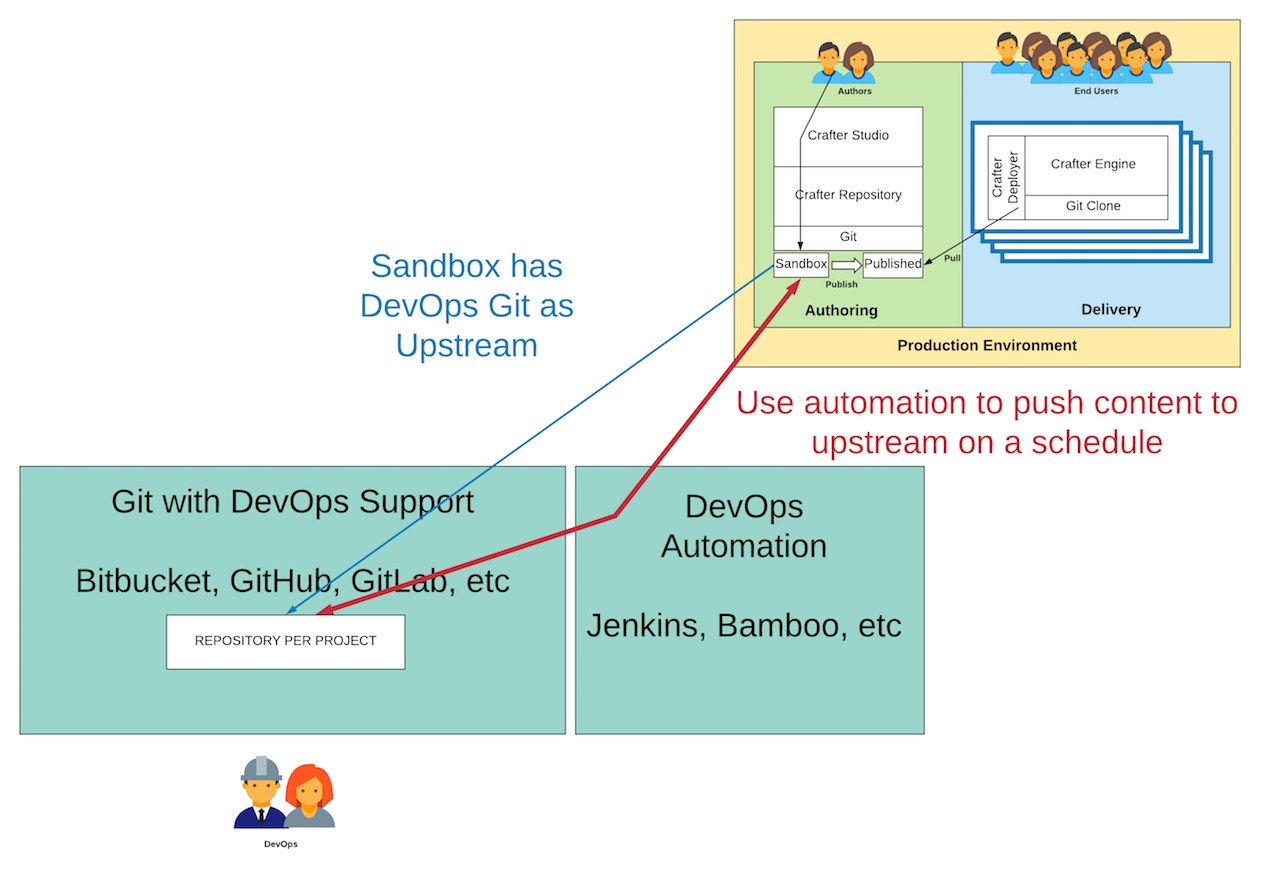
Content flows from Production Authoring Sandbox to the Developer repository via automated Git Push
Step 3: Use the Upstream Repository to Support Development and Testing Environments and Workflow
From this upstream repository, you will feed all lower environments and branch for each of your development efforts. From the upstream repository, you can support any development process and supply content to any development or testing environment. Lower environments may consist of Authoring and Delivery, or just Authoring, or just Delivery. It depends on the needs. For example, Development often contains both Authoring and Delivery, while QA tends to focus only on Delivery. Simple “Git pull” mechanics are used to move code and content from the upstream repository, typically from a branch.
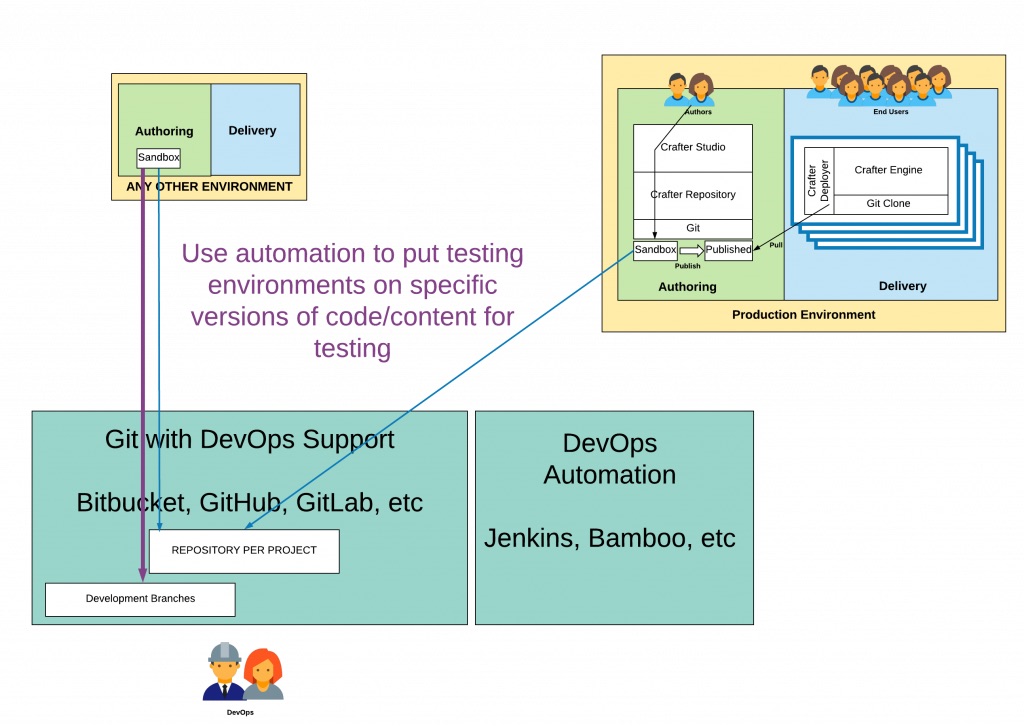
Development branches and forks can be created to meet your specific workflow needs. Lower environments use these repositories and branches as their upstream.
Step 4: Merge Code Updates Into the Upstream Master and Pull them to the Production Authoring Sandbox Repository
When you are ready to move code from a development branch to the authoring Sandbox you will first merge the work into the master of the upstream repository. You can do merge all of your commits or you can merge them into a single commit by using the Git rebase command. By Squashing all of the commits into a single commit you make it easier to move the workaround as a single unit. Merges are typically done via pull requests on repositories that support development workflow. Once the merge operation is complete in the upstream repository your automation will carry that work to the production authoring Sandbox.
Use “Pull Requests” and other Git workflow mechanics to promote code through the process. When it’s ready to go live merge it to the “Master” of the Developer Repository. At this point, it will flow via automation to the Production Authoring Sandbox.
Step 5: Use Crafter Studio’s Publish Commits API to Publish Code to Delivery
Once your development work is in the Production Sandbox you will want to publish it. To do this Crafter Studio provides a REST API that will trigger the publishing on one or more commits. Simply call Crafter Studio’s Publish Commits REST API (/api/1/services/api/1/publish/commits.json) via the DevOps automation platform passing the required parameters including the commit IDs to be published and Crafter Studio will move the work to the Published repository from which it will be replicated to your delivery nodes.
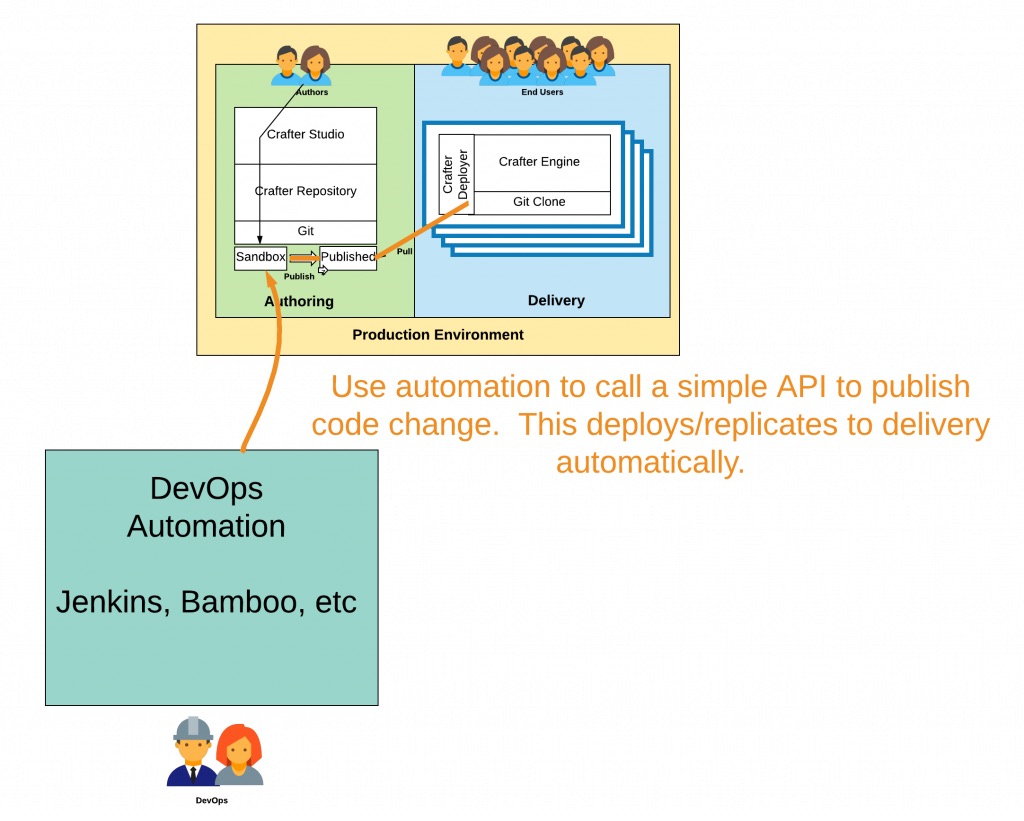
Move code from Sandbox to Published with a simple API call.
Setting Up the Workflow
If you don’t have Crafter Studio up and running, begin with Step 0, otherwise, go to Step 1
Step 0: Install Crafter Studio
Before we begin setting up the workflow for Devops, we need to have Crafter Studio up and running.
First, please review the following for requirements and supported platforms: Requirements and Supported Platforms.
We’ll then install the Crafter Studio (authoring instance). You can follow the Quick Start Guide to install and start authoring.
Alternatively, you can also install craftercms and start authoring by cloning the craftercms repo and building and deploying it using gradle.
git clone https://github.com/craftercms/craftercms.git ./gradlew init build deploy -Penv=authoring ./gradlew start -Penv=authoring
Step 1: Create your upstream
Create an empty repository in your upstream (GitHub, Bitbucket etc.) The specific steps depend on the repository you are using. The key here is that you want to create an empty or what’s sometimes called a “bare” repository.
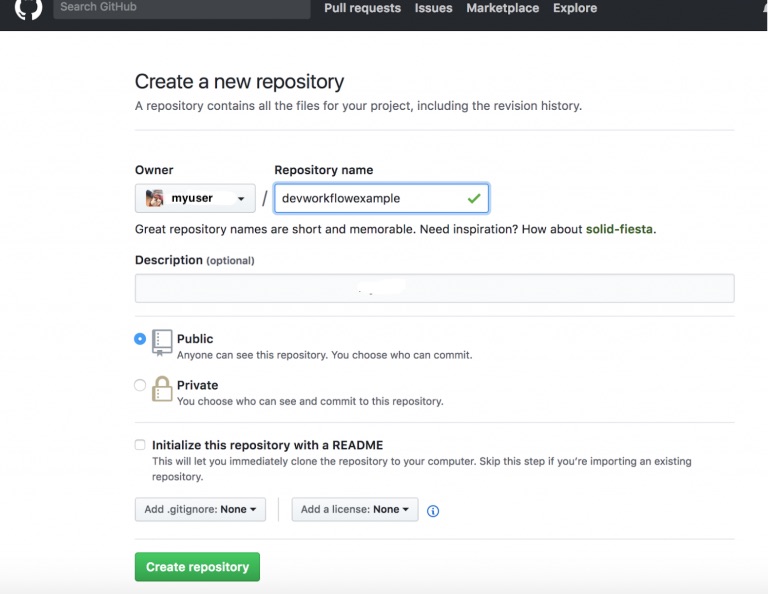
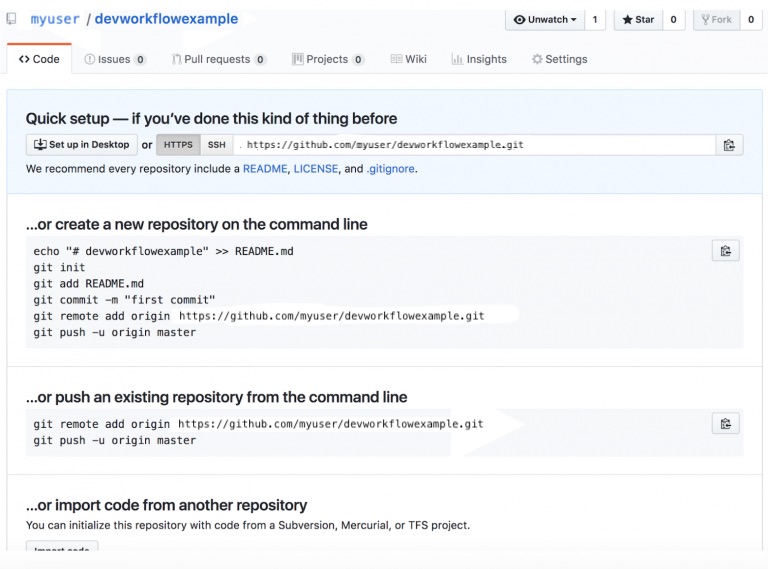
On GitHub, once created you will see the following screen. Here you will note the repository URL (https://github.com/myuser/devworkflowexample.git) which you will need for the next step. Also, if you’re trying to create an upstream for an existing project, you’ll find the instructions below in the “push an existing repository from the command line” section.
Step 2: Create Your Project In Crafter Studio
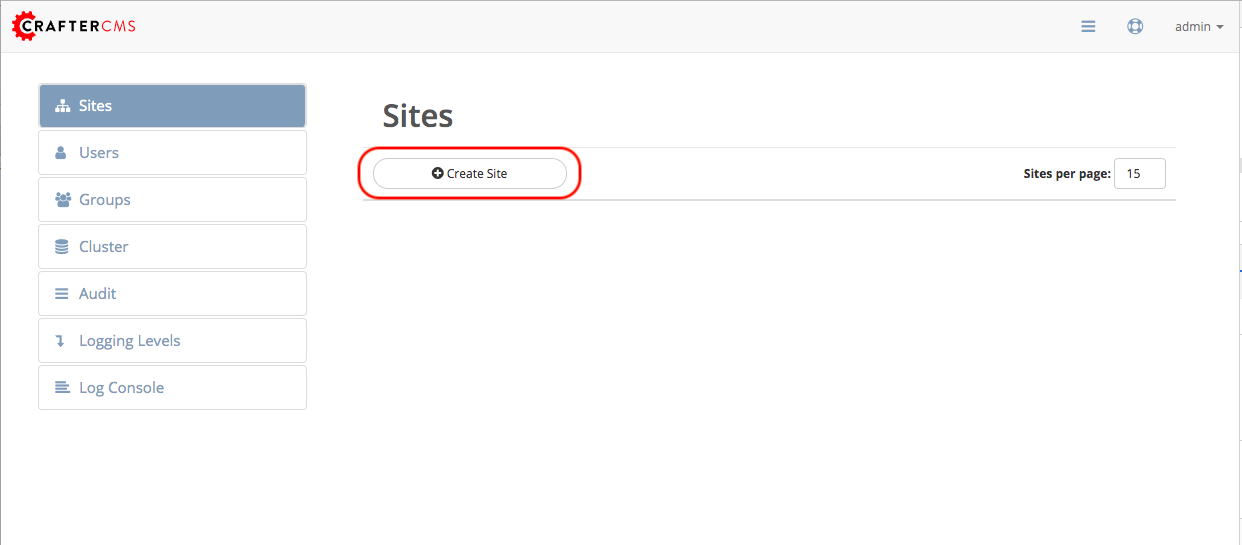
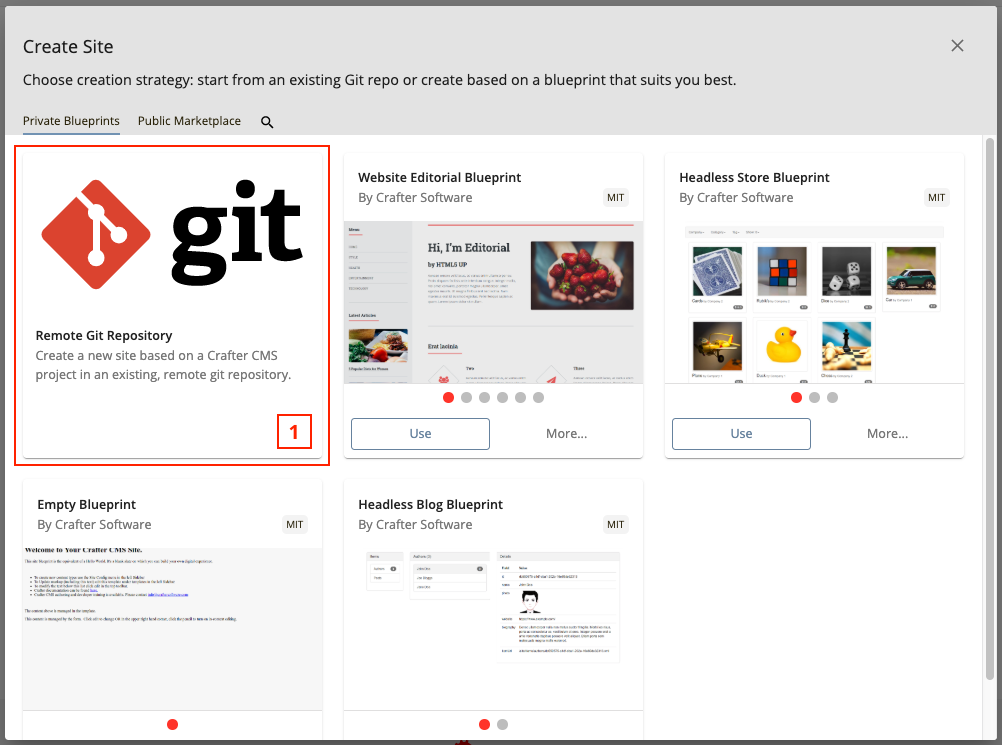
Next, you want to log in to Crafter Studio as the admin user. The admin user has the rights to create new projects (called sites.) Click Create Site.
Clicking Create Site will present you with the Create Site dialog. This dialog changes depending on what you choose. Below is an example of the dialog filled out in a way that creates your project locally, set the GitHub repository as its upstream remote and pushes the initial project contents to the upstream repository.
Let’s walk through each part of the dialog:
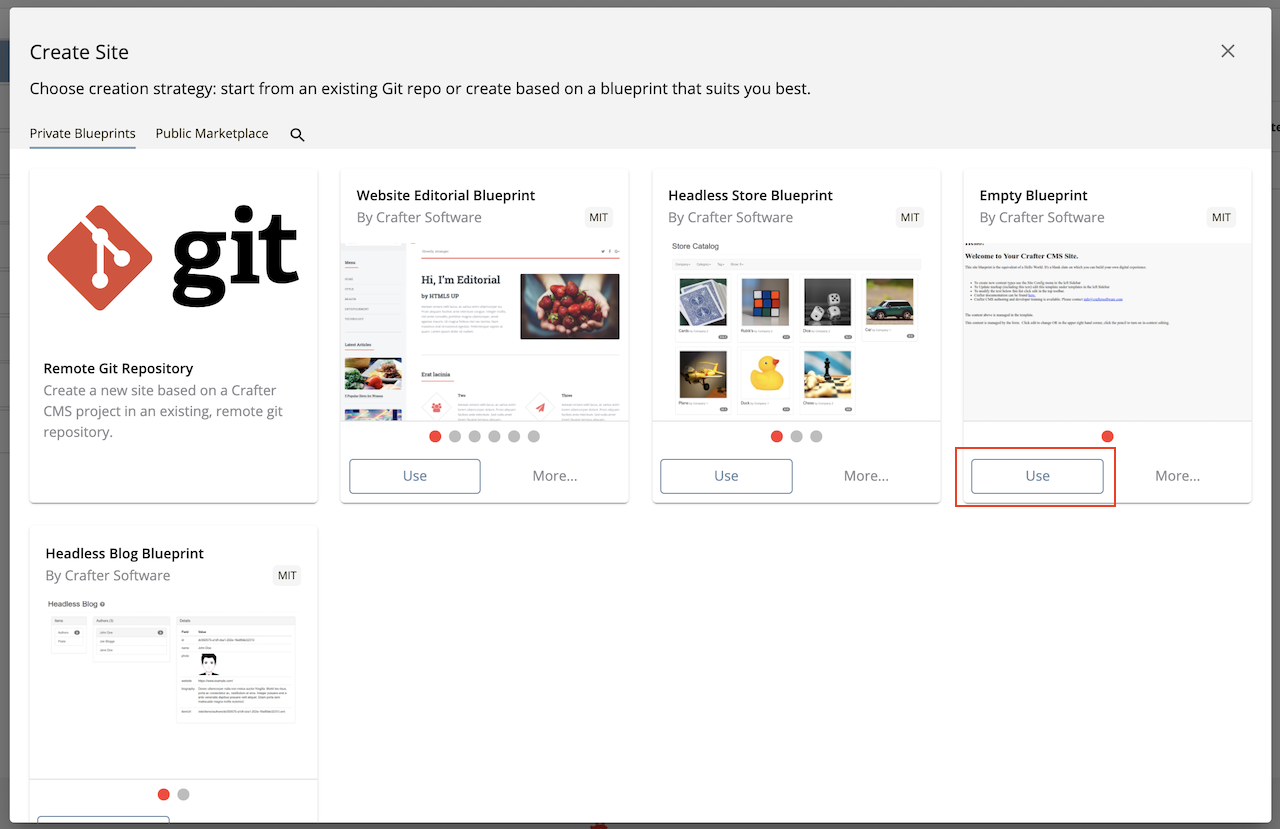
There are several out of the box blueprints provided by default. Choose one of these or one of your own. For our example, we’ll choose
Emptywhich is the “Hello World” of blueprints.
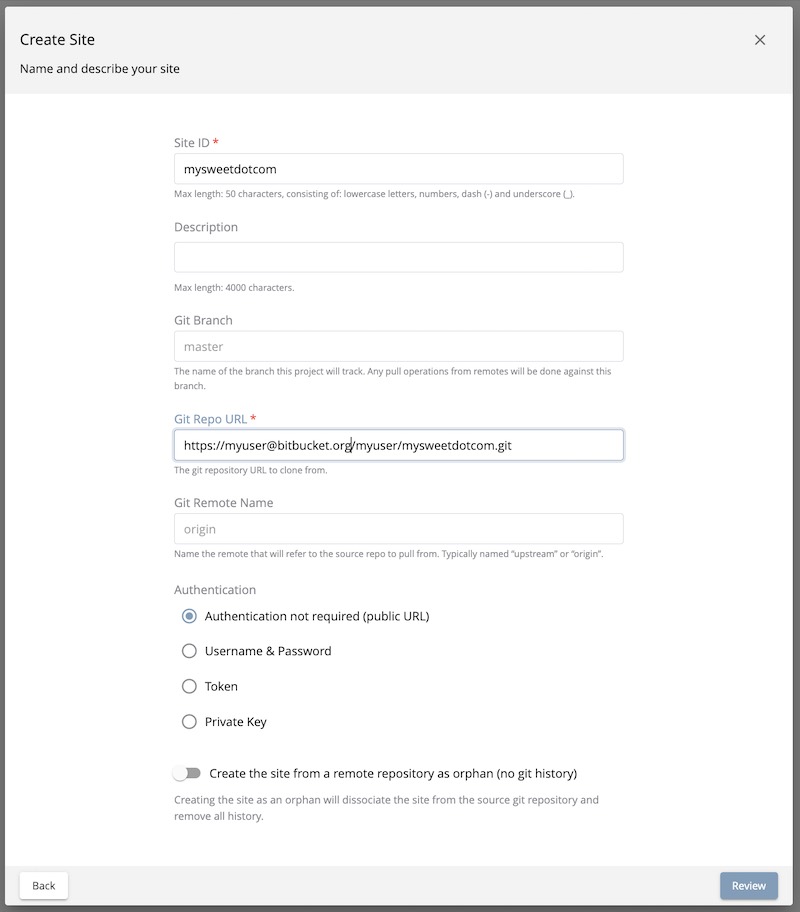
The next thing to do is give your site an ID. The ID itself doesn’t matter in a sense. It doesn’t need to match anything per se, technically speaking the only requirement is that it’s unique. That said, it’s a best practice to provide an ID that is meaningful/recognizable to the team. If your website is called FreshFlowers.com a good ID might be “freshflowerscom”
Click on the Push the site to a remote repository after creation slider button to turn it on, which will display more fields where we can fill in all the information for our remote Git repository.
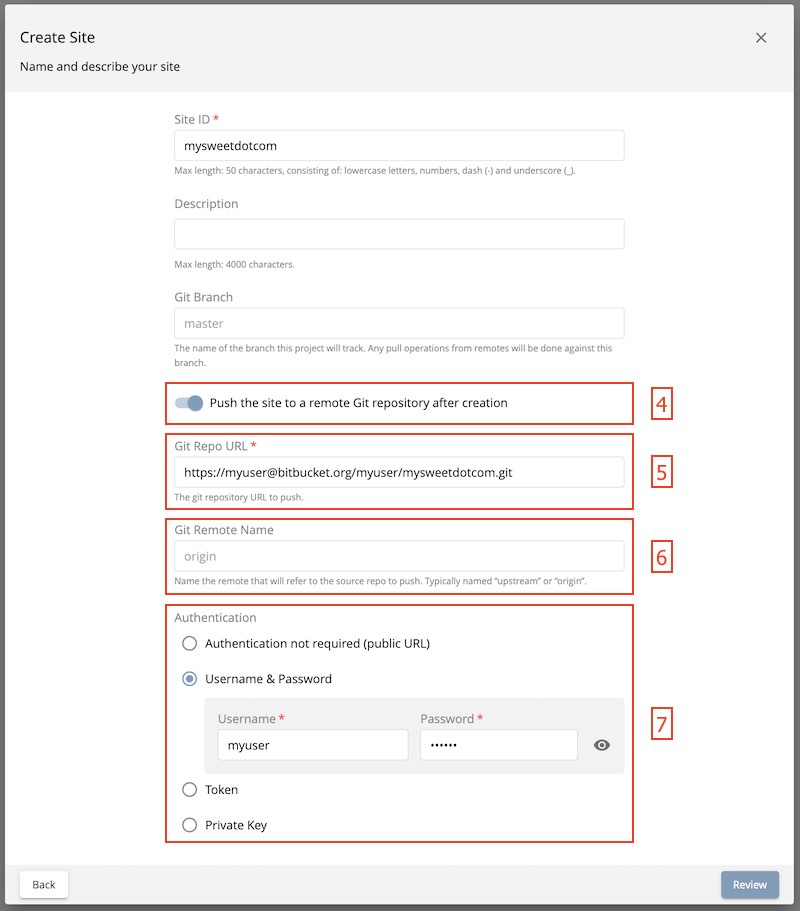
With the Push the site to a remote Git repository after creation slider in the on position, Crafter Studio will create a new site based on the blueprint you chose, link the remote repository as an upstream and then once the blueprint is installed in the local repositories it will be pushed automatically to the upstream remote.
In the Git Repo URL field you must provide the link to the Git repository discussed in Step #1:
https://github.org/myuser/mysweetdotcom.gitProvide your credentials based on the authentication method selected. In our example, we chose
Username & Passwordas the authentication method and we’ll need to fill in Username and PasswordIn the Git Remote Name field you want to provide a repository name that makes sense. It’s common to use “origin” or “upstream.”
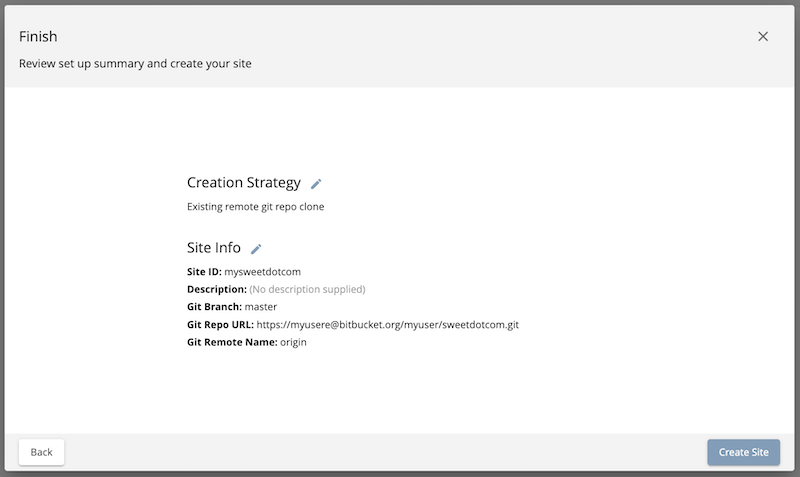
Click Review. The next screen will give you a chance to review your entries and make corrections as needed by clicking on the Back button
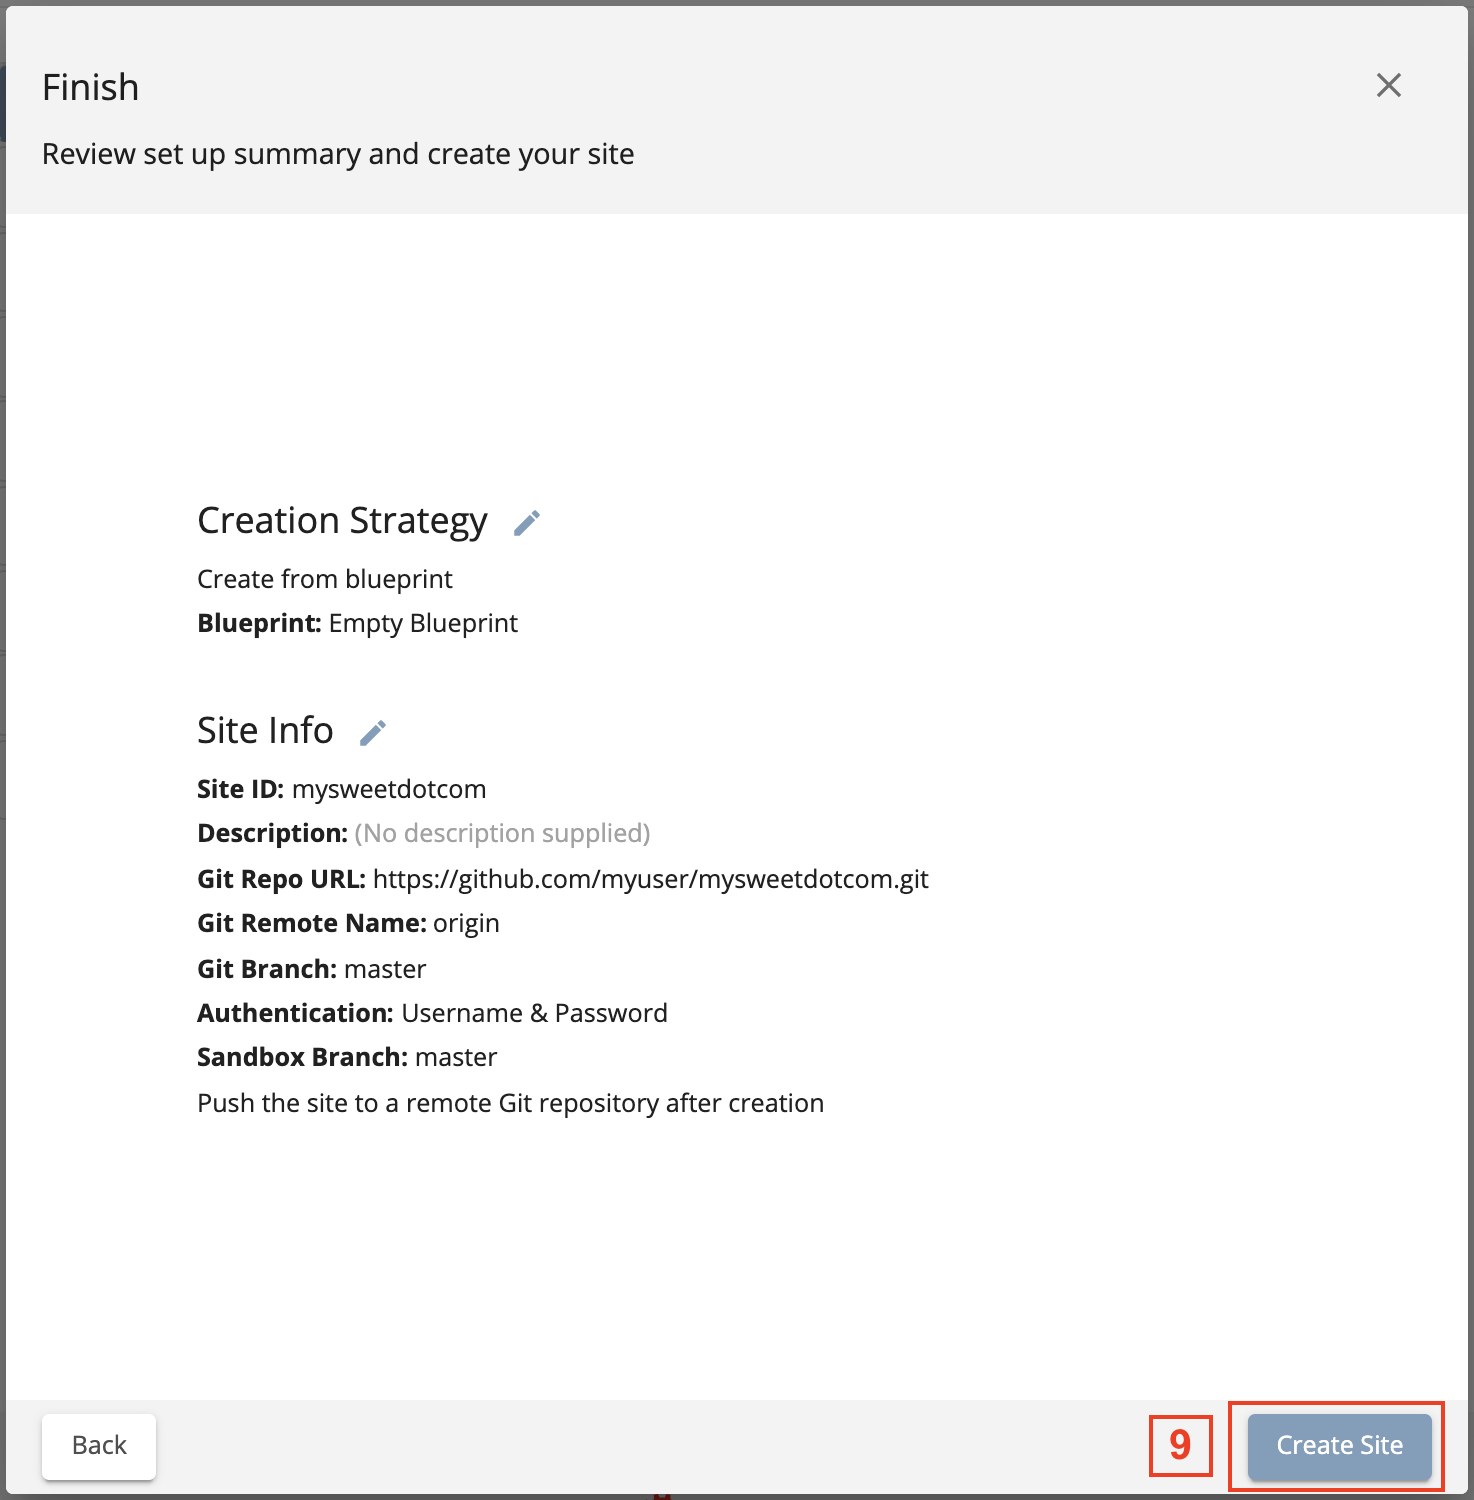
Once you’re satisfied with your entries for creating your site, click on the Create Site button. CrafterCMS will create the local repositories, search index and internal data structures required to support the project and install the blueprint. Once complete it will connect to the upstream and push the contents of the Sandbox repository to the remote.
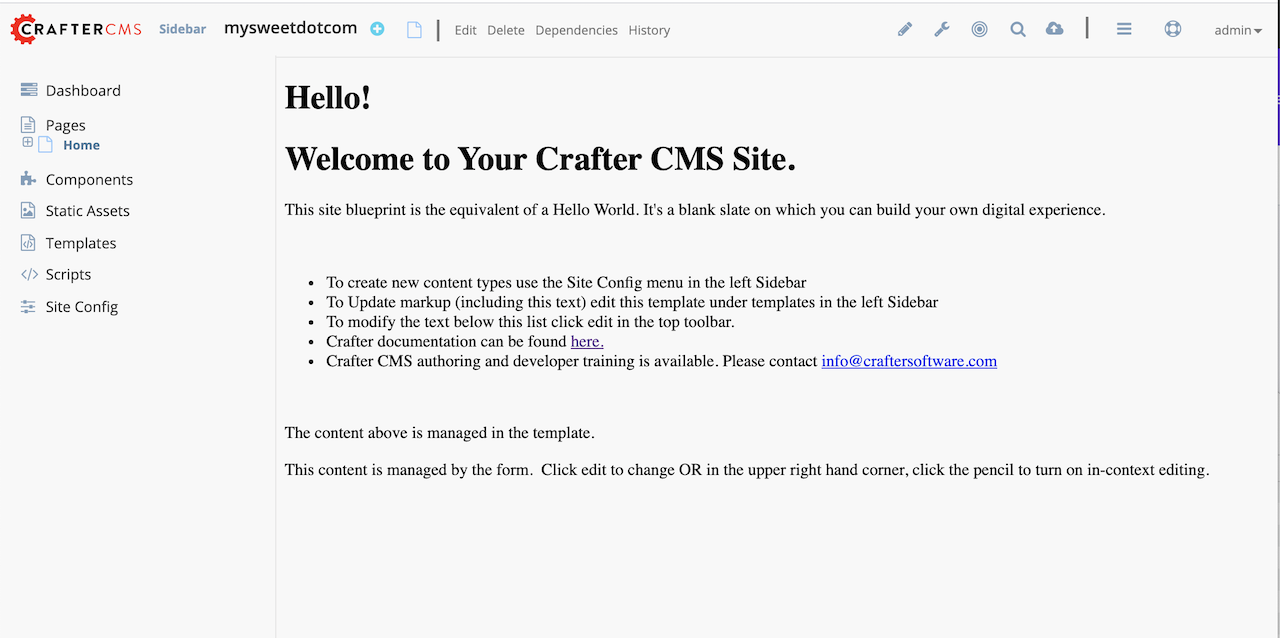
Figure:: Site is created and the contents of the sandbox are automatically pushed to the upstream repository
Step 3: Set up Your Delivery Nodes
Now that your project is created you can set up the rest of your production environment by initializing your delivery nodes to receive deployments from authoring. Remember these delivery nodes will pull from Crafter Studio’s repositories, not the upstream remote repository.
When you add a new delivery node a simple command line script is run on that node that configures it to replicate and process content from the “Published” repository from authoring.
Instructions for creating a site can be found here .
Instructions for initializing a delivery node can be found here.
Step 4: Set up your Developer Workflow and Lower Environments
Now that your upstream repository is initialized in GitHub you can set up any developer workflow you want. It’s typical to consider Master to be in-sync with the Production Authoring Sandbox. Given that, you don’t want to work in Master. Create branches to isolate development work from work that’s ready to move to Production Authoring. Below is an example topology that shows multiple environments and developer workflow that include feature branches, developer forms, and local developer clones.
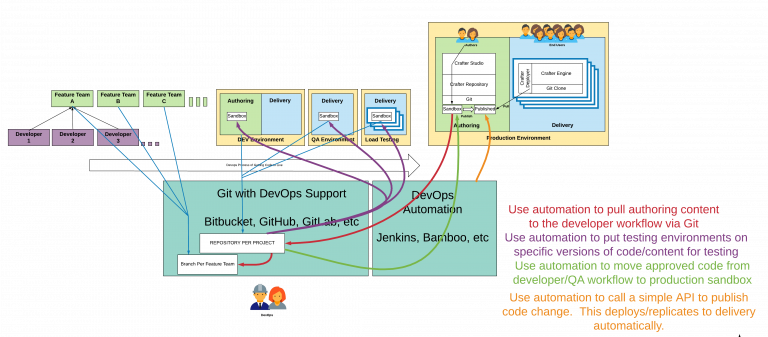
Full DevOps “Code Forward, Content Back” workflow for CI/CD with CrafterCMS leveraging Git mechanics and DevOps automation
Setting Up to Work Locally Against the Upstream
After setting up the topology above, if you just want to get a local environment up and going (say a new developer joining the team), follow these instructions:
Install Crafter Studio locally (Binaries download or Source build)
Login as Admin
Click Create Site
Fill out the Create Site Form as in a similar fashion described in Step 2 above, except this time, instead of selecting a blueprint, select Remote Git Repository to create your site based on an existing upstream repository. This can be your team’s branch or your own fork. The exact workflow is up to you.
Set up a project based on existing remote Git repository via Crafter Studio