
Implementation of the DevOps Workflow
In the previous section entitled Code Repository & DevOps Workflow we discussed the details and mechanics of the workflow that takes content from a feature branch all the way through to production. We demonstrated:
How this process enables the development of multiple (any number of) features to take place simultaneously.
How stability and reliability is forged in to releases without needing to do project wide code freezes.
How content can flow backward from production to development environments at any time and code can flow forward from development to production without any code freezes
And how this process can be simplified and automated with CrafterCMS Git-based distributed repository platform and DevContentOps process.
In this section we’ll cover the specific mechanics of facilitating this process at each step of the way.
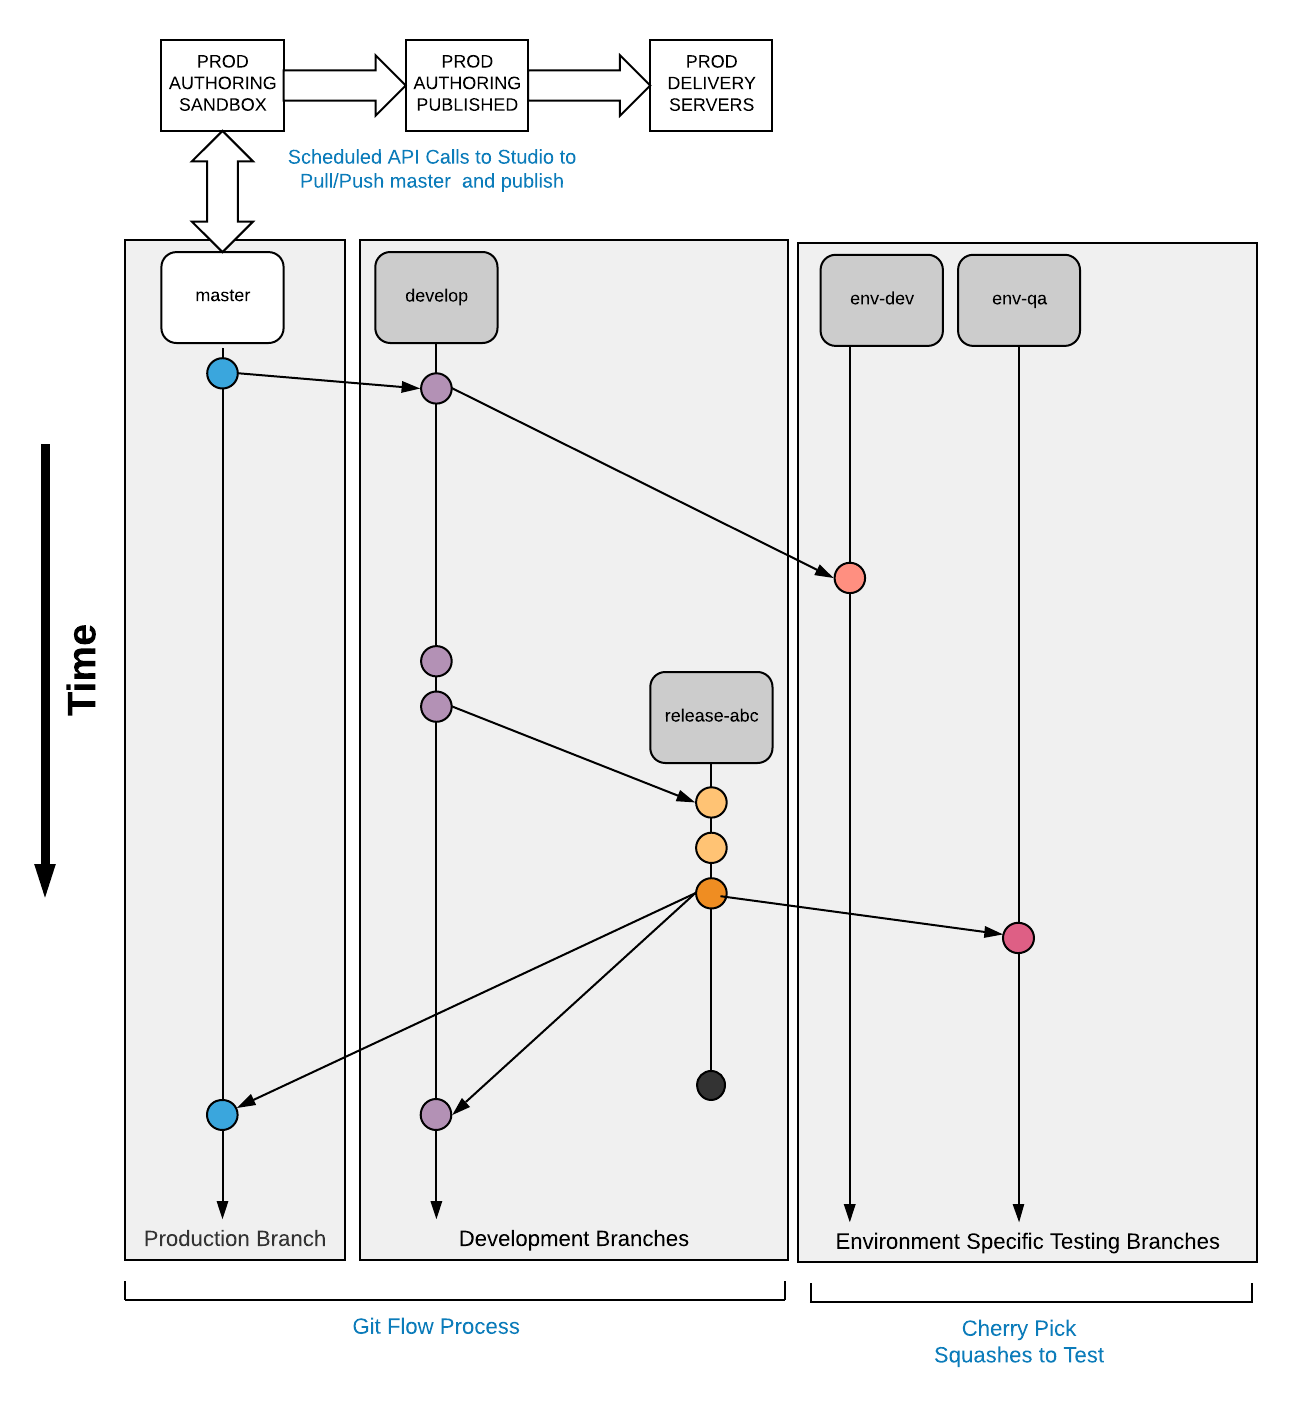
For the sake of review below is the diagram that illustrates the full workflow.
Note
Changes made directly to the git repository cannot rewrite history (no git resets, merge unrelated histories, or other git updates that remove or change the past). Git changes must only be fast forward actions so Studio can catch up and be in sync with your git updates
GitFlow, the Process and GitFlow, the Tool
GitFlow is an industry standard branching strategy that supports goals we have for enabling parallel development and release of high-quality, robust features and fixes. Please refer to the previous section entitled Code Repository & DevOps Workflow for an overview of this process and details on how it is applied. A more detailed description of the GitFlow process can be found here: https://www.atlassian.com/git/tutorials/comparing-workflows/gitflow-workflow
GitFlow is also the name of a tool that reduces the number of steps (commands required to be executed) in order to support the GitFlow process. The GitFlow tools is NOT required in order to support the GitFlow Process. This is stated only to illustrate the separation between the process and the tool. It’s standard in the industry to use both the process and the tool. https://gist.github.com/JamesMGreene/cdd0ac49f90c987e45ac
This document assumes the use of both the GitFlow process and the GitFlow tool that supports it.
Who will need the GitFlow plugin?
Developers
DevOps admins
The automation server
Where do I get the GitFlow toolset plugin
Initializing the Repository for the GitFlow Tool
To create a branch you use the following GitFlow command:
git flow init
Example:
 1➜  sandbox git:(master) git flow init
 2
 3Which branch should be used for bringing forth production releases?
 4   - develop
 5   - master
 6Branch name for production releases: [master]
 7
 8Which branch should be used for integration of the "next release"?
 9   - develop
10Branch name for "next release" development: [develop]
11
12How to name your supporting branch prefixes?
13Feature branches? [feature/]
14Release branches? [release/]
15Hotfix branches? [hotfix/]
16Support branches? [support/]
17Version tag prefix? [] v
Creating a Feature Branch
Create the Branch
Whenever a new feature team is formed to work on a new feature, the first thing they need to do is to create a feature branch where their work will take place. Feature branches are based off of the develop branch. At any time the team can pull the latest features and content into their branch from develop to make sure their work is properly integrated with the current state of the overall system.
To create a branch you use the following GitFlow command:
git flow feature start [FEATURE_NAME]
Example:
 1➜  sandbox git:(master) git flow feature start MYFEATURE
 2Switched to a new branch 'feature/MYFEATURE'
 3
 4Summary of actions:
 5- A new branch 'feature/MYFEATURE' was created, based on 'develop'
 6- You are now on branch 'feature/MYFEATURE'
 7
 8Now, start committing on your feature. When done, use:
 9
10   git flow feature finish MYFEATURE
11
12➜  sandbox git:(feature/MYFEATURE)
Publish the Branch to the Team
Once you create the branch it exists locally. It is not yet part of your Remote Code Repository where your team members can access it and collaborate with you. To make it available on the Remote Code Repository you must publish it.
To publish a branch you use the following GitFlow command
git flow feature publish [FEATURE_NAME]
Example:
 1➜  sandbox git:(feature/MYFEATURE) git flow feature publish MYFEATURE
 2Counting objects: 271, done.
 3Delta compression using up to 8 threads.
 4Compressing objects: 100% (265/265), done.
 5Writing objects: 100% (271/271), 7.62 MiB | 2.18 MiB/s, done.
 6Total 271 (delta 175), reused 0 (delta 0)
 7remote: Resolving deltas: 100% (175/175), completed with 14 local objects.
 8remote:
 9remote: To create a merge request for feature/MYFEATURE, visit:
10remote:   https://gitlab.com/myuser/my-awesome-project/merge_requests/new?merge_request%5Bsource_branch%5D=feature%2FMYFEATURE
11remote:
12To https://gitlab.com/myuser/my-awesome-project.git
13 * [new branch]      feature/MYFEATURE -> feature/MYFEATURE
14Already on 'feature/MYFEATURE'
15Your branch is up-to-date with 'origin/feature/MYFEATURE'.
16
17Summary of actions:
18- A new remote branch 'feature/MYFEATURE' was created
19- The local branch 'feature/MYFEATURE' was configured to track the remote branch
20- You are now on branch 'feature/MYFEATURE'
Local Development and Feature Team Collaboration
Now that the feature is present in the Remote Code Repository your team members can collaborate with you.
GitHub and Pull Requests
It’s common for GitHub projects to designate specific leads who have access to write in the main repository. Other team members who do not have write access need to fork the repository (creating their own private, related version) where they have write access and can perform their work. When their work is complete they can submit it for review and merge via Pull Request.
The pull request mechanism provides a check-point that potentially triggers a code review whenever a team member wants to give code to the rest of the team. Use of the Pull Request mechanism along with code reviews is a best practice and is recommended (but not required.)
Setting Up Your Local With the Feature Branch
As a team member you want to get the code for the branch locally on your machine. Assuming you have already cloned the main Remote Code Repository or your fork of it:
To get branch you use the following GitFlow command
git flow feature pull origin [FEATURE_NAME]Example:
1➜  sandbox git:(feature/MYFEATURE) git flow feature pull origin MYFEATURE
2Pulled origin's changes into feature/MYFEATURE.
WORK
Perform your code and config updates.
Can I Work in My IDE?
Yes. Your IDE and debugger are now able to be fully integrated with CrafterCMS. Go ahead and sit your IDE project directly on top of your checked out feature branch.
Any changes you make and commit will be detected by Crafter Studio if it’s also running locally.
Remember to .gitignore any IDE or local developer specific files so these do not flow off your machine.
Can I Work in a Local Crafter Studio?
Yes. Crafter Studio is useful if you want to modify content types. Point your local Crafter Studio at your checked out branch and use it to update content types and configuration. You can update code as well if you prefer.
Can I Modify Content?
You probably shouldn’t. Production Authoring is used to update content. If you do need to update content make sure it does not conflict with the content that the business users work with otherwise there will be a merge conflict later in the process.
If you are creating a net new page as part of your feature, this kind of content update is ok. If you are modifying existing content make sure you coordinate properly.
Commit work locally
Commit your work locally as code is ready.
Push work up to remote
Once you have completed your work locally you will want to push it up to the Remote Code Repository (or your fork of it). Committing as you work locally is great. It gives you a version history on your machine but ideally you want your work saved elsewhere each day as well.
Ideally you are working in your own personal fork of the Remote Code Repository. If you are, you can push code to it at any time without fear of impacting anyone else. If you are working directly against the feature branch and pushing code up to the Remote Code Repository directly make sure your updates don’t break things for the rest of your team.
To push your updates to the Remote Code Repository you use the following Git command
git push origin feature/[FEATURE_NAME]
Example:
 1➜  sandbox git:(feature/MYFEATURE) git push origin feature/MYFEATURE
 2Counting objects: 5, done.
 3Delta compression using up to 8 threads.
 4Compressing objects: 100% (5/5), done.
 5Writing objects: 100% (5/5), 539 bytes | 0 bytes/s, done.
 6Total 5 (delta 4), reused 0 (delta 0)
 7
 8remote: To create a merge request for feature/MYFEATURE, visit:
 9https://gitlab.com/myuser/my-awesome-project/merge_requests/new?merge_request%5Bsource_branch%5D=feature%2FMYFEATURE
10
11remote:
12To https://gitlab.com/myuser/my-awesome-project.git
13   fd9173d..fbbb177  feature/MYFEATURE -> feature/MYFEATURE
DO A PULL REQUEST
You are likely working on a fork of the actual Remote Code Repository. This gives you the ability to keep your edits in the cloud without giving them to the rest of your team. Now that your work is shareable, pull request it to the team repository. At this point the lead can do a review and if accepted, your work is viewable by the rest of the team.
Moving a Feature to Dev Environment
Once the team feels the feature is ready you’ll want to do system integration testing (SIT). Basic SIT testing is performed in Dev environment.
Dev and the other test environments have specific content on them. Given this we must move our feature via an operation known as a “Cherry Pick.” A cherry pick allows us to take a set (ideally one) of commit and move it. Why one commit? Because moving multiple commits around is more difficult and error prone.
In this section we’ll learn how to:
Take a set of commits in a branch and re-commit them as a new single commit.
Move that commit to another branch.
Begin the Squash All of the Feature Development in to a Single Commit ID
When we work on features, especially when we work in teams, it’s very likely that by the time we want to start testing we’ll have 10(s), 100(s) or even 1000(s) of commits. When we want to apply these commits on another branch we either need to apply each commit in the proper order OR we need to collect all of them in the same commit. Collecting many commits as a new, single commit is called a “Squash” operation.
To begin the squash of multiple commits in to a single commit use the following Git command
git reset --soft [BASELINE COMMIT ID]
BASELINE COMMIT ID is the first commit ID in your set of changes. E.g. If your team made 10 commits, find the commit ID (via the git log command) that is the first of 10. Alternatively, note the commit ID of the repo at the time you create your feature branch.
Note that a reset --soft essentially rolls back your add and commit commands so that they appear uncommitted. This will allow you to add and commit all of them as a single commit (or “squash” them.)
Example:
➜ sandbox git:(feature/MYFEATURE) git reset –soft fc0c32793b286ed5895375b77fc220ff8fa98b4f
Example:
➜ sandbox git:(feature/MYFEATURE) git reset –soft fc0c32793b286ed5895375b77fc220ff8fa98b4f
Commit the List of Changes in a Single Commit (“Squash”)
Once you are satisfied that all of the changes are present in the list you will create the new commit. This is the actual squash operation.
To complete the squash of multiple commits into a single commit use the following Git command:
git commit -m "COMMENT HERE"
Example:
1➜  sandbox git:(feature/MYFEATURE) ✗ git commit -m "Combining all MYFEATURE Commits in to a single Commit ID"
2[feature/MYFEATURE 1879915] Combining all MYFEATURE Commits in to a single Commit ID
31 file changed, 1 insertion(+), 1 deletion(-)
Rebase/Merge the Squash to The Head of Feature
Once you have squashed the content you need to rebase your work relative to the remote origin so that you can push the Squashed Commit back up.
To rebase the squashed commit at the tip of the Remote Code Repository use the following GitFlow command:
git flow feature pull origin [FEATURE_NAME]
Example:
1➜  sandbox git:(feature/MYFEATURE) ✗ git commit -m "Combining all MYFEATURE Commits in to a single Commit ID"
2[feature/MYFEATURE 1879915] Combining all MYFEATURE Commits in to a single Commit ID
31 file changed, 1 insertion(+), 1 deletion(-)
Push the Squash to the Feature Remote Code Repository
Once the commit has been rebased you can push the work up to the Remote Code Repository so that the single commit is available to the team (and other environments)
To push the rebased commit up to the Remote Code Repository use the following GitFlow command:
git push origin feature/ [FEATURE_NAME]
Example:
 1➜  sandbox git:(feature/MYFEATURE) git push origin feature/MYFEATURE
 2Counting objects: 2, done.
 3Delta compression using up to 8 threads.
 4Compressing objects: 100% (2/2), done.
 5Writing objects: 100% (2/2), 580 bytes | 0 bytes/s, done.
 6Total 2 (delta 1), reused 0 (delta 0)
 7remote:
 8remote: To create a merge request for feature/MYFEATURE, visit:
 9remote:   https://gitlab.com/myuser/my-awesome-project/merge_requests/new?merge_request%5Bsource_branch%5D=feature%2FMYFEATURE
10remote:
11To https://gitlab.com/myuser/my-awesome-project.git
12   61fbeea..247d20f  feature/MYFEATURE -> feature/MYFEATURE
Cherry Pick the Feature into the Environment
Now that the remote code repository has your squashed commit you can update the repository clone on a given environment and then use the Cherry Pick operation to put the feature on the environment.
No more paper manifest/change logs. You simply reference that single commit ID.
To cherry pick the squashed feature commit use the following Git command:
git cherry-pick [SQUASHED COMMIT ID]
Example:
1➜ sandbox git:(evn-x) git cherry-pick 294235aa042c7dadd84ecd6b33ce7d02818c291d
How does Git know where to get the content for the Commit ID?
Commit IDs are globally unique hashes. You don’t need to tell Git which branch the commit ID is on etc. It can find it on it’s own.
Moving a Feature to the Release Process
A feature will stay in a feature branch until it’s blessed for a potential release. Once it’s blessed it needs to be moved off the branch and on to it’s parent develop branch. This makes it available to other features and starts the wheels turning for a release.
Finalize the Feature Branch
For each feature you are looking to release, once it’s complete and blessed (and no more core development is required) you want to “finalize it.” Finalizing a feature merges the code up to the develop branch and deletes the feature branch. To finalize a feature branch use the following GitFlow command:
git flow feature finish [FEATURE_NAME]
Example:
 1➜  sandbox git:(feature/MYFEATURE) git flow feature finish MYFEATURE
 2Switched to branch 'develop'
 3Merge made by the 'recursive' strategy.
 4static-assets/js/main.js | 1 +
 51 file changed, 1 insertion(+)
 6Deleted branch feature/MYFEATURE (was a7c9db9).
 7
 8Summary of actions:
 9- The feature branch 'feature/MYFEATURE' was merged into 'develop'
10- Feature branch 'feature/MYFEATURE' has been removed
11- You are now on branch 'develop'
Push the Changes to Develop on the Remote Code Repository
When you run the finalize command you are running it locally, you need to push that operation up to the remote code repository.
To push the finalized work up to the remote repository use the following Git command:
git push origin develop
Example:
 1➜  sandbox git:(develop) git push origin develop
 2Counting objects: 1, done.
 3Writing objects: 100% (1/1), 377 bytes | 0 bytes/s, done.
 4Total 1 (delta 0), reused 0 (delta 0)
 5remote:
 6remote: To create a merge request for develop, visit:
 7remote:   https://gitlab.com/myuser/my-awesome-project/merge_requests/new?merge_request%5Bsource_branch%5D=develop
 8remote:
 9To https://gitlab.com/myuser/my-awesome-project.git
10* [new branch]      develop -> develop
Remove the Feature Branch from the Remote Code Repository
The finalize command also removed your feature branch locally. Now you need to push that operation to the Remote Code Repository:
To push the branch removal up to the remote repository use the following Git command:
git push origin :feature/[FEATURE_NAME]
Example:
 1➜  sandbox git:(develop) git push origin develop
 2Counting objects: 1, done.
 3Writing objects: 100% (1/1), 377 bytes | 0 bytes/s, done.
 4Total 1 (delta 0), reused 0 (delta 0)
 5remote:
 6remote: To create a merge request for develop, visit:
 7remote:   https://gitlab.com/myuser/my-awesome-project/merge_requests/new?merge_request%5Bsource_branch%5D=develop
 8remote:
 9To https://gitlab.com/myuser/my-awesome-project.git
10* [new branch]      develop -> develop
Repeat Process For All Features that are Part of the Release
Repeat the process above for any/all features that are complete and will be part of the release.
Create a Feature Branch (Freeze a Snapshot of Develop)
Now you are ready to take a bunch of feature, combined through the release vetting process. You want to snap-shot them, essentially freezing them in time so that other code that’s getting blessed and showing up in the develop branch has no impact on them. You are going to create a release branch. You will QA and qualify the work on this branch. If you find an issue, you will fix it here first. To create a release branch use the following GitFlow command:
git flow release start [VERSION ID]
Example:
 1➜  sandbox git:(develop) git flow release start 1.2.0
 2Switched to a new branch 'release/1.2.0'
 3
 4Summary of actions:
 5- A new branch 'release/1.2.0' was created, based on 'develop'
 6- You are now on branch 'release/1.2.0'
 7
 8Follow-up actions:
 9- Bump the version number now!
10- Start committing last-minute fixes in preparing your release
11- When done, run:
12     git flow release finish '1.2.0'
Push the Release Branch to the Remote Code Repository
The release branch you just created was done locally, now you need to push this to the Remote Code Repository so it’s available to the QA and load testing process
To push the new branch to the Remote Code Repository use the following Git command.
git flow release publish [VERSION ID]
Example:
 1➜  sandbox git:(release/1.2.0) git flow release publish 1.2.0
 2Total 0 (delta 0), reused 0 (delta 0)
 3remote:
 4remote: To create a merge request for release/1.2.0, visit:
 5remote:   https://gitlab.com/myuser/my-awesome-project/merge_requests/new?merge_request%5Bsource_branch%5D=release%2F1.2.0
 6remote:
 7To https://gitlab.com/myuser/my-awesome-project.git
 8 * [new branch]      release/1.2.0 -> release/1.2.0
 9Already on 'release/1.2.0'
10Your branch is up-to-date with 'origin/release/1.2.0'.
11
12Summary of actions:
13- A new remote branch 'release/1.2.0' was created
14- The local branch 'release/1.2.0' was configured to track the remote branch
15- You are now on branch 'release/1.2.0'
Moving a Release to the QA Environment
See the section on Moving a Feature to Dev (1, 2) Environment.
The process for moving a work from a release branch to QA is exactly the same as moving work from a feature branch to Dev. The only differences are that when you squash you will have far fewer commits to deal with.
Releasing
Once the release has been QA approved and Load Testing Approved it’s time to go live. Now we’re going to move our code and configuration in the release to the production CMS.
Finalize the Release Branch
The first step in moving the release to the production CMS is to finalize the release. This will merge the release code in to the Master branch and remove the release branch.
To finalize the release use the following GitFlow command:
git flow release finish [VERSION ID]
Example:
1➜  sandbox git:(master) git flow  release finish 1.2.0
2Deleted branch release/1.2.0 (was 3d9b92a).
3
4Summary of actions:
5- Latest objects have been fetched from 'origin'
6- Release branch has been merged into 'master'
7- The release was tagged 'v1.2.0'
8- Release branch has been back-merged into 'develop'
9- Release branch 'release/1.2.0' has been deleted
Push the Merged Release Branch to the Remote Code Repository Master (GOING TO SANDBOX)
The finalize work you just performed was done locally, so now you need to push these operations to the Remote Code Repository.
To push the finalized release to the Remote Code Repository use the following Git command:
git push origin master
Example:
1➜  sandbox git:(master) git push origin master
2
3Counting objects: 1, done.
4Writing objects: 100% (1/1), 360 bytes | 0 bytes/s, done.
5Total 1 (delta 0), reused 0 (delta 0)
6To https://gitlab.com/myuser/my-awesome-project.git
7   645bc14..b46ff22  master -> master
Make Sure Develop is Up to Date
Now make sure Develop has the latest release. Ideally there is no real update here:
git push origin develop
Example:
1➜  sandbox git:(master) git push origin develop
2Everything up-to-date
Remove the Release Branch From the Remote Code Repository
Finally, the release branch was removed locally when it was finalized. Push the removal of the release branch to the Remote Code Repository
git push origin :release/[VERSION ID]
Example:
1➜  sandbox git:(master) git push origin :release/1.2.0
2To https://gitlab.com/myuser/my-awesome-project.git
3 - [deleted]         release/1.2.0