
Blueprints
What are Blueprints?
Blueprints are CrafterCMS project templates. It provides an initial set of styles, pages, behaviors, content types and more, containing one or more of the following: content types such as pages and components as described in Content Modeling, static assets such as images, videos, etc., and site configuration files for managing items in the blueprint such as taxonomies (categories, segments), roles, permissions, etc.
The blueprint that comes out of the box with CrafterCMS, Website Editorial Blueprint, provides us with an initial structure for our site, along with the site navigation, content inheritance, taxonomies for organizing the content such as categories and segments, which is also used for targeting content, static assets such as the initial images and fonts used for the site and configuration files for managing things like the segments for targeting, the permissions for all the items in the site, the role mappings, the RTE configuration, etc. To see more of the Website Editorial Blueprint, please see Your First Website where we create a site based on the Website Editorial Blueprint.
As mentioned earlier, blueprints allows us to generate sites with predefined layouts, contents and configuration. Blueprints could be a site theme or an API only site. New blueprints can be created from a site and added into CrafterCMS allowing the creation of more sites based on the new blueprint. In the section that follows, we will see how the Empty Blueprint that comes out of the box from CrafterCMS and an existing site is used to create a new blueprint.
Developers may submit their blueprints to the CrafterCMS Marketplace. Users can browse the marketplace catalog where submitted blueprints are listed, and power users of CrafterCMS can create sites based on marketplace plugins directly from the Create Site dialog in the CMS. See Submit a plugin for more information on how to submit your blueprint to the marketplace.
How do I make my own Blueprint?
Start by Quick Start Guide.
Blueprints are almost the same as a site (Warnings). So, you can use a new site created from the Empty blueprint as the starting point for your blueprint. (See Your First Website but create it from the Empty blueprint).
Adapting an HTML template
If you have an existing pure HTML template (and if you don’t, you can find free ones, even with commercial friendly licenses like MIT and some flavors of Creative Commons), you can adapt it into a blueprint.
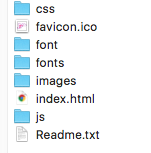
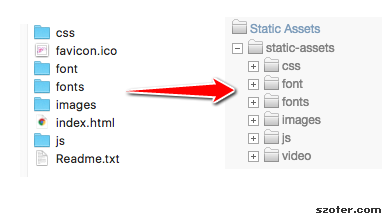
Generally, pure HTML templates have a file structure similar to the picture above. To start, you’ll want to copy all files except for index.html and any other .html files to your site’s static-assets like this:
HTML files will become Freemarker templates. For this cookbook, you’ll see how to adapt an index.html page, then you’ll be able to adapt other pages. Start by editing the main page’s ftl template, and replacing its contents with the index.html’s contents:

You should keep <#import "/templates/system/common/cstudio-support.ftl" as studio /> at the very start, and add <@studio.toolSupport/> right before the body tag closes to have proper Studio support. Next, all resource locations are probably pointing to the wrong location. To fix this, replace every relative url that doesn’t point to a page (this would include <link rel="stylesheet" href=" tags for CSS files, <script src=" for JS files, <img src=" for image files, and <source src=" for video and sound files) such that it starts with /static-assets/ and points to the corresponding file.
Modify the Rich Text Editor configuration so it uses your template’s stylesheets. See Rich Text Editor (RTE TinyMCE 2) Setup
At this point, you should have a static page that looks just how the template is supposed to look. For every other HTML page, you have to either create a new page content type and, like with index, replace its ftl template with the page’s source; or, generalize the content type, with proper content modeling, such that multiple pages share a single ftl template and vary only in the components they contain. Let’s see some tips for this.
Content Modeling
A powerful and extensible blueprint that can be used in a variety of pages and scenarios needs proper Content Modeling, so you have to be familiar with it before proceeding.
A good blueprint separates each meaningful chunk of HTML code into a component. For example, whether you implement an “Our Team” section using a repeating group or multiple “Teammate” shared components, it still has to be a separate type that only contains information related to “Our Team”. Whether it is a Component or a Page, it shouldn’t contain “Product” information. Once you have identified HTML chunks with a meaning, start by moving them into their type’s template.ftl. Next, replace any information with a variable from the contentModel (and add the respective control to the Content Type). Unless they are extremely simple, most pages will contain shared components, even if they are just a header and footer component provided by the Section Defaults.
Here are some best practices to help you:
Prefix all your Content Type’s display label with either “Component - “ or “Page - “ as appropriate.
Make use of Section Defaults. Most sites will have a site logo that will be used all throughout the site, this is a perfect use case for Section Defaults.
Additionally, since Section Defaults have inheritance mechanics, a child folder that’s meant to have private pages could have it’s own Section Defaults that overrides the normal site logo with a more private looking one, signalling users that they are in the intranet.
You can apply this similarly for headers, footers, log in floating forms, and many more.
Use drag and drop but keep it to a minimum. At the moment, you can’t limit what kind of components can be dropped into a container, so this enormous amount of flexibility can make for a confusing user experience. Picture having a page with a group of sections, that each contains headers. If both sections and headers are drag and droppable, an user could accidentally drop a section inside another section without noticing instead of just reordering. It could be more comfortable that only sections are drag and droppable.
You can use label controls to add additional information to the content type’s form. This is useful to add tips or additional information for advanced controls.
Prefer repeating groups over shared/embedded components. Shared/embedded components are ultimately more versatile, but if you are only going to repeat text, and that text is not going to appear outside the repeating group again, it’s a better user experience to just use a repeating group.
Bear in mind that you can’t have nested repeating groups, so only the innermost repetition can be a repeating group.
You can set up folders for specific content types, and you can enforce them by using
<paths>in your types’ config.xml. Useincludeswhenever you want to whitelist some paths, and useexcludesto blacklist some paths, but do not mix them. For more examples, see Content Creation Permissions<paths> <includes> <pattern>REG_EXP_HERE</pattern> </includes> OR <excludes> <pattern>REG_EXP_HERE</pattern> </excludes> </paths>
You can also use this to enforce single page blueprints by using
<excludes> <pattern>^/.*</pattern> </excludes>in your page type’s config.xml, effectively forbidding from creating a new page.Ensure your blueprint supports In-Context Editing.
For most sites, you’ll have to override Studio’s default navigation menu tags. You can do this by reading Rendering Navigation.
Above all, blueprints should be usable and simple.
Section Defaults
Section Defaults provides inherited values to all children and sibling content items. To learn more about content inheritance see Content Inheritance and for an example to see how Section Defaults is used in the Website Editorial blueprint Example of Out of the Box Strategy “inherit-levels” .
Packaging
Suppose {CRAFTER_HOME} is the path to your Crafter installation so that it contains the startup scripts, apache-tomcat/ and data/ folders.
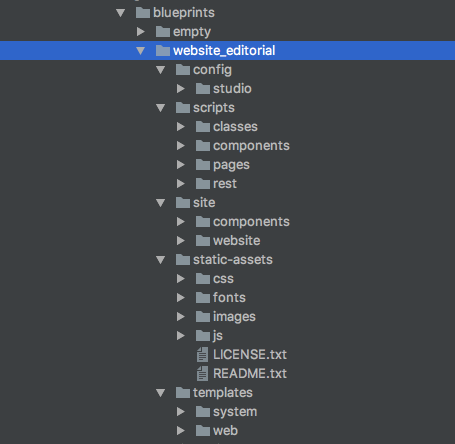
Blueprints reside in {CRAFTER_HOME}/data/repos/global/blueprints since Crafter 3.0. Each folder corresponds to a blueprint (You may notice the empty and website_editorial blueprint folders), you can start by copying the empty folder and renaming it to your blueprint’s name, like “my_blueprint”.
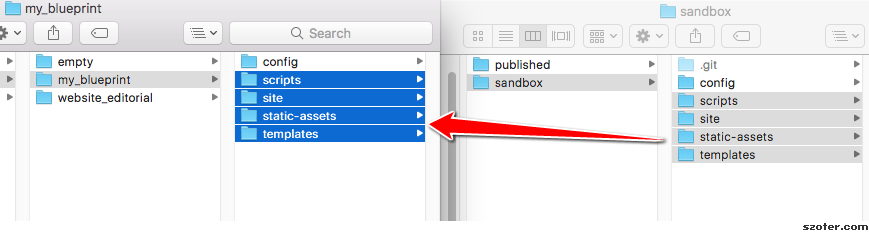
Your site exists in {CRAFTER_HOME}/data/repos/sites/your-site-name. Inside, you’ll notice 2 repos, sandbox and published. Inside of either of them, lie the site’s folders, but since sandbox contains your site as it currently exists in your Studio preview, we’ll be grabbing the files from this one. You need to move this site’s folders into an external folder named as your blueprint, but avoid copying the .git/ folder contained there, as it’s unnecessary for the final distributable package and may even contain sensitive information.
Note
Don’t merge folders, before copying any folder, delete the existing one so any renamed or deleted files don’t persist.
In the previous screenshot, we didn’t copy the config/ folder. Why? (Warnings). You can either:
Copy the config folder and modify
permission-mappings-config.xmlandsite-config.xmlto use{siteName}again as explained in (Warnings)Keep config as is and only copy the files you’ve modified. This will likely include the whole
config/studio/content-types/folder andconfig/studio/preview-tools/components-config.xmlfor drag and drop.Keep your blueprint in a VCS which will allow you to compare it against your changes and interactively see when to preserve the old version. This will also help you make any updates when blueprints get updated. You can either use Git or a visual diff tool.
Now that you have merged your “site” with the Empty blueprint in the proper way, the resulting folder is ready to be distributed. To install, follow the next steps.
Installing
Copy your blueprint folder into
{CRAFTER_HOME}/data/repos/global/blueprints.Check in your blueprint folder if it contains a
craftercms-plugin.yamlfile. Add in the file if it does not exist by copying acraftercms-plugin.yamlfile from one of the default blueprints, such as from the folder4000_empty, which contains the empty blueprint and modifying it as needed. See What’s in the craftercms-plugin.yaml file? for details on the fileOnce you do, commit the change to the global repo (
{CRAFTER_HOME}/data/repos/global/) by usinggit, and your blueprint will now start appearing when you try to create a new site.Crafter 3 uses a vanilla version of Git, so regular Git commands work as intended. To commit your changes so Crafter can see it, head to
{CRAFTER_HOME}/data/repos/global/blueprintsand git add your modified files like thisgit add <filename>
for each filename. Or, to add all at once use:
git add --all
And once you are done, commit them with the following command:
git commit -m "<the commit’s description>"
No need to push, there’s no remote configured. You can also use any Git client. Now, it will be available when you create a new site.
What’s in the craftercms-plugin.yaml file?
The craftercms-plugin.yaml file contains information for use in CrafterCMS. We’ll take a look at a file used for a blueprint. Here’s a sample taken from the craftercms-plugin.yaml for the Empty blueprint.
 1# This file describes a plugin for use in CrafterCMS
 2
 3# The version of the format for this file
 4descriptorVersion: 2
 5
 6# Describe the plugin
 7plugin:
 8  type: blueprint
 9  id: org.craftercms.blueprint.empty
10  name: Empty Blueprint
11  tags:
12    - blueprint
13    - website
14  version:
15    major: 1
16    minor: 0
17    patch: 0
18  description: |
19    Simple empty blueprint
20  website:
21    name: Empty Blueprint
22    url: https://craftercms.org
23media:
24  screenshots:
25    - title: Home Page
26      description: Screenshot of the homepage
27      url: .crafter/screenshots/default.png
28developer:
29  company:
30    name: CrafterCMS
31    email: info@craftercms.com
32    url: https://craftercms.com/
33build:
34  id: c3d2a5444e6a24b5e0481d6ba87901d0b02716c8
35  date: 2019-01-23T00:00:00Z
36license:
37  name: MIT
38  url: https://opensource.org/licenses/MIT
39crafterCmsVersions:
40  - major: 3
41    minor: 1
42    patch: 1
43crafterCmsEditions:
44  - community
45  - enterprise
46searchEngine: Elasticsearch
where the following fields are required:
descriptorVersion- The version of the format for this file (You can copy the value from thecraftercms-plugin.yamlin one of the default blueprints underCRAFTER_HOME/data/repos/global/blueprints/if using a copy from the default)plugin.type-blueprintfor our purposesplugin.id- a unique Id that is meaningful/recognizable to people who will be using the blueprint/pluginplugin.name- blueprint/plugin name (For our blueprint example, it is the blueprint name shown in the Choose Blueprint screen of Create Site)plugin.version- a version number for the blueprintplugin.crafterCmsVersions- CrafterCMS versions that the blueprint applies to (look in the Release Notes section for the versions available)plugin.searchEngine- search engine that will be used when a site is created from the blueprint (possible values are,CrafterSearchandElasticsearch)
For the plugin.media.screenshots, CrafterCMS uses a default path .crafter/screenshots/default.png to look for a default representative image of a plugin or blueprint.
Note
For the images to be used for the
screenshotsin thecraftercms-plugin.yamlfile, we recommend using images with approximately a4:3aspect ratio (width to height), such as an image sized at 1200x800
Passing Parameters to Blueprints
Some parameters may need to be passed to the blueprint instead of left in the blueprint, say, AWS credentials, Box credentials, CommerceTools credentials, etc. CrafterCMS supports passing parameters to blueprints during creation.
To add parameters to be passed to blueprints, simply add the following to the craftercms-plugin.yaml file
parameters:
  - label: My Parameter Label
    name: myParam
    type: string
    description: My parameter
    required: true
where:
label: Label to display for parameter on Create Site dialogname: Name of the parameter in camelCase notationtype: Type of the parameter, possible values areSTRINGandPASSWORD. The default isSTRINGdescription: Description of the parameterrequired: Indicates whether the parameter is required. The default istrue
To use the parameters in configuration files, simply use ${plugin:PARAM_NAME} where PARAM_NAME is the name of the parameter.
Example
Let’s take a look at an example of adding parameters to the Website Editorial blueprint. In our example, we will be passing AWS credentials when the site is created to be used for storing files in an S3 bucket and will setup the configuration file that will be using the passed parameters, along with the changes required in the content type and template so users can upload files to S3 once the site is up.
To store files in an S3 bucket, we’ll follow this guide, but instead of manually adding the AWS credentials so the user can upload files, we’ll pass the AWS credentials through the blueprint when the site is created.
The first thing we need to do is to add the parameters to the
craftercms-plugin.yamlfile of the Website Editorial blueprint. Open thecraftercms-plugin.yamlwhich is under the{CRAFTER_HOME}/data/repos/global/blueprints/1000_website_editorialfolder and add the following lines to the end of the file:{CRAFTER_HOME}/data/repos/global/blueprints/1000_website_editorial/craftercms-plugin.yaml1# This file describes a plugin for use in CrafterCMS 2 3# The version of the format for this file 4descriptorVersion: 2 5 6# Describe the blueprint 7plugin: 8 type: blueprint 9 id: org.craftercms.blueprint.editorial 10 name: Website Editorial Blueprint 11... 12searchEngine: Elasticsearch 13parameters: 14 - label: Access Key 15 name: accessKey 16 description: AWS Access Key 17 required: true 18 type: PASSWORD 19 - label: Secret Key 20 name: secretKey 21 description: AWS Secret Key 22 required: true 23 type: PASSWORD 24 - label: AWS Region 25 name: awsRegion 26 description: AWS region for the service 27 required: true 28 - label: Bucket Name 29 name: bucketName 30 description: Name of the bucket where files will be uploaded 31 required: true
Next, we’ll add the
aws.xmlfile which will contain all the parameters passed from the blueprint which we’ll use to create an S3 profile, so files can be uploaded to an S3 bucket. To access the parameters passed from the blueprint when the site was created, simply use${plugin:PARAM_NAME}, where PARAM_NAME is the name of the parameter passed through the blueprint that you would like to use.Create the folder
awsunderCRAFTER_HOME/data/repos/global/blueprints/configthen inside the newly create folder, create the fileaws.xml. Add the following inside the file:CRAFTER_HOME/data/repos/global/blueprints/config/aws/aws.xml1<?xml version="1.0" encoding="UTF-8"?> 2<aws> 3 <version>2</version> 4 <s3> 5 <profile> 6 <id>s3-default</id> 7 <credentials> 8 <accessKey>${plugin:accessKey}</accessKey> 9 <secretKey>${plugin:secretKey}</secretKey> 10 </credentials> 11 <region>${plugin:awsRegion}</region> 12 <bucketName>${plugin:bucketName}</bucketName> 13 </profile> 14 </s3> 15</aws>
Next we’ll modify the content type
Page - Articleand the template for it,article.ftlto allow the user to select files to be uploaded like in the example here. We’ll end up with two files modified. Thearticle.ftlandform-definition.xmlfiles.CRAFTER_HOME/data/repos/global/blueprints/1000_website_editorial/templates/web/pages/article.ftl1 <#if contentModel.attachments??> 2 <h2>Attachments</h2> 3 <ul> 4 <#list contentModel.attachments.item as a> 5 <li><a href="${a.attachment.item.key}">${a.attachmentName}</a></li> 6 </#list> 7 </ul> 8 </#if> 9 10 |
CRAFTER_HOME/data/repos/global/blueprints/1000_website_editorial/config/studio/content-types/page/article/form-definition.xml1 ... 2 3 <field> 4 <type>repeat</type> 5 <id>attachments_o</id> 6 ... 7 8 <datasource> 9 <type>S3-upload</type> 10 <id>s3Upload</id> 11 <title>S3 Upload</title> 12 <interface>item</interface> 13 <properties> 14 <property> 15 <name>repoPath</name> 16 <value></value> 17 <type>string</type> 18 </property> 19 <property> 20 <name>profileId</name> 21 <value>s3-default</value> 22 <type>string</type> 23 </property> 24 </properties> 25 </datasource> 26 27 |
Commit your changes using
git addandgit commit➜ craftercms git:(develop) cd CRAFTER_HOME/data/repos/global/blueprints ➜ blueprints git:(master) ✗ git add 1000_website_editorial/config/studio/aws/ ➜ blueprints git:(master) ✗ git add 1000_website_editorial/config/studio/content-types/page/article/form-definition.xml ➜ blueprints git:(master) ✗ git add 1000_website_editorial/craftercms-plugin.yaml ➜ blueprints git:(master) ✗ git add 1000_website_editorial/templates/web/pages/article.ftl ➜ blueprints git:(master) ✗ git commit -m "Add storing assets to S3"
Refresh your browser. We will now try creating a site using the Website Editorial blueprint to see the parameters we added to the blueprint earlier.
Click on the
Main Menu➜Sites➜Create Sitebutton, then finally select theWebsite Editorialblueprint. You will then be presented with theCreate Sitedialog. Notice that the parameters we added to thecraftercms-plugin.yamlfile is near the bottom of dialog. The values entered there will now be available to the site being created which for our example, will be used for the AWS profile inaws.xml. Enter the requested information then click onCreate Site
Once your new site is up, users can upload files to S3 from an article page. Let’s verify the parameters you passed through the blueprint by checking the
aws.xmlfile. Open the Sidebar, then click on . Click on
 Configuration, then selectAWS Profilesfrom the dropdown.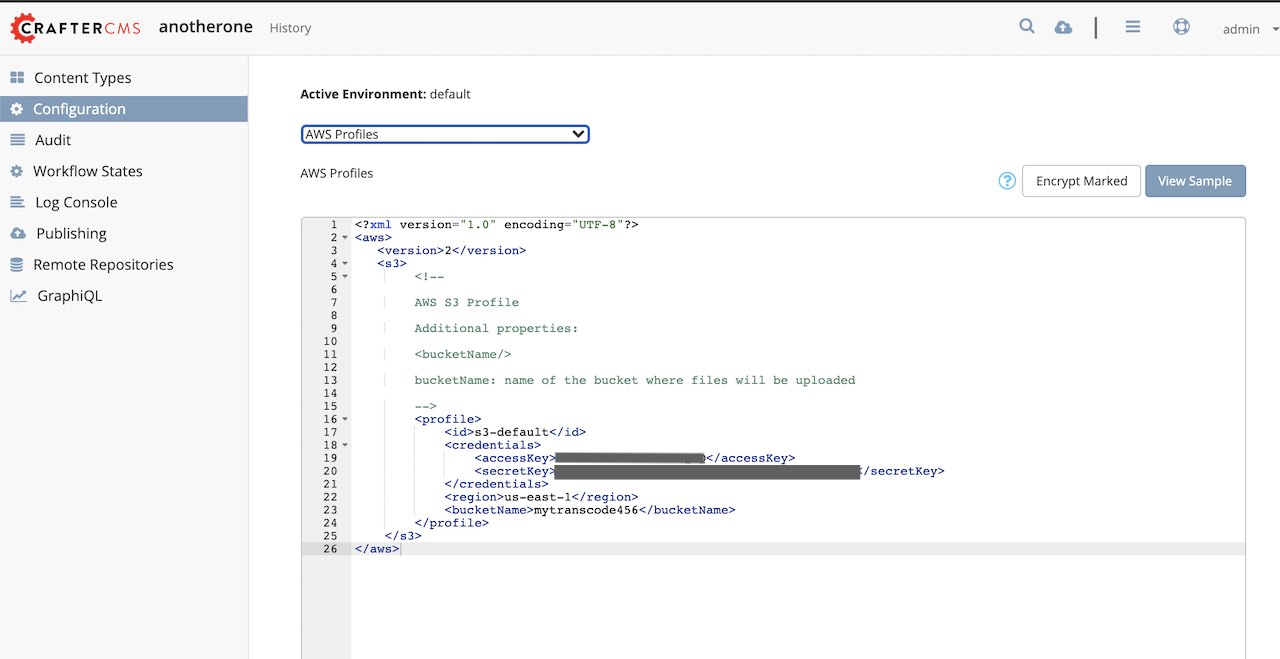
Editing as a Site vs Editing directly
Since a blueprint is very similar in its layout to a site, you can modify a blueprint by modifying a site created with that blueprint and then merging the changes. This has several benefits:
You can quickly see the effects of your modifications on Studio’s preview site.
You can create components, pages, and other file types through Studio, providing you with base templates, snippets, and type-specific UIs.
Warning
However
The
config/folder contains multiple configuration files with the site name. In blueprints, this is generically represented with{siteName}, so you must either only edit config files directly on the blueprint’s filesystem, or carefully replace your preview site name with{siteName}as appropriate. Having an initial version of the blueprint (when it was just copy of the Empty blueprint before making it a site) in a Git repository will be helpful for this.Specifically,
permission-mappings-config.xmlandsite-config.xmluse{siteName}in a way where Studio replaces it with the site’s name when creating a site. Sample files keep their{siteName}.permission-mappings-config.xmluses it in<site id="{siteName}">site-config.xmluses it in<wem-project>{siteName}</wem-project>and<display-name>{siteName}</display-name>
Each site is made up of 2 different Git repos,
sandboxandpublished. Inside of either of them, lie the site’s folders and also the.git/folder. You need to move this site folders back to the blueprint folder, but avoid copying this.git/folder, as it’s unnecessary for the final distributable package and may even contain sensitive information.
Remember that whenever you edit directly in the filesystem, you need to commit your changes to ensure they are properly reflected.
Small edits after the initial development may be faster by editing the blueprint directly and testing by creating a new site.