
Engine Site Security Guide
The following guide will help you configure Crafter Engine to:
Add authentication for your website.
Add authorization so that access to certain pages and URLs of your site are restricted.
Add Authentication
Crafter Engine is able to integrate with multiple authentication providers:
Using SAML2
To configure SAML 2.0, follow the instructions: Engine SAML2 Configuration
Using Crafter Profile
To configure Crafter Profile, follow the instructions: Engine Crafter Profile Configuration then do the following:
Add Login
To add a login page:
In Crafter Studio, create a Home > Login page.
The page template should contain a form that POSTs to /crafter-security-login, sending the
username,passwordandrememberMeparameters, like in the following snippet:1<form action="/crafter-security-login" method="post"> 2 <label for="username">Username: </label> 3 <input type="text" name="username"/> 4 <br/> 5 <label for="password">Password: </label> 6 <input type="password" name="password"/> 7 <br/> 8 <input type="checkbox" name="rememberMe" value="true">Remember Me</input> 9 <br/> 10 <button type="submit">Sign in</button> 11</form>
Add Logout
To add logout, just add a link in the global header that points to /crafter-security-logout:
1<a href="/crafter-security-logout">Log Out</a>
Add Authorization
Adding authorization allows restricted access to certain pages and URLs of your site depending on what is setup.
Restrict Pages
You can restrict pages based on whether a user is authenticated or has a certain role. To do this, you need to follow the next steps to create in the page content type a Repeating Group with a text Input for the roles:
In Studio, click on
 .
.Click on Content Types then Open Existing Type and select the content type for the pages that you want to restrict.
On Controls, select the Repeating Group and add it to any Form Section (you can even create an Authorization section just for these fields).
In the Repeating Group properties, set the Title field to “Authorized Roles” and the Name / Variable Name field to “authorizedRoles.”
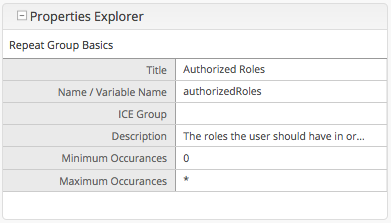
Warning
The UI autofills the Name/ Variable Name field and adds postfixes as you’re typing in the Title field. Remember to remove the postfix
_o, asauthorizedRolesis a reserved variable name used by CrafterCMS. For a list of variable names used by CrafterCMS, see Form Control Variable Names for more informationThe
ROLE_prefix is optional for values inauthorizedRolesAdd an Input control inside the Repeating Group, with the Title field set to “Role” and the Name / Variable Name field set to “role”. Make this Input required by checking the checkbox under Constraints in the Required field in the Properties Explorer.
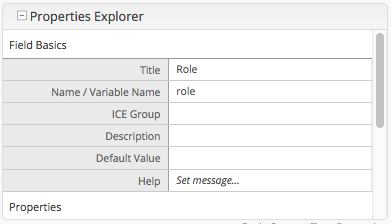
Warning
The UI autofills the Name/ Variable Name field and adds postfixes as you’re typing in the Title field. Remember to remove the postfix
_o, as therolevariable name is used by CrafterCMS for enforcing access to a page. For a list of variable names used by CrafterCMS, see Form Control Variable Names for more informationSave the changes. The added fields should look like this:
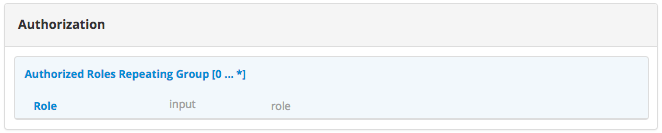
With these changes, now you or any other content author can go to any page of this content type and add the roles that
are required to access the page. Two special roles which indicate authentication state can be used besides the roles
that are included in user profiles: Anonymous and Authenticated. The complete access check algorithm executed
by Crafter Engine is described below:
If the page doesn’t contain any role, no authentication is needed.
If the page has the role
Anonymous, no authentication is needed.If the page has the role
Authenticated, just authentication is needed.If the page has any other roles, the user needs to be authenticated and have any of those roles.
Restrict URLs
Sometimes it is not enough to restrict a single page. Sometimes you need to restrict an entire site subtree, or restrict several static assets. For this, CrafterCMS provides configuration parameters that allow you to restrict access based on URL patterns. You just need to add configuration similar to the following in Config > Engine Site Configuration:
1<security>
2    <urlRestrictions>
3        <restriction>
4            <url>/user/*</url>
5            <expression>hasAnyRole({'user'\, 'admin'})</expression>
6        </restriction>
7    </urlRestrictions>
8</security>
The <urlRestrictions> can contain any number of <restriction> elements. Each restriction is formed by an
Ant-style path pattern (<url>) and a Spring EL expression (<expression>) executed against the current profile.
If a request matches the URL, and the expression evaluates to false, access is denied. The following expressions can
be used:
isAnonymous()isAuthenticated()hasRole('role')hasAnyRole({'role1'\, 'role2'})permitAll()denyAll()
Note
For the
<url>Ant-style path pattern,<url>/*</url>indicates just one level of the URL and<url>/**</url>indicates all urls. For more information on Ant-style path pattern matching, see https://docs.spring.io/spring/docs/current/javadoc-api/org/springframework/util/AntPathMatcher.html
For the hasAnyRole expression, remember to escape the comma , separating the roles inside the expression as shown above.
Access User Attributes
Once the authentication and authorization configurations are completed you can use the authToken object in
templates and scripts to access the current user attributes. The class of the object will change depending of the
authentication provider used, but you can always obtain an instance of CustomUser using the principal property.
1<#if authToken??>
2  Hello ${authToken.principal.attributes.firstName}!
3<#else>
4  <#-- show login button -->
5</#if>
Note
You can find more details about the authToken variable in FreeMarker (Templating) API or Groovy API
Migrating from Crafter Profile
Prior to version 3.1.5 Crafter Profile was the only security provider available, all sites created in previous
versions will continue to work without any changes, however if you need to migrate to a different provider like SAML2
you will need to replace all uses of the profile and authentication variables, both have been replaced with
authToken.
In templates and scripts you can replace all uses of profile with authToken and profile.attributes with
authToken.principal.attributes.
Note
Some advanced uses like custom security filters will need to be updated to integrate with Spring Security
Important
The variables
profileandauthenticationwill be null in most cases and should not be used anymore