
Plugins
What are plugins?
A plugin can contain one or more extensions for CrafterCMS in a single package. These extensions can:
Extend Crafter Studio (authoring)
Add Studio authoring widgets that drive the Sidebar and other UI elements
Add embedded applications that render in their own page within Studio (see Plugin Host)
Add new Form Engine extensions including data sources and components
Add server-side code and services that drive the Studio UI extensions
Extend Crafter Engine and the project/web application (delivery)
Add new content types along with their Groovy controllers and FreeMarker templates
Add REST APIs and/or server-side code
Add 3rd party integrations to your web app
Plugins allows the user to easily add/extend functionality and features of a Web experience (site, mobile app) or the content authoring experience (authoring tools) or both. Examples of features/functionalities a user may want to add to their Web app may be a contact form, a chat bot or Website analytics.
Delivery Plugins
Delivery plugins allow you to extend the CrafterCMS project by adding content types (and all content types involve) and REST APIs.
Content Types
You can add Content Types including their definition, Groovy controller, Freemarker templates and accompanying assets.
For example, a delivery plugin may be a YouTube video component. The plugin would have the content type definition, its freemarker template and some JavaScript and CSS to render the content type when used. When the extension containing the content type is installed, authors would be able to make use of the YouTube video component adding videos to their content.
Scripts
Scripts allow you to add APIs to you CrafterCMS project application.
Templates
Through delivery plugins, you can add Freemarker templates to your project. Templates could be the rendering template of a content type or a Freemarker template hook (explained below). So, in summary, you can add templates to render your extension content types or to add functionality to pages via the Freemarker template hooks.
Freemarker Template Hooks
CrafterCMS provides a mechanism (a “hook”) for adding markup and defining macros for plugins via Freemarker templates. These templates, when the plugin has one of them will be automatically included in the project.
Here are the supported templates:
definitions.ftl: can be used to define macros for the plugin
head.ftl: can be used to add markup in the HTML <head> element
body_top.ftl: can be used to add markup at the beginning of the HTML <body> element
body_bottom.ftl: can be used to add markup at the end of the HTML <body> element
Place the template/s in the {your_plugin_folder}/delivery/templates directory location in your plugin
like below:
 1{your_plugin_folder}/
 2  craftercms-plugin.yaml
 3  .crafter/
 4    screenshots/
 5      default.png
 6  delivery/
 7    templates/
 8      definitions.ftl
 9      head.ftl
10      body_top.ftl
11      body_bottom.ftl
The Google Analytics plugin for CrafterCMS available from the Marketplace uses a Freemarker template (google-analytics-plugin/delivery/templates/plugins/org/craftercms/plugin/google/analytics/head.ftl) to add markup in the HTML <head> element.
See https://github.com/craftercms/google-analytics-plugin/blob/master/delivery/templates/plugins/org/craftercms/plugin/google/analytics/head.ftl for an example on what can be in included in the template.
How Do I Make My Own Plugin?
Requirements
You’ll need the following for creating your plugin:
A plugin descriptor file,
craftercms-plugin.yamlYour plugin files
The craftercms-plugin.yaml file contains information about your plugin, such as the license,
the versions of CrafterCMS supported, and other configurations and metadata.
See CrafterCMS Plugin Descriptor for more information on what’s inside the plugin descriptor.
Your plugin files/folders could be JavaScript files, XML files, Groovy scripts, images, CSS files, and more depending on the plugin type you’re creating.
Directory Structure
A plugin consist of a group of files that are copied to the project repository when installed. To create your own plugin, your files/folders needs to go in the corresponding type of plugin folder, following the structure below:
craftercms-plugin.yaml: the plugin descriptor, see CrafterCMS Plugin Descriptor for details.crafterscreenshotsdefault.png: the default representative image of the plugin placed under the default path.crafter/screenshots/
authoring: contains all files related to Crafter Studio extensionscontent-typescomponent: contains configuration files for components, see below for an examplepage: contains configuration files for pages
static-assets: contains files for Studio UI pluginsscriptsclasses: contains Groovy classesrest: contains REST Groovy scripts
delivery: contains all files related to Crafter Engine extensionstemplates: contains Freemarker templatesstatic-assets: contains binary filesscriptsclasses: contains Groovy classescomponents: contains Groovy scripts for componentscontrollers: contains Groovy controllersfilters: contains Groovy filterspages: contains Groovy scripts for pagesrest: contains Groovy REST scripts
An easy way to develop new plugins is to start with an empty project and when all the files are ready copy them to a new repository following the given structure. However all references should be updated to match the final destination of the file:
Location in the plugin repository |
Location in the project repository |
|---|---|
|
|
|
|
|
|
|
|
|
|
|
|
|
|
|
|
|
|
|
|
|
|
|
|
|
|
Your plugin is installed in a project via the Marketplace or via copy-plugin CLI command, your plugin descriptor containing the directory structure will be read and corresponding plugin files copied to the project.
UI Plugin Directory Structure
Authoring plugins should use the following directory structure:
{PLUGIN_DIRECTORY}/authoring/static-assets/{ID}/{CATEGORY}/{NAME}/
where:
ID: A directory named after the plugin id (e.g.
org.craftercms.sample)CATEGORY: A directory named after the type of plugin (e.g. control, datasource, sidebar, app, lib, etc.)
NAME: A directory named after the plugin name
Plugin sources and/or build output of the plugin would be placed here.
Example Directory Structure
Here’s an example directory structure for a plugin with the pluginId value set to org.craftercms.sample :
 1{your_plugin_folder}/
 2  craftercms-plugin.yaml
 3  .crafter/
 4    screenshots/
 5      default.png
 6  authoring/
 7    static-assets/
 8      plugins/
 9        org/
10          craftercms/
11            sample/
12              controls/
13                color-picker/
14                  main.js
15                  style.css
16  delivery/
17    scripts/
18      rest/
19        org/
20          craftercms/
21            sample/
22              hello.groovy
23    templates/
24      org/
25        craftercms/
26          sample/
27            head.ftl
The repository here contains
a skeleton plugin directory structure for your use. You can use the repository to help you start
create your plugin. Simply fill in the plugin descriptor file craftercms-plugin.yaml file and
remove items you don’t need
Create your plugin
To create a plugin, a descriptor file craftercms-plugin.yaml is required.
This article contains more information on what’s in the file and
an example file.
The next requirement for creating your plugin are the plugin files.
Depending on the plugin type you are creating, this could be a JavaScript file, Freemarker template files,
Groovy file, XML file, etc. The plugin file/s should then be placed in a directory structure as described
above depending on the plugin created. For example, say your plugin is a component content type, your
plugin files should be placed under the directory authoring/content-types/component
Example directory structure for a component content type pluginauthoring/ content-types/ component/ <your_component_name>/ config.xml controller.groovy form-definition.xml
CrafterCMS uses a default path to look for a default representative image of a plugin, the url ../.crafter/screenshots/. Here’s a sample plugin files/directory with a default image to represent the plugin:
Example directory structure for a component content type plugin with a default representative image.crafter/ screenshots/ default.png authoring/ content-types/ component/ <your_component_name>/ config.xml controller.groovy form-definition.xml
Reusing libraries written in Java in your plugin
Some users may have some libraries written in Java that they may want to reuse in their plugin. To reuse those libraries, do the following:
Publish your JARs to Maven Central
Pull the JARs from Maven in a small Groovy script in your plugin via Grapes
If the JAR is available in Maven Central
Pull JAR available in Maven Central via Grapes@Grab(value='com.example:my-java-plugin:1.0.0', initClass=false) import com.example.java.Plugin // This class is made up, it can be anything
If the JAR is in a private Maven Repo
Pull JAR available in private Maven Repo via Grapes@GrabResolver(name='my-repo', root='https://maven.example.com/') @Grab(value='com.example:my-java-plugin:1.0.0', initClass=false) import com.example.java.Plugin // This class is made up, it can be anything
Publishing Your Plugin
To publish a plugin in the Crafter Marketplace you can follow the instructions in Create Extensions for the Crafter Marketplace
Retrieving Extension Assets
At the low level, Crafter Studio APIs provide an endpoint that gets a file for a given plugin, (i.e. getPluginFile). This API takes care of setting all the right headers for whatever kind of asset you’re retrieving (JavaScript, CSS, image, etc). There are also higher level mechanisms for developers to load and use plugins like the Plugin host or through the Crafter CLI.
If you need to manually load assets from your plugin (e.g. set the src of a <script />,
set the href of a <link />, set the src of an <img />, etc.), you should use the following URL
/studio/1/plugin/file?siteId={siteId}&type={yourPluginType}&name={yourPluginName}&file={fileName}
If your extensions is nested on a plugin id directory, you should also include the pluginId argument.
/studio/1/plugin/file?siteId={siteId}&pluginId={yourPluginId}&type={yourPluginType}&name={yourPluginName}&file={fileName}
Installing a Plugin
Plugins may be installed a couple of ways depending on where the plugins are located:
After installing a plugin, depending on the plugin you created, the plugin will be be installed under the:
{siteRoot}/config/studio/static-assets/plugins/{yourPluginId}/{yourPluginType}/{yourPluginName}/
{siteRoot}/config/studio/content-types/component/{yourPluginType}/{yourPluginName}/
{siteRoot}/config/studio/content-types/page/{yourPluginType}/{yourPluginName}/
{siteRoot}/templates/{yourPluginId}/{yourPluginType}/{yourPluginName}
{siteRoot}/static-assets/{yourPluginId}/{yourPluginType}/{yourPluginName}
{siteRoot}/scripts/{yourScriptType}/{yourPluginId}/{yourPluginType}/{yourPluginName}
Install a plugin from the Crafter Marketplace
Once a plugin is published to the Crafter Marketplace it can be installed using the Crafter Studio user interface or the REST API:
Note
To access the Plugin Management tool or use the install plugin REST API your user needs to have the following permissions:
list_plugins
install_plugins
For more information on installing plugins from the Crafter Marketplace using Crafter Studio, see Plugin Management
Install a plugin in development from a Studio local folder
For developers who want to test out their plugins before submitting to the Crafter Marketplace, CrafterCMS
provides a CLI command copy-plugin for installing a plugin from a Studio local folder into a project using
the crafter-cli.
Let’s take a look at an example to show how to install a plugin using the CrafterCMS cli copy-plugin command.
We’ll use a project named myeditorial where we will be installing the plugin, and the plugin we want to
install located in /Users/myuser/plugins/sidebar-plugin
To install the plugin sidebar-plugin to our project myeditorial, we’ll run the copy-plugin command
like below:
./crafter-cli copy-plugin -e local -s myeditorial --path /users/myuser/plugins/sidebar-plugin
Remember that the connection to CrafterCMS needs to be setup via the add-environment command before
using any of the crafter-cli commands.
See copy-plugin for more information on the copy-plugin command.
Example Creating a Plugin
Let’s take a look at an example of creating a component content type plugin named My Component
First, we’ll configure the descriptor file craftercms-plugin.yaml file for our plugin
 1# This file describes a plugin for use in CrafterCMS
 2
 3# The version of the format for this file
 4descriptorVersion: 2
 5
 6# Describe the plugin
 7plugin:
 8  type: site
 9  id: org.craftercms.plugin.mycomponent
10  name: My Component Plugin Example
11  tags:
12    - test
13  version:
14    major: 4
15    minor: 0
16    patch: 0
17  description: My simple component content type plugin
18  website:
19    name: Component Content Type Plugin Example
20    url: https://craftercms.com
21  media:
22    screenshots:
23      - title: CrafterCMS
24        description: CrafterCMS Example Component Plugin
25        url: "https://raw.githubusercontent.com/craftercms/site-plugin-example/master/.crafter/screenshots/default.png"
26  developer:
27    company:
28      name: CrafterCMS
29      email: info@craftercms.com
30      url: https://craftercms.com
31  license:
32    name: MIT
33    url: https://opensource.org/licenses/MIT
34  crafterCmsVersions:
35    - major: 4
36      minor: 0
37      patch: 0
38  crafterCmsEditions:
39    - community
40    - enterprise
We’ll then create the directory structure for a component content type plugin authoring/content-types/component/*,
to place our plugin files in,
Directory structure for component content type plugin My Componentauthoring/ content-types/ component/ mycomponent/ config.xml controller.groovy form-definition.xml
Here are the plugin files:
authoring/content-types/component/mycomponent/config.xml
 1<content-type name="/component/mycomponent" is-wcm-type="true">
 2<label>My Component</label>
 3<form>/component/plugins/org/craftercms/mycomponent/mycomponent</form>
 4<form-path>simple</form-path>
 5<model-instance-path>NOT-USED-BY-SIMPLE-FORM-ENGINE</model-instance-path>
 6<file-extension>xml</file-extension>
 7<content-as-folder>false</content-as-folder>
 8<previewable>false</previewable>
 9<quickCreate>false</quickCreate>
10<quickCreatePath></quickCreatePath>
11<noThumbnail>true</noThumbnail>
12<image-thumbnail></image-thumbnail>
13</content-type>
authoring/content-types/component/mycomponent/form-definition.xml
  1<form>
  2    <title>Test</title>
  3    <description></description>
  4    <objectType>component</objectType>
  5    <content-type>/component/plugins/org/craftercms/plugin/mycomponent/mycomponent</content-type>
  6    <imageThumbnail>undefined</imageThumbnail>
  7    <quickCreate>false</quickCreate>
  8    <quickCreatePath></quickCreatePath>
  9    <properties>        <property>
 10            <name>display-template</name>
 11            <label>Display Template</label>
 12            <value>/templates/plugins/org/craftercms/plugin/mycomponent/mycomponent.ftl</value>
 13            <type>template</type>
 14        </property>
 15        <property>
 16            <name>no-template-required</name>
 17            <label>No Template Required</label>
 18            <value></value>
 19            <type>boolean</type>
 20        </property>
 21        <property>
 22            <name>merge-strategy</name>
 23            <label>Merge Strategy</label>
 24            <value>inherit-levels</value>
 25            <type>string</type>
 26        </property>
 27    </properties>
 28    <sections>        <section>
 29            <title>Test Properties</title>
 30            <description></description>
 31            <defaultOpen>true</defaultOpen>
 32            <fields>
 33                <field>
 34                    <type>auto-filename</type>
 35                    <id>file-name</id>
 36                    <iceId></iceId>
 37                    <title>Component ID</title>
 38                    <description></description>
 39                    <defaultValue></defaultValue>
 40                    <help></help>
 41                    <properties>
 42                        <property>
 43                            <name>size</name>
 44                            <value>50</value>
 45                            <type>int</type>
 46                        </property>
 47                        <property>
 48                            <name>maxlength</name>
 49                            <value>50</value>
 50                            <type>int</type>
 51                        </property>
 52                        <property>
 53                            <name>readonly</name>
 54                            <value></value>
 55                            <type>boolean</type>
 56                        </property>
 57                    </properties>
 58                    <constraints>
 59                    </constraints>
 60                </field>
 61                <field>
 62                    <type>input</type>
 63                    <id>internal-name</id>
 64                    <iceId></iceId>
 65                    <title>Internal Name</title>
 66                    <description></description>
 67                    <defaultValue></defaultValue>
 68                    <help></help>
 69                    <properties>
 70                        <property>
 71                            <name>size</name>
 72                            <value>50</value>
 73                            <type>int</type>
 74                        </property>
 75                        <property>
 76                            <name>maxlength</name>
 77                            <value>50</value>
 78                            <type>int</type>
 79                        </property>
 80                    </properties>
 81                    <constraints>
 82                        <constraint>
 83                            <name>required</name>
 84                            <value><![CDATA[true]]></value>
 85                            <type>boolean</type>
 86                        </constraint>
 87                    </constraints>
 88                </field>
 89                <field>
 90                    <type>input</type>
 91                    <id>someValue_s</id>
 92                    <iceId></iceId>
 93                    <title>Some Value</title>
 94                    <description></description>
 95                    <defaultValue></defaultValue>
 96                    <help></help>
 97                    <properties>
 98                        <property>
 99                            <name>size</name>
100                            <value>50</value>
101                            <type>int</type>
102                        </property>
103                        <property>
104                            <name>maxlength</name>
105                            <value>50</value>
106                            <type>int</type>
107                        </property>
108                        <property>
109                            <name>readonly</name>
110                            <value></value>
111                            <type>boolean</type>
112                        </property>
113                        <property>
114                            <name>tokenize</name>
115                            <value>false</value>
116                            <type>boolean</type>
117                        </property>
118                    </properties>
119                    <constraints>
120                        <constraint>
121                            <name>required</name>
122                            <value><![CDATA[]]></value>
123                            <type>boolean</type>
124                        </constraint>
125                        <constraint>
126                            <name>pattern</name>
127                            <value><![CDATA[]]></value>
128                            <type>string</type>
129                        </constraint>
130                    </constraints>
131                </field>
132            </fields>
133        </section>
134    </sections>
135    <datasources>    </datasources>
136</form>
authoring/content-types/component/mycomponent/controller.groovy
 1import scripts.libs.CommonLifecycleApi;
 2
 3def contentLifecycleParams =[:];
 4contentLifecycleParams.site = site;
 5contentLifecycleParams.path = path;
 6contentLifecycleParams.user = user;
 7contentLifecycleParams.contentType = contentType;
 8contentLifecycleParams.contentLifecycleOperation = contentLifecycleOperation;
 9contentLifecycleParams.contentLoader = contentLoader;
10contentLifecycleParams.applicationContext = applicationContext;
11
12def controller = new CommonLifecycleApi(contentLifecycleParams);
13controller.execute();
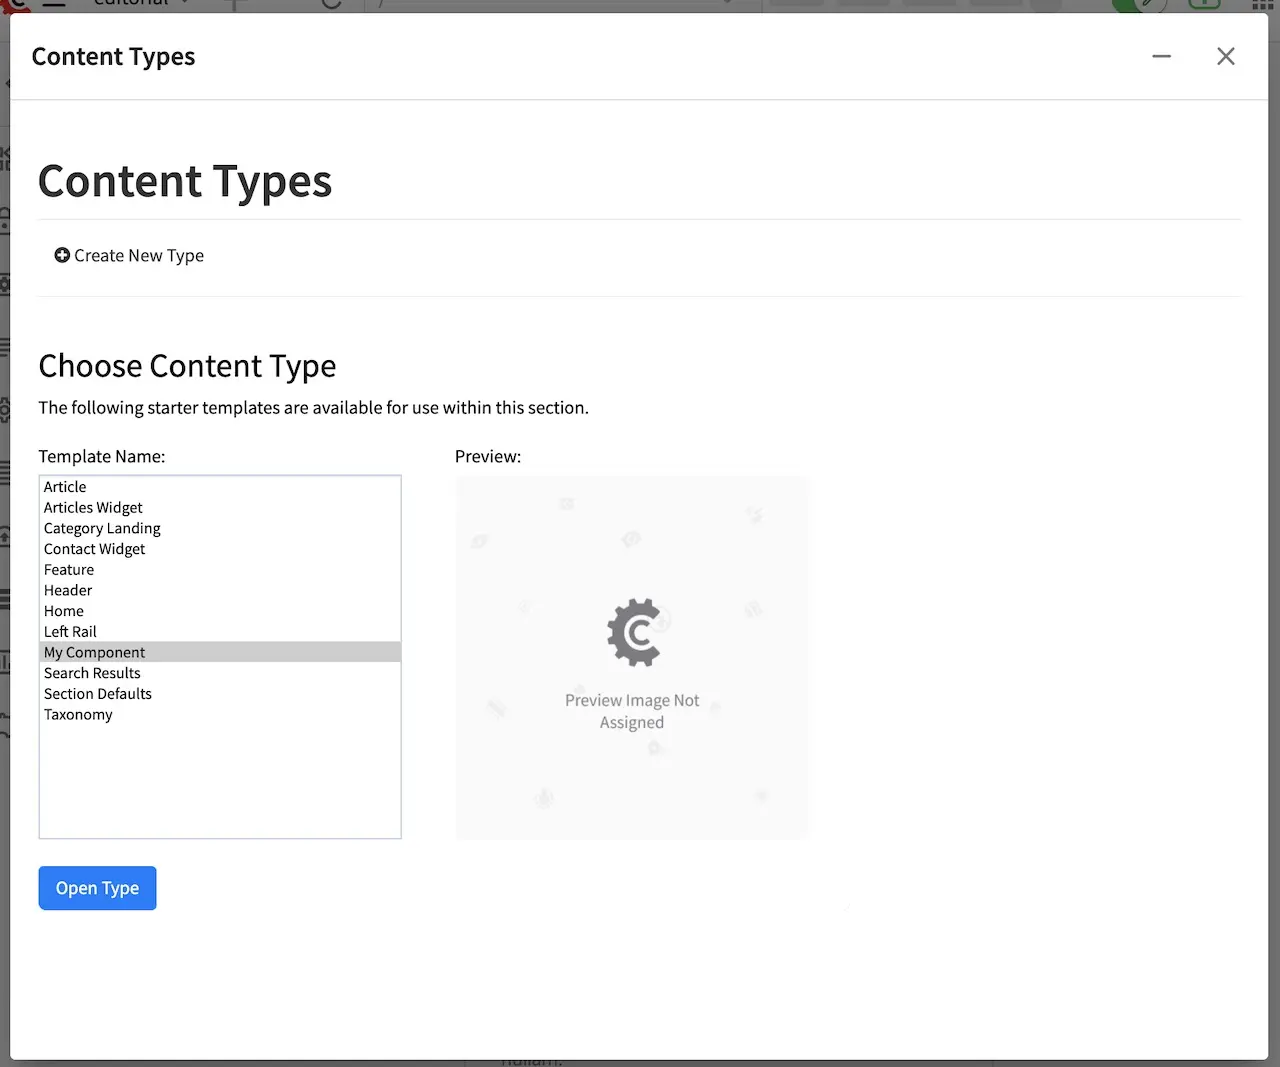
The plugin is now ready to be tested. We’ll install our plugin located under /users/myuser/component-plugin
using the crafter-cli command copy-plugin to test it out to a project named editorial
./crafter-cli copy-plugin -e local -s editorial --path /users/myuser/component-plugin
After installing our plugin, we can now verify that our component plugin is available in ![]() Content Types
Content Types
Some More Examples & Resources
Here are some more examples and resources to help you create your plugins
Guides
Below are more authoring examples of creating plugins:
- Crafter Studio Sidebar Plugin Example
- Crafter Studio Experience Builder Plugin Example
- Crafter Studio Toolbar Plugin Example
- Crafter Studio Dashboard Plugin Example
- Crafter Studio Project Tools Plugin Example
- Crafter Studio Navigation Menu Plugin Example
- Building Form Engine Control Project Plugins
- Building Form Engine Data Source Project Plugins
- Crafter Studio Full Screen Plugin Example
Example Plugins
CrafterCMS also provides various plugin examples available from the Marketplace to help you create your own plugins. These plugins can be installed to your project using Plugin Management in ![]() through the Studio UI. See Plugin Management for more information on installing plugins from the Crafter Marketplace.
through the Studio UI. See Plugin Management for more information on installing plugins from the Crafter Marketplace.
Cliengo plugin to add Cliengo to a project
Image Carousel plugin to add a highly configurable carousel plugin based on Tiny Slider
Contact Form plugin to add one or more contact forms to your project
Google Analytics plugin to add Google Analytics to your project
Google Maps plugin to add Google Maps to your project
Google Tag Manager plugin to add Google Tag Manager to your project
Sitemap plugin to generate a sitemap for your project
YouTube plugin to add YouTube videos to your project
Redirect plugin to add file-based redirects in your project